Antipyretics for children are prescribed by a pediatrician. But there are emergency situations for fever when the child needs to be given medicine immediately. Then the parents take responsibility and use antipyretic drugs. What is allowed to give to infants? How can you bring down the temperature in older children? What medicines are the safest?
Practical exercises play a compensatory role in the development of the basic processes of cognition and thinking. During their conduct, children compare real perceived objects with their existing representation. Visual memory helps to recreate the image of an object or phenomenon according to a verbal description, for which bright, figurative expressions are used. The connection of visual representations with speech contributes to the assimilation of knowledge by children and the development of skills. Motor activity has a great influence on the formation of the brain, psychophysical, sensory, intellectual and mental capabilities of the child. Of particular importance is the development of fine motor skills of the hand, which is why the method of sand therapy is very effective in corrective work with children with visual impairments.
Download:
Preview:
sand therapy
on the light table for children
Educational psychologist
MADOU CRR - d / s No. 14, Kropotkin
Cheprasova L.V.
Practical exercises play a compensatory role in the development of the basic processes of cognition and thinking. During their conduct, children compare real perceived objects with their existing representation. Visual memoryhelps to recreate the image of an object or phenomenon according to a verbal description, for which bright, figurative expressions are used. The connection of visual representations with speech contributes to the assimilation of knowledge by children and the development of skills. Motor activity has a great influence on the formation of the brain, psychophysical, sensory, intellectual and mental capabilities of the child. Of particular importance is the development of fine motor skills of the hand, which is why the method of sand therapy is very effective in corrective work with children with visual impairments.
This is a universal form of education that allows you to simultaneouslypursue two directions:restore, compensate and correct oculomotor, visual and mental functions.
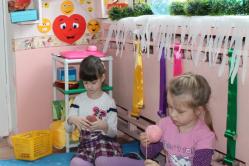
Experience shows that playing with sand has a positive effect on the emotional well-being of children, contributes to their development and self-development. Classes with sand relieve stress, reduce the level of neuropsychic stress, cheer up. Sand therapy can be used to identify anxiety, aggressiveness and fears in children, as well as to correct such deviations. Games and exercises using sand therapy, carried out in a small group (2-4 children), develop communication skills and social activity.
Graphic image- it emphasizes the main, characteristic features of objects and omits minor, insignificant ones. At the entrance to drawing the contours of an object, following the movement of a finger across the sand with the eyes, the child gradually develops images of objects, and an emotional attitude towards them is formed. The graphic image has a beneficial effect on the development of the intellectual sphere. Drawing with the fingers of both hands on the sand, accompanied by sensory sensations, contributes to the active work of both the left and right hemispheres, liberates and harmonizes a person. Illumination of a table intended for drawing with sand serves as an adequate irritant for the visual analyzer and provides comfortable conditions for the eye to work during corrective exercises and games related to looking, searching. In doing so, you can usecolored lights or multi-colored sheets paper . The disinhibition of the retina by color increases the visual acuity of the eye. The most favorable for visual function is green color . By reducing eye strain, it delays the onset of fatigue. In certain cases L.A. Grigoryan suggests using yellow, orange and red colors as well irritating to the retina.
By selecting tasks taking into account the individual and psychological characteristics of the child, it is possible to control his activity to a certain extent, because the drawings reflect the inner world: emotional experiences, the state of the intellect, performance, perception, thinking and mood.
The sand painting method on the light table has no age restrictions and can be used to work with children fromfrom 2-3 years of age. For children under 5 years of age, such classes are recommended. in for 10 minutes, with children over 5 years old, the duration of the lesson is 20 minutes. Corrective work by the method of sand therapy is carried out both in individual and in group form (no more than 3-4 children in a group), in particular with parent-child couples.
Light You can buy a table or make your own. Its size and shape are not of such fundamental importance as in the classic sandbox. The main requirement for a light table is its safety. You should pay attention to the fact that the edges of the glass are processed and recessed into the special grooves of the table base (it is better to use frosted plexiglass). The backlight wiring must be well insulated. Any fine (not only quartz) sand is suitable for drawing, but it must first be sieved, washed with hot water, dried and ignited.
The game session is held in a darkened room. During the session, the use of musical accompaniment is allowed (for example, David Sun "Calm", series "Alone with Nature", etc.). You can invite your child to use colored glass pebbles designed to decorate aquariums.
- as a joint lesson in the course of counseling a parent-child couple, when the emotional contact between the child and the parent is broken for one reason or another (due to the parent's distance due to illness, military service, being on a long business trip, etc.);
- as one of the elements of the entry of the future adopter
in contact with the child; - in the individual work of a speech therapist with autistic children;
- as part of a comprehensive lesson conducted by the educator on any lexical topic;
- to strengthen the muscles of the hands and develop joints in work with children
with a violation of the musculoskeletal system (sand drawing
has a beneficial effect on the emotional state, helps to relieve muscle clamps).
Preview:
Sand painting exercises
On the light table
Exercise "Introduction"
Purposes of use:introducing children to sand; reduction in muscle tension.
Conduct form:
The psychologist spreads sand in a thin even layer over the light table, runs his finger over it, shows the child the resulting bright contrast line and asks him to draw several chaotic lines on his own. When meeting with sand, you can play games (T.N. Grabenko, T.D. Zinkevich-Evstigneeva):
Glide your palms and their edges along the surface of the sand, performing zigzag and circular movements (like cars, snakes, sleds, etc.);
walk with your palms along the already laid tracks, leaving your marks on them;
Create with prints of palms, fists, knuckles of hands, edges of palms all sorts of fancy patterns on the surface of the sand;
walk on the sand with the fingers of the right and left hands alternately (first only the index, then the middle, ring, thumb, and finally the little fingers). Then you can ask the child to draw simple shapes (squares, diamonds, circles), patterns; depict simple objects and phenomena (fence, leaves, rain, waves); write letters etc.
The psychologist shows the children that you can draw on the light table with your fist, palm, edge of your thumb, pinch, little fingers. Interesting images are obtained by using several fingers at the same time, if you draw symmetrically with both hands. The details of the image are drawn when cutting off the excess or pouring sand from the fist.
Exercise "Sandy Beach"
Purposes of use: development of tactile sensitivity; regulation of muscle tension.
Conduct form:individual or group.
The psychologist invites the child to imagine that he is on the seashore (river): “You are on the seashore. A wonderful summer day, soft sand... Everything is calm and quiet around you, you breathe evenly and easily... There is a blue sky above you, the warm sun... The waves gently roll up to your feet, gently stroking them and your whole body...(pause - stroking the child). Stroking ... (name). You feel the pleasant freshness of sea water on your face, on your back, on your stomach, on your arms and legs... You feel lightness all over your body, you breathe easily and freely. The mood becomes vigorous and cheerful. Touch the sand - it is cool and loose. Close your eyes, on a deep breath, pick up the sand in your hands and squeeze your fingers into a fist as tightly as possible. While holding the sand, hold your breath, and then, as you exhale, slowly pour out the sand ... Now gently shake it off your palms.(The exercise is repeated.)Now stretch and open your eyes on the count of three. You are full of strength and energy!
Exercise "Cheerful - sad - angry - frightened»
Purposes of use:introducing children to basic emotions; learning to determine the emotional state and its reflection verbally and non-verbally; help in understanding the emotions experienced.
Conduct form: group.
Children are invited to draw with sand on the light table animals expressing different emotions (joy, anger, fear, resentment, surprise). Then each of them in turn says:
Who did he draw?
what is the mood of the drawn animal;
what it feels;
what happened to him and why;
What can you advise him.
Exercise "My mood"
Purposes of use: familiarizing children with basic emotions; learning to determine the emotional state and reflect it verbally and non-verbally; help in understanding the emotions experienced.
Conduct form: group.
Additional materials: mirrors in a safe frame, pictogram cards of emotional states.
Children are given small mirrors and cards - pictograms of emotional states. The psychologist asks them to express on their faces the emotion they saw on the card and look at themselves in the mirror. Children need to memorize their reflection in the mirror, and then draw it with sand on the light table. After drawing, each child talks about his drawing:
what mood he portrayed;
in what situations (cases) does he experience such feelings;
What can you advise him.
Exercise "Me and my feelings"
Purposes of use:development of fine motor skills; formation of adequate self-esteem.
Conduct form
The psychologist invites the children to continue the phrases:
Hearing helps me...
- Vision helps me...
- The sense of smell helps me...
- Touch helps me...
By tasting food, I can...
Children should be encouraged to give as many options as possible.
continuation of the phrase.
Then the children choose one of their answers and represent it with sand on the light table.
For example, a child who saidhearing helps him hear the sound of a bell, draws
bell.
Phrases can be rearranged to emphasize the child's abilities, for example:"I cant
it's good to see, but I can... (still I can..)".
You can fantasize with children on how to improve one or another ability to receive
sensations while encouraging humorous solutions to the problem, such as:
- “To improve your sense of smell, you need to sniff everything in a row, as dogs do (every morning, sniff bouquets of different flowers; distribute bottles of perfume to everyone you know and identify
them with their eyes closed) - "; - “.To develop taste buds, you need to eat something bitter every day, and immediately after that something sweet (you need to go to the ice cream exhibition more often).”
Exercise "Photography"
Purposes of use:development of fine motor skills and coordination of movements; formation of communication skills and social activity.
Conduct form: group, in pairs.
Children are divided into pairs. The psychologist invites them to look at each other carefully, remember the partner’s appearance, hairstyle and draw his portrait with sand on the light table (take a “photo”), and then discuss how successful the image turned out.
Exercise "Conversation through glass"
Purposes of use: development of communication skills, imagination; development of fine motor skills.
Conduct form: group, in pairs.
Psychologist instructs: Imagine that you and your friend are separated by a window with thick, soundproof glass, and you need to tell him about some subject. It is forbidden to speak, and a friend will not hear you anyway. Try to convey the description of the object through the glass. And your partner must guess what kind of object it is and draw it with sand on the table. Stand up against each other. Get started!
All other participants carefully observe what is happening without commenting. There is a discussion at the end of the exercise.
Exercise "Mittens" (modification of the GA. Zuckerman technique)
Purposes of use: formation of communication skills; development of the ability to negotiate with each other, come to a common decision, convince, argue, etc.; the formation of the skill of mutual assistance.
Conduct form:group, in pairs.
Children are divided into pairs. Each of them is given the task to draw two mittens so that they make up a set. Children can come up with and draw a pattern on mittens, but first they need to agree among themselves about this.
Exercise "Drawing in pairs"
Purposes of use: formation of communication skills; development in children of the ability to negotiate, come to a common decision, convince, argue, etc .; the formation of the skill of mutual assistance.Conduct form: group, in pairs.
The couple is invited to depict a certain time of the year with the help of sand. To do this, the partners must first agree with each other on what exactly they will draw on the light table. Upon completion of the drawing, children are invited to convey in words the plot of their drawing.
Exercise "My favorite toy"
Purposes of use: development of the ability to understand each other, to delve into the essence of the received
information; development of the ability to argue their statements.
Conduct form: group.
With the help of a counting rhyme, the driver is selected.
Tryntsy-byntsy, bells, The daredevils rang out. Digi-digi-digi-dong, get out quick!
The driver draws his favorite toy with sand on the light table, and then describes it in words, without naming it. The rest of the children have to guess which toy they are talking about. Then the leader changes, the exercise resumes.
Exercise "Fairytale Land"
Purposes of use:development of cognitive processes, imagination, fine motor skills.
Conduct form: individual or group.
The psychologist invites the child to draw a fairy-tale country with sand on the light table, and then discusses with him what kind of country it is:
what creatures inhabit it;
what kind of character they have;
- what they can do;
- from where they came to this country;
in what relationship are they with each other;
whether all beings feel good in this world (this country), and if not, what can be done,
to make them feel better;
what can be changed;
what events will take place in this country;
Is there a name for the resulting drawing;
What do you like or dislike about the picture, what would you like to change... Note . If the child is having difficulty compiling a story, it is recommended to use the method of unfinished sentences.
Exercise "Riddles"
Purposes of use: development of cognitive processes, imagination, fine motor skills.
Conduct form: group.
Children are invited to guess the object (animal, bird, etc.) using suggestive phrases. For example, an apple is guessed. The following can be said about it:
- it is a fruit;
- grows on a tree;
- it happens green, yellow, red;
it is sour and sweet; - you can eat it raw, cook compote, jam, bake a pie with it.
Then the children should, without saying the answer aloud, draw the answer with sand on the light table.
Option . The psychologist describes a situation in indirect phrases, the children must guess it and draw it. For example, a situation is guessed - the celebration of the New Year: everyone has smiles on their faces;
- heard laughter and the clatter of feet;
- cheerful music sounds;
- all hold hands, lead a round dance;
volleys of fireworks are heard; - children are waiting for gifts;
the smell of spruce and tangerines is felt.
Exercise "Flowers"
Purposes of use:development of fine motor skills; formation of communicative
skills.
Conduct form: group.
With the help of a counting rhyme, a child is selected who will be a "bee":
The bees flew into the field
They buzzed, they buzzed.
The bee sits on the flowers -
We draw, you drive!
Children draw flowers on the light table with sand, and the “bee” must choose the most beautiful and neat drawing among them. The child whose image turns out to be the most successful becomes the "bee", and the game is repeated.
Option . With the help of a counting rhyme, "Santa Claus" is selected:
You are white, you are bright
You are in a fur coat, you are in a hat,
You have a red nose
So you are Santa Claus!
The rest of the children draw snowflakes on the table.
Exercise “What is it? For what?"
Purposes of use
Conduct form:individual or group.
The use of this game depends on the lexical topic being studied by the children in the group. The psychologist draws with sand on the light table contour images of an animal, a tool, a piece of furniture, dishes, an element of clothing ... Then he asks the children to name the object depicted by him, describe its shape, purpose. Together you can come up with an unusual story that happened to this item.
Exercise "In the garden, in the garden"
Purposes of use: expanding horizons and general awareness of the world around; development of thinking, speech, fine motor skills.
Conduct form:individual or group.
 Municipal preschool educational autonomous institution
"Kindergarten No. 7" Cinderella ", Tynda, Amur Region.

series of abstracts on the technique of sand drawing
for children of primary preschool age
Done: educator
Fisyukova Elena Petrovna
Explanatory note
Visual activity - one of the types of artistic creativity that provides the child with the opportunity to create on his own.
There are many different non-traditional drawing techniques known - monotype, drawing with cotton buds, crumpled paper, stencil printing, etc.
Of particular interest to children and adults is such a technique asdrawing in the sand. And this is no coincidence. The malleability of the sand and its natural magic are mesmerizing.
This type of drawing is one of the most unusual ways of creative activity, because children create unique masterpieces on the sand with their own hands.
Of course, you are familiar with the elements of sand therapy. But I would like to introduce you to another form - drawing in the sand.
In the process of drawing on the sand in children, tactile sensitivity increases, fine motor skills of hands, imagination, creativity, memory develop, and active formation ofspeech activity.
Surprisingly, the hands of the baby turn a handful of sand into a landscape, a starry sky, a forest, a sea or a magical land. The use of illumination, including colored or multi-colored, gives children special joy.
The content of educational activities
Training in the technique of drawing on the sand is carried out with a subgroup of children or individually duringafternoon.
Classes include three cycles:
1st - initial - getting to know the sand, preparing the hand, word games and exercises to develop the imagination and the ability to draw on the sand;
2nd - plot drawing on the topic and according to the plan, first with the teacher, then independently;
3rd - Telling, reasoning, compiling fairy tales, stories from drawings, diagrams, pictograms.
Activity themescan be changed, supplemented depending on the imagination and creative intent of the child.
For the organization of educational activities, appropriate equipment is needed - a table with glass or a tablet measuring 50 x 30 with backlight. For drawing, fine white sand is used, which is stored in a special compartment in a box on the table (tablet).
Sand painting methods.
Sand is the same paint, only it works on the principle of “light” and “shadow”.
There are several ways to draw on a sand table. Simplest:light in the dark . First, we prepare the background: a thin, uniform layer of sand is applied by uniform dispersion (“salt”) of sand over the surface of the table with a height of 20-30 cm. Images are obtained by applying lines, dots and other shapes to the background with fingers, the side of the palm, palms. A thin layer is pushed apart, raked.
Waydark in bright (filling) . It's a little more difficult. Sand can be poured onto a clean “light” sheet in any way: thin, thick, curly lines (for example: seagulls over the sea).
Wayprints . Imprints can be applied with the side surface of the palm, fingertips, nails (for example: bunnies jump, an elephant walks, a flower grows).
Techniques can be easily combined, combined in one composition. The drawing can always be corrected - no need to be afraid to make a mistake. This is one of the beauties of sand painting - everything is fixable. Over time, you feel how and what to portray, you understand what possibilities the sand has.
You can start familiarizing children with sand with simple tricks: say hello to the sand, stroke it (what kind of sand is warm, dry?), warm it in a fist, pass it between your palms, listen to how it talks to you, whispers. Children like to amuse the sand: tickle it first with one finger, then with all, with both hands - the sand laughs. Glide your palms on the sand, drawing how the car drove, with two fingers - a sled.
Simple graphic exercises
1. Choose or fill in straight lines: paths, wires, poles, fences, rain.
2. Choose and fill in wavy and then closed lines: waves, smoke, fountain beads.
3. Go to pouring contours and selecting objects of geometric shape.
4. Simple scenes: sharp turns, lightning, rainbow, high mountains.
5. Spiral element. Moreover, we advise the constrained, closed children to unwind the spiral from one point - to unfold. And hyperactive, on the contrary, twist - it calms and balances them.
Based on the principle of graphics, it is good to introduce the child to its elements.
6. Point. Small, bigger, and so on (cream, apple, moon, sun, and two dots next to it - already a chicken, an oval and a circle - a heron).
7. Line. The lines are different and can convey the mood: light, cheerful, prickly, gentle, playful, mysterious (circling without taking your finger off the table).
8. Spots vary in density, composition and volume. They create an image. A spot of dots turns into porridge on a plate, into a lamb; several such spots - in the image of a tree (add a few lines). A spot of strokes (short lines) is easy to turn into a hedgehog.
To implement each idea, a certain amount of sand is used, the central figure conceived by the child stands out, the rest of the details are drawn additionally. By adding a handful of sand, children learn to make the drawing dark, bright or, removing the excess, light, transparent, they try to convey their mood, feelings and thoughts in the drawing.
Do you think you will get beautiful sand drawings from the first lesson? This is not entirely true, unfortunately. Good drawings are created not even by all adults, not to mention the kids.
If you're really interested in trying things out on your own, then find and read a book called Writing and Drawing in the Sand by German educator Mariella Seitz. This is a unique guide! In an accessible and very interesting way, the author shares tips on how adults can learn to draw with sand themselves and how to teach children different drawing techniques.
The cycle of abstracts is a methodological development aimed at teaching children of the younger group (3-4 years old) the technique of drawing on the sand for the further development of creative abilities.
"Rain, rain, more fun!"
Target: learn to draw straight lines (vertical).
Tasks:
Learn to draw straight lines (vertical).
Develop fine motor skills, develop a sense of rhythm, aesthetic perception.
Preliminary work: Sand experimentation. Examination of landscape paintings on the theme "Autumn", conversation, observation.
light table, sand, paper silhouette of clouds, musical accompaniment of "Voice of Nature" (the sound of rain).
Teacher: Do you like rainy weather? Not? But trees, grass, flowers need rain. Yes, and it's fun to walk through the puddles, unless of course you have rubber boots.
1. Finger gymnastics.
Rain, rain is more fun!
Drip, drip, don't be sorry!
Just don't get us wet!
Don't knock on the window in vain
Spray into the field more:
The grass will get thicker!
Shows drawings made with pencils or felt-tip pens. He asks the children what these pictures are drawn with and offers to draw rain with sand.
3. Drawing.
Look, in the picture, the rain has not started yet, although the clouds have covered the sun. And then the first drops of rain fell to the ground. Cap-cap, cap-cap.
We draw long, long lines - this is heavy rain, trickles run;
We draw short lines - this is a light rain, raindrops (droplets) drip.
The rain is getting quieter and now it is completely over, only puddles remain on the ground.
What kind of rain will you have?
Children draw raindrops, accompanying the drawing with the words "Drip, drip, drip ..."
4. Reflection.
Teacher: - Well done, what a fun rain you got.
Did you guys like it?
Look at our palms -They have become wiser!Thank you, our dear sand,You helped us all grow!

"Here's a hedgehog - no head, no legs!"
Target:
Tasks:
Learn to draw straight vertical lines.
Develop fine motor skills, develop a sense of rhythm. aesthetic perception.
Preliminary work: drawing centipede legs, modeling hedgehogs from plasticine. Shadow theater "Hedgehog".
Material, tools, equipment: light table, sand, paper silhouette of a hedgehog, musical accompaniment.
The content of the organized activities of children:
Creating a game situation
The teacher with the help of the shadow theater beats the poem by G. Lagzyn "Hedgehog".
I met a hedgehog
He carried mushrooms on his back.
Good afternoon prickly hedgehog!
Do you live far away?
2. Finger gymnastics. "Prickly hedgehog". Children raise their hands up, at the signal of the teacher spread their fingers, clench into a fist and open again - “the hedgehog hides and shows its thorns.”
The child is invited to touch the sand, hold it in his hands, pour it from one hand to another ...
4. Drawing.
The teacher shows a “hedgehog silhouette” and offers to draw him many, many needles.
This is a hedgehog where is his back? Here. Needles grow on the back of a hedgehog. Needles grow up.
The teacher explains and shows how to draw needles.
Here is the back, I put my finger here and draw first, one needle - like this. Next to the other - like this (fixes the movement so that the children notice the separation of the finger from the light screen). The hedgehog has a lot of needles, let's draw more.
5. Reflection.
Teacher: - Well done, what prickly hedgehogs you got.
Did you guys like it?
Look at our palms -They have become wiser!Thank you, our dear sand,You helped us all grow!
After the lesson, you can take pictures of the drawings with the names of the children.

"The sun is shining."
Target:
Tasks:
Learn to draw a circle closing the line into a ring.
Develop fine motor skills. ability to work as a model.
To cultivate curiosity, initiative, interest in visual activity.
Preliminary work: looking at images of the sun in children's books. Sun watching on walks.
Material, tools, equipment: easel, flannelgraph, figurines for flannelgraph (sun, cloud), light table, sand, musical accompaniment.
The content of the organized activities of children:
1.Creating a game situation
A figurine of the sun is attached to the flannelograph:
In the morning the sun rises
Calls everyone to the street.
I leave the house:
Hello sunshine, it's me!
From the bright light, everyone becomes joyful, cheerful. But when the sun hides behind a cloud (they attach a cloud), everything becomes gloomy. Our mood also changes. Let's draw a cheerful sun so that it always delights us with its radiance.
2. Exercises "Say hello to the sand." The child is invited to touch the sand, hold it in his hands, pour it from one hand to another ...
3. Drawing.
The teacher invites the children to draw a cheerful sun. Shows how to draw the sun with sand.
Draw a circle with your finger
Rays are different: straight and wavy; short and long.
The child creates a drawing according to his plan.
Look how happy the sun is. The sun woke up and smiled at you. Smile back at him: Say "Hello, sunshine!"
Who can be awakened by its rays? Think and tell.
4. Reflection.
Teacher: - Well done, what beautiful suns you got.
Did you guys like it?
Look at our palms -They have become wiser!Thank you, our dear sand,You helped us all grow!
After the lesson, you can take pictures of the drawings with the names of the children.

"Bath the duckling."
Target:
Tasks:
Learn to draw wavy lines (horizontally).
Development of coordination of movements (bivalent work of the brain through conscious drawing with two hands at once).
To cultivate curiosity, initiative, interest in visual activity.
Preliminary work: mobile game "Jump over the stream", games with geometric mosaics.
Material, tools, equipment: duck toy,light table, sand, musical accompaniment.
The content of the organized activities of children:
1.Creating a game situation
Teacher: let's play ducklings, reads A. Barto's poem "Uchi-uti". Children perform the movements on the show.
early in the morning
Mother duck came out
Teach ducks.
She teaches them, teaches them!
You swim, ooh ooh
Nicely in line.
Though the son is small, small.
Mom does not order to be cowardly, does not order.
Swim, swim, baby
Don't be afraid, you won't drown.
Finger gymnastics. "Ducks"
One, two, three, four, five - (unbend fingers)
The ducks went out for a walk (we rhythmically squeeze and unclench our fingers)
One, two, three, four, five - (bends all fingers into a fist in turn, starting with the little finger).
They hid in the house again. (rhythmically we squeeze and unclench our fingers)
3. Exercises "Say hello to the sand." The child is invited to touch the sand, hold it in his hands, pour it from one hand to another ...
4. Drawing.
Teacher: Look how good and handsome the duckling is! The eyes are blue, the paws are red, the beak is clean. Oh, our duckling is sad for some reason, he probably wants to swim in the stream. Let's draw streams.
The teacher asks the children to show with their hands how ducklings swim in the water. Children (by imitating the teacher's actions) depict a wave - "draw" wavy lines in the air - first with one hand, then with both synchronously.
The teacher shows the silhouettes of ducklings and distributes them to the children. Offers to help ducklings learn to swim in streams.
5. Reflection.
Teacher: - Well done, what beautiful streams you got. Ducklings love to swim.
Did you guys like it?
Look at our palms -
They have become wiser!Thank you, our dear sand,You helped us all grow!
After the lesson, you can take pictures of the drawings with the names of the children.

"Baranki-kalachi".
Target:
Tasks:
Learn to draw a circle - closing the line into a ring.
Develop fine motor skills, eye, eye-hand coordination, aesthetic perception.
Generate interest in creating an image in the sand.
Preliminary work: examining and examining the pyramid rings of different sizes to enrich and clarify the tactile sensation, develop the perception of the form. Presentation of the shadow theater "Come visit".
Material, tools, equipment: light table, sand, a bunch of donuts to show to children, musical accompaniment.
The content of the organized activities of children:
1.Creating a game situation
The teacher shows the children a bunch of bagels and plays the nursery rhyme “Ay, kachi-kachi-kachi!”
with the help of bi-ba-bo dolls.
Hey, kachi-kachi-kachi!
Look - bagels kalachi!
Look - bagels kalachi!
From the heat, from the heat of the oven.
From the heat, from the heat of the oven -
All blushes are hot.
Rooks flew here
They grabbed rolls.
We've got lambs left!
Finger gymnastics.
3. Exercises "Say hello to the sand." The child is invited to touch the sand, hold it in his hands, pour it from one hand to another ...
4. Drawing.
“Ay, kachi-kachi-kachi, look - bagels, kalachi. Everyone is ruddy, hot" and asks to "draw" in the air first a huge roll, then a big bagel, and a small one - a small bagel. Children draw in the air with their fingers.
Then the teacher draws attention to the light table, asks to circle the silhouettes of “donut-bagels” along the outer edge with a finger (3-5 times) in order to remember the movements.
The teacher offers to draw "donuts - kalachi"
5. Reflection.
Teacher: - Well done, what beautiful tasty bagels you got - kalachi.
Did you guys like it?
Look at our palms -They have become wiser!Thank you, our dear sand,You helped us all grow!
After the lesson, you can take pictures of the drawings with the names of the children.

"Butterfly"
Target: Learn to draw with two hands.
Tasks:
Learn to draw with two hands.
Develop fine motor skills. Enrich children's tactile experience.
Generate interest in creating an image in the sand.
Preliminary work: observation.Conversation.Examining illustrations.
Material: light table, butterfly illustration, butterfly body paper blanks, musical accompaniment.
The content of the organized activities of children:
Creating a game situation
Teacher: make a riddle.
Moved by the flower
All four petals.
I wanted to rip it off
He fluttered and flew away.
Guys, who is this? (shows a butterfly)
That's right, children are a butterfly. What can butterflies do?
Why do they fly? What they have?
Look at her wings. She has 2 large wings and 2 small ones. And now let's try to turn into butterflies.
2. Mobile game "Butterfly"
The flower was sleeping and suddenly woke up, (trunk to the right, to the left.)
I didn’t want to sleep anymore, (torso in front, back.)
Moved, stretched, (hands up, stretch.)
Soared up and flew
The sun will only wake up in the morning, (circle)
Butterfly spinning, winding.
(Children “flutter” around the group to the soundtrack. As soon as the soundtrack ends, the children squat on an imaginary flower).
Look, children, I have butterflies (shows a blank), but they don’t have wings, let’s draw wings.
3. Exercises "Say hello to the sand." The child is invited to touch the sand, hold it in his hands, pour it from one hand to another ...
4. Drawing.
Children, draw a butterfly 2 large and 2 small wings. We will draw with two hands. (children draw, the teacher watches their work, if necessary, helps, while the children draw, musical accompaniment is turned on).
5. Reflection.
Well done, what beautiful butterflies you have turned out. My butterfly from the picture will definitely fly in and make friends with your butterflies.
Did you guys like it?
Look at our palms -They have become wiser!Thank you, our dear sand,You helped us all grow!
After the lesson, you can take a picture of the resulting butterflies with the names of the children.

LITERATURE
Mariela Seitz "We write and draw in the sand" Practical recommendations M. INT, 2010. – 94s
Lykova I. A. Visual activity in kindergarten: planning, class notes, methodological recommendations. Early age. - M .: "KARAPUZ", 2009. - 144 p.
Internet resources:
Drawing with sand on light tables for children is one of the ways to develop a child by involving them in the game process. Sand painting allows you to expand the boundaries of “permissible”, and the light table allows you to enjoy the process at any time of the year.
From the first minutes of his life, the child learns the surrounding reality and his place in it with the help of tactile sensations. That is why, only having learned to move, young researchers tend to touch and taste everything. Sand drawing is a psychological and pedagogical technique that will become the basis for the formation of memory, mental and speech activity of children. And drawing with colored sand will allow, in parallel with mental activity, to control the psychological aspects of the development of children.
Light table (tablet) for sand painting - what is it?
Before proceeding with the method of painting with sand on light tables for children, you need to understand what this device is.
A table or tablet is a box for sand painting. It can be made from the following materials:
- Wood;
- Plywood;
- Plastic;
Devices are sold in the form of a table or tablet. Their main difference is the presence or absence of legs. If the child is not yet three years old, then sand drawing for him should take place on the floor. The kid should not stand on a chair, because, carried away by the game, he can fall from there. So you need to buy a tablet.
The table (device with legs) is suitable for children who have crossed the three-year milestone. Special telescopic supports are adjustable in height. Therefore, the table can "grow" with the baby. The best option for doubting parents is removable legs. Thanks to this feature, the table quickly turns into a tablet.
Psychologists recommend using backlit screens that are rectangular in shape. The rectangle does not constrain the format of the picture. Children easily identify the central part of the composition. This form helps to create various symmetrical, geometric shapes.
The device has sides that will not allow the material to get enough sleep. Adds convenience in using the "filling" of the table. It includes such a "stuffing":
- Compartment for storing bulk material residues;
- Unbreakable frosted glass (polymer material);
- Backlight consisting of LED strip;
- Quartz sand.
Material of any color is suitable for drawing. However, light, almost white tones are considered the best option.
Benefits for the child and development of abilities
Drawing for children is the best way to realize their fantasies, their inner world. Watch small children. They always draw lines on paper with inspiration, without thinking about how beautiful their masterpiece is. For them, the process is important.
Sand painting allows you to expand the boundaries of "permissible". And a special device is to enjoy the process at any time of the year. Do the benefits of painting with colored sand end there, or are there many more?
- Ability to draw at home. Neither rain nor snowdrifts are afraid of young artists.
- Reducing tension. The unhurried movements of the hands pouring bulk material calm the child, make him forget about all the troubles. The kid gets rid of nervous tension, learns calm and measured movements.
- Formation of a creative personality. The kid is subject to any form, design. The child has the opportunity to use the whole hand in drawing, starting from the index finger and ending with the edge of the palm. With the help of sand, the child recreates not only concrete, but also abstract concepts: wind, cold, love. He develops imagination. What adults seem to be simple curved lines, the young artist evokes associations with concepts that are important to him.
- The development of fine motor skills of the hands. While educators arrange classes for children with many specially selected exercises, your creator will simply draw. At the same time, it does not matter at all whether his masterpiece will have a plot or artistry. Sprinkling grains of sand from one hand to another, scattering them, drawing stripes on glass with a finger, the child uses all the points on the hands and fingers necessary for development.
- Acquisition of a good mood. Even if the baby began to draw in a bad mood, the “sand art session” will provide him with positive emotions. He will calm down, get carried away by an important matter for him, imbued with the depth of the plot, invented on his own or with the help of adults.

Rules for using the light table
Painting with sand on glass is a fascinating activity. To make such a fun pastime convenient and comfortable for all participants in the creative process, you need to follow a number of rules.
- The working area of the box for "sand drawing" is glass. It is strong. However, even such a durable polymer material must be protected. Do not leave large or heavy things, toys or molds on it. Do not use objects that scratch the surface, because they can damage the hands of the young talent.
- The sand is electrified. This ability poses a threat to the health of the baby. To avoid such undesirable consequences of the material for creativity, wipe the glass surface with an antiseptic material.
- Dirt. The presence of debris in the material will lead to the appearance of small insects that interfere with creativity and violate hygiene rules. To prevent such violations is simple: sift the sand through a fine sieve. If a young artist takes up this important work, you can instill in him labor skills.
- Lumps. When working with sand for children, the flowability of the material is important. However, the longer it is used, the more small lumps appear in it. Such an obstacle does not allow you to draw well. Washing will help restore the material to its previous flowability. The grains of sand are then dried in an oven.

The influence of the color of the table backlight on the child
Educators and psychologists unanimously agree that color plays a big role in personality development. Moreover, color shades can change the mood of the baby, eliminate anxiety, fatigue and apathy. Useful drawing on glass has another important advantage: it affects the psyche of the baby with color.
To achieve the desired goal, drawing with colored sand or multi-colored illumination is used.
Let's give a brief description of the colors, the choice of which will allow you to competently influence the psyche of children.
- Red. Strength, leadership. The abundance of red color causes aggression, so it should be used extremely metered.
- Orange. Optimism, joy, good mood and appetite. Relieves depression and fatigue.
- Yellow. Concentration, concentration. Helps to cope with self-doubt and indecision.
- Green. Quickly eliminates irritation, promotes deep, restful sleep.
- Blue. Helps to find harmony, especially in family relationships.
- Purple. Stabilizes mental imbalance, helps to eliminate mental problems.

Sand games on the light table - a list of exercises
Introducing the young genius to a new device for unusual art, tell him about the methods and techniques of drawing. Explain the meaning of all tools and materials: brushes, tray, container, sieve. For very young children, it is better to start playing with sand on a light table with an entertaining story or fairy tale. Don't forget to turn on the background music.
Here are examples of the simplest and most effective exercises that will help children master the fascinating technique of sand drawing.
Preparatory exercise
Sand painting technique involves the ability to draw the right lines. Therefore, you need to start classes with an exercise that will teach kids to properly pour the material on the glass.
Consider how to learn how to draw with sand, drawing the right lines of the right shapes.
- The child picks up grains of sand in his fist;
- He puts his hand on the glass;
- Slowly unclenching his fist, "draws" lines.
Explain to the child that the lower the fist with sand is above the glass, the thicker the line will be. From a highly raised hand, an almost transparent, but wide line will “fall” onto the table. The sand drawing technique for children is the ability to draw lines of different formations: zigzags, spirals, wide, narrow or transparent. Already drawn lines can be adjusted.

Draw "Letters"
Sand painting involves the ability to "write". Beautiful uppercase or lowercase letters will be within the power of schoolchildren. You can use both printed and handwritten versions.

Draw "Sun"
The next step to the knowledge of "sand art" is drawings. The simplest image is the sun. From it, young artists begin to hone their skills.
- We raise a handful of sand 20 cm from the table;
- We pour it on the glass without moving the hand;
- Bouncing grains of sand will “draw” a circle;
- We level the material from the center, falling asleep the sun;
- With quick movements from left to right, we form a background around the sun.
Constantly doing sand painting, the child improves his skills, acquires a unique style. Let his drawings be far from ideal. But they will help him to show creativity, individuality, relieve stress and give self-confidence.
Creative activities and games with children on the light table solve many problems: gaining new sensory experience, developing fine motor skills, attention, figurative-logical thinking and imagination.
The light table is a convenient and modern device for sand animation.
Light tablet for drawing with sand "Kidstation" is made of natural wood. Low sides at the edges prevent sand from spilling out. Size: 40*30*11 cm.
**********************************************************************
Ideas for activities on the light table
Sand animation. To draw with sand, you will need colored sand for children's creativity (c, c) Sand therapy will appeal to both children and adults. Turn on your imagination and create your masterpieces.

Sand can be replaced with semolina or edible salt. Try using colored bath salts.

Games on the light table with colored rice will keep the child busy for a long time. How to color rice, read.

Drawing with shaving foam. The child will have a new sensory experience.

Source: artfulparent.com
Painting on ice in watercolor. It is transparent ice that looks very impressive on the light table. To make the ice clear, freeze distilled water or boiled water twice. Ice can be formed into a ball by freezing water in an inflatable balloon.

Drawing on milk. On the light table, paint stains on the surface of milk will look even more spectacular.

Nature on the light table. Lay out leaves, flowers, and other natural objects on the surface of the table for observation. Indeed, the structure of plants is better visible in the light.

An interesting activity on the light table is the design of objects from cocktail tubes and modeling dough (recipe).

Playing on a light table with hydrogel balls (in, on) will certainly appeal to children. Put a transparent plastic container with high sides on the light table and fill it with soaked hydrogel balls - the child will get a lot of pleasure from new sensations. Attention: if your child tends to put small objects into his mouth, stop playing. 
Magnetic constructor made of transparent plastic. With backlight, the game will change before our eyes and give new impressions. As an option - the popular Magformers magnetic designer (in, in).

Invite your child to play with colored wooden blocks (c c ) to enrich the sensory experience.

Story games. Come up with a theme for the game, pick up figures (in, in on) and create your own little world.

Source: facebook.com
Games with colorful plastic cups. Build towers, paint with felt-tip pens and use them in themed games.


Add dimension to the game with mirrors.

Collage. Give your child various small things: decorative glass pebbles, beads, mosaic elements, colored transparent chips (on), etc. Use both transparent and opaque objects. Invite the child to lay out the pattern on the light table.

We lay out the patterns along a pre-drawn contour. For class, prepare a drawing on paper.


Look at the collage through the teleidoscope (c). The teleidoscope patterns are formed directly from the environment. The variety is absolutely endless! It has been proven that 15 minutes of such a spectacle has a relaxing effect, comparable in healing to 5 minutes of healthy laughter. The colors of the device and amazingly beautiful compositions will help improve the well-being of the child and increase efficiency.

Luminous neon sticks/bracelets ( , ). Be vigilant - they can be dangerous if the integrity of the shell is violated and if it comes into contact with the skin.

We study the account.

We lay out geometric shapes with decorative sticks for stirring drinks.
Sensory bottles. Place hair gel and hydrogel balls into a transparent bottle and get a beautiful toy for the light table.