Antipyretics for children are prescribed by a pediatrician. But there are emergency situations for fever in which the child needs to be given medicine immediately. Then the parents take responsibility and use antipyretic drugs. What is allowed to be given to infants? How can you bring down the temperature in older children? What are the safest medicines?
It is always pleasant to receive gifts, no matter how old you are - 5 or 35. Our men - dads, grandfathers, husbands, brothers, uncles - rarely think about pleasant things and gifts for themselves. On the eve of the men's holiday on February 23, we invite loving wives and children to make an interesting gift for their defender with their own hands - a photo frame in the form of a car. This children's craft is easy to make, but it will be a wonderful congratulation for dad and an expression of the love of people close to him.
To make crafts for dad and grandfather, you will need:
- thick cardboard (corrugated cardboard from unnecessary boxes);
- colored paper / cardboard;
- black paint (gouache, acrylic);
- pencil / felt-tip / pen;
- scissors;
- glue / double-sided tape;
- family photo.
Step 1. We make the component parts of the craft
We draw a template of the future photo frame for dad on a sheet of paper. The shape, model and size of the car can be absolutely arbitrary. It could be an SUV, a sports car, or even a truck. If you cannot boast of artistic skills, you can take a suitable image from the Internet as a template.

When the image is ready (drawn or printed), cut it out and draw the details of the gift for dad:
- on thick cardboard - the general outline of the machine, which we also cut out, and then paint over with black paint - this will be the base;
- on colored paper - a contour and a cut for the windshield, and also draw a small rectangle on top, with which the colored "body" of the car will be attached to the cardboard base.

We also cut out two strips 2 cm wide and 10-15 cm long from cardboard for future stand wheels. They must be bent in two or three places, glued into small triangles, and painted with black paint.

Step 2. Design the front of the frame
On the color template of the car outline, we work out the small details of the photo frame: the steering wheel, headlights and the number. They can be cut out of colored paper and glued or drawn with colored felt-tip pens. And do not forget to bend a small rectangle along the roof line for fastening.

Step 3. We connect the prepared parts of the photo frame-car
We glue the "lapel" of the colored front of the machine to the back of the cardboard frame. We glue the triangles-wheels right there on the back side. This must be done so that only about 2 cm of the height of these support wheels is visible from the front. You can attach the parts both with glue and with double-sided tape - whatever you like best.

Now the only thing left is to place and fix a photo or photographs on a cardboard base and glue the bottom edge of the colored template so that it does not rise. That's all!

Homemade photo frame in the form of a family car, made for your beloved daddy, is ready. You can decorate it with additional details or make a similar gift to your grandfather or brother. A school-age child will be able to make it on their own, and the kids will be happy to make a gift to dad with their mom, decorating and gluing separate parts of the frame. Such a frame is not a shame to decorate a shelf in the house or even the desk of the head of the family.
The men's holiday is approaching and I want to please the stronger sex with pleasant surprises and gifts. Crafts for February 23 is an opportunity to show imagination and please loved ones. Involve a child in creativity, make a gift for dad, grandfather with your own hands. Any father will be pleased with a touching craft or a children's postcard from a son or daughter.
TO
drinking a gift in the store for February 23 is not a big problem. In each store, the corresponding goods are laid out before the holidays. It seems to us that a handmade gift will be much more pleasant and memorable than just a purchase. And your men, be it dad, husband, brother, will definitely like your efforts and your child's.
It's a good idea to give your dad a photo frame as a gift on February 23rd. Only one child cannot cope with this work. If you take part in creativity, he will succeed.
For work you will need:
- Colored cardboard.
- Thicker cardboard (you can take any color).
- Colored paper for applique or colored cardboard.
- Scissors.
- PVA glue.
- Ruler.
Take a green cardboard, stepping back from the edge 4-5 cm with a ruler and a pencil frame for a photo. First, we figure out which photo will fit here, all our calculations depend on this. Drawn, attached a photo. If everything works out, carefully cut out the frame.

We cut out the details for the design of the frame, drawing them by hand or printing them on a printer.

We glue the colored applique to the frame and start making the frame itself. Cut out a rectangle from thick cardboard, equal in area to the frame, we get the back of the product. We glue two pieces of cardboard and glue the leg for stability. The gift is ready.

You can decorate the frame by gluing a shell, a beaded fish, an anchor, a steering wheel - on the theme of the sea.
If you don't know what to give a young man on February 23, there is a good option, here is a tank:

Assembled from corrugated paper, double-sided tape or glue.

It turns out here is such an interesting gift:

Another tank, but with different "contents".

The same materials are used, only there is more sweetness here.

We got an original gift:

Crafts made from salt dough, made with your child on February 23, can be presented at home and at work, at school and in kindergarten. These gifts do not require large expenses, but they will delight you with care and attention.

Salted dough is easy to prepare. You can make a figurine, keychain, fridge magnet from the dough.
One of the many recipes for salt dough:
- Flour - 300 grams.
- Salt ordinary, large - 300 grams.
- Water - 200 grams.
- Vegetable oil - 1 tbsp. spoon.
Knead the dough, pouring in water gradually. When it's ready, roll it out on the table and squeeze out the parts with molds. Even small children can handle such a simple job. Dry the workpieces in the oven. You can paint either with paints for food purposes or with acrylic paints. It's up to you whether you are giving for food or for beauty.


Our next craft for February 23 is a salt dough keychain. We do it for dads, grandfathers, brothers and mothers (after all, there are mothers' military personnel).

We collect all sorts of little things: coins, nuts, buttons, screws, nails - all this will come in handy for working with the dough.

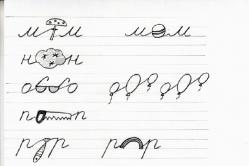
We cut out letters from cardboard: "P", "M" or the initial letter of the name, for example, Sasha. We make a hole in the corner with a hole punch or scissors.


We spread the dough "sausage" on cardboard, evenly distributing it over the surface of the letter.

We make a through hole for the ring with an awl or scissors.


We paint the keychain in any color, best of all with acrylic paints. If the paint is not waterproof, cover the keychain with varnish on top (you can use nail polish).

Leave to dry or dry in the oven. When it dries, we pass the ring through the hole and you can give it.
We have got an original steampunk keychain. What is steampunk? Science fiction and mechanics, very interesting style.

First, we will come up with a design for our postcard made of paper. It will be easy to complete or difficult - you decide. The main thing is that it is a beautiful congratulation on February 23rd.

Volume postcards in kindergarten and school:
Let's start with the original postcard, on which we will write congratulations and wishes. We will make postcards using different techniques. You can make such a postcard using the origami technique. For a postcard, you will need a rectangular sheet of colored paper. Take regular A4 paper for a sample, fold according to the instructions, you will understand which sheet size is more suitable.

Fold the rectangle in half along the sheet. The paper folds like a book, there is nothing complicated in the work.

We unfold the sheet and fold it again, from the sides to the center.

We got a rectangle: a sheet on one side, and a vest on the other.

The photo shows that you need to bend inward, this is a mistake. Bend the corners outward so that the corners protrude slightly beyond the fold. We made "sleeves", turn the work over and bend it 2 cm in the opposite direction.


This is how the "collar" turns out, we will direct the square of the shirt to the corners of the collar.


A tie or bow tie can be cut and glued to the "shirt", or you can make a tie, as in the video.

Do not forget to write congratulations and wishes inside the sheet. We hope that your man will be satisfied. And if you also add a small gift (for his hobby), it will be just wonderful.
Here is such an interesting postcard you can make with your child. A very interesting technique that requires only perseverance and patience.

For work you will need:
- A set of paper ribbons (you can cut it yourself).
- Cardboard.
- PVA glue.
- Tweezers.
- Scissors.
A special tool for twisting ribbons (you can do it yourself).
How to make a twisting tool: stick a needle with a large eye in a wooden stick (pencil, stick from an art brush) and bite the eye in half.

Scheme of work on a postcard:

Cut out the cardboard base, cut thin strips by winding them onto the tool, fix the edges, and then glue to the base.
Any CD-disks are also suitable for postcards. For this postcard, we cut out a star from red cardboard, stick a CD-disk over the star with inscriptions and clippings from magazines or drawings.

Useful Tips
Hand-made cards are always a pleasure to give and receive. By February 23rd, you can cook several different postcards and crafts made by hand. They can be made by yourself or with children and presented to dad, grandfather, uncle, friend, colleague.
To date, the holiday on February 23 has ceased to simply be a holiday for military personnel. Defender of the Fatherland Day congratulations to all beloved men.
To make a postcard or a gift, you need to prepare a few details, but first you need to think about the design, about what exactly you would like to do.
In this master class, you will learn how to make several types of postcards and do-it-yourself gifts.
DIY crafts for February 23rd. Origami shirt

Video Lesson (below it is a diagram in pictures)
To make a paper shirt you will need rectangular sheet of paper any color.
You can also yourself choose shirt size... When choosing a size, you need to take into account several details: the ratio of the length and width of the rectangle is 2: 1; the sides of the shirt after assembly will be 2 times smaller than the sides of the rectangle.

* You can start by trying to fold an origami shirt using a regular sheet. Thus, you will find out where and how mistakes can be avoided when making a direct gift.
1. First you need to fold the rectangle in half, but along and not across. Next, you need to unfold and fold the edges of the paper to the middle (see picture).


3. Prepare your sheet again, face down. Bend the corners again to the fold lines you just made. You don't need to unbend those little corners this time.


4. Now bend the top of the sheet with folded corners in the part of the paper where the edge of the sheet intersects with the fold lines of the corners.


5. The next thing to do is fold the two ribs in the middle of your paper shirt and make the sleeves (see picture) while holding the ribs with one finger.


6. You've made the sleeves, and now it's time to move on to the collar. You may have already guessed that the collar needs to be started from the other end of the folded rectangle. To do this, fold the bottom edge of the sheet so that the collar is about 2 times shorter than the sleeve.

7. Flip the folded sheet over and make the corners of the collar.


8. Finally, fold the resulting sheet so that the hem lines up with the sleeves and collar. Straighten the corners of the collar and use glue to secure them for security.

You have made the base of the shirt. Move on to the decoration. Add buttons. You can also add a corner of a handkerchief, bow tie, or tie.
Scheme of how to make a paper tie for your shirt:
Using an origami shirt as a base, you can easily decorate your card. You can make a large shirt and use it alone as a gift.
You can also make several small shirts in different colors and attach them to one card.
On any occasion, the most important gift is a reminder that the man you love is important to you. For this, a handmade gift is what you need.
Diy frame postcard for February 23
And if you are not inclined to knitting, then you can prepare just such a colorful postcard frame, which not only looks original, but also very easy to make. In principle, anyone can make such a frame.

You will need:
Wooden frame for photos 10x15
* Better to choose white. And if you have a dark frame, you can repaint it light with white acrylic paint and a sponge.
Colour pencils
Hot glue gun
* It can be replaced with strong hold clear glue.
Colored paper (in the form of a square), for the manufacture of a boat or airplane.
1. Prepare a light frame and select the correct size crayons.
* To paint the frame in white acrylic paint, dip a sponge in the paint and gently apply evenly to the frame. Then leave the frame to dry.
* Pencils must be selected so that they look beautiful on the frame.
2. Glue the pencils to the frame using a hot glue gun.
3. Draw a postcard and make a boat that you want to glue on the postcard, and that, in turn, glue it to the frame.
Cool congratulations on February 23
Men also like sweets, and so you can make and decorate chocolates beautifully.

You will need:
Wooden skewers
Colored paper
Double sided tape
Multicolored thick cotton threads
PVA glue
Two wrapped chocolates
Scissors
Side cutters for cutting skewers
1. To make a sail, you need to cut an isosceles triangle out of paper with sides equal to 10cm and a base of 12cm.
2. Fold the triangle in half and place a piece of skewer in its fold. Make the end of the skewer just 1cm above the sail.
3. Now you need to glue the structure using PVA glue.
4. Apply double-sided tape along the entire length of the chocolate.
5. On the other side of the tape, remove the protective film and glue the mast with the sail as shown in the picture.
* The mast must be pressed between two chocolates.
* You can decorate the mast using colored paper flags!
Congratulations to the boys on February 23. Photo frame "Order"
With this gift you can reward your hero for all his merits. Such a self-made order is suitable not only for an adult man, but also for a little boy. And most importantly, he will be pleased.

You will need:
Hot cork rack
Thin plexiglass
Satin ribbon (color blue, width 4cm)
Cardboard (thick paper)
Metal ring (2pcs)
Acrylic paint (gold color)
Colored paper
Eyelet 0.4cm, 1pc (you can do without it)
PVA glue
Glue gun
Punch
1. Using PVA glue, prime the hot cork pad and paint over with gold acrylic paint.
2. Cut an eight-pointed star out of cardboard or thick paper so that the cork stand fits as shown in the picture.
3. The star now needs to be covered with two coats of acrylic paint.
4. Use a glue gun to connect the stand and the star. In this case, the recess in the stand should be on the outside.


5. Prepare plexiglass and cut a circle out of it, the diameter of which should be 0.1 cm larger than the diameter of the stand. This will ensure a good fixation of the plexiglass in the photo frame.
6. Use a universal punch to make a hole in one of the star's rays.
7. Insert the eyelet, which also needs to be fixed, using the same punch, but with a special attachment for installing eyelets. Insert a metal ring into the hole.
8. Prepare a satin ribbon, thread it through the ring and make a bow.
9. Now you need to glue the second metal ring on the back. You will need it for fasteners.


10. It's time to decorate the rays with triangular elements made of colored paper.
DIY gift for February 23rd. Keychain - shoulder strap.
In this master class, you can learn how to make a military attribute with your own hands and present it to a man. Namely, you will learn how to make a felt keychain with embroidery as a decoration.

You will need:
Burgundy felt (thickness 0.1cm)
Green felt (thickness 0.5cm)
Floss threads (different colors)
Copy paper
Eyelets 0.4cm (quantity 2pcs)
Ring with chain (as part of a keychain)
Universal punch
1. Find a drawing with a picture of a soldier. Use carbon paper to transfer the design to felt.
2. Pull the felt slowly over the embroidery frame. Use the simple double-sided stitch technique and try to embroider the picture on felt. Next, you need to remove the hoop and cut out the image, while leaving an allowance of 1.5 cm.

3. Prepare felt green and cut out 2 parts from it in the form of a small shoulder strap (both should be the same size). Now you need to make holes about both parts. To do this, install the nozzle on the punch and punch.
Use the special attachment to secure the eyelets. You can also try to sew this hole by hand - just wrap the edges with thread of a suitable tone.
4. It is tedious to sew embroidered felt to one of the green felt blanks using a blind stitch.

5. As for another workpiece, here you need to make a slot in the form of a window.
6. For now, fold all the pieces together, and sew by hand using an over-seam.

7. The upper part needs to be decorated. To do this, sew it with red threads.
8. Insert a chain with a ring into the hole.

Postcard for February 23 in quilling technique

You will need:
Paper
Simple pencil
Scissors
Quilling tool (can be replaced with a toothpick or awl)
Quilling paper
If you do not know about quilling, then watch two short video tutorials on quilling for beginners.
Quilling for beginners (video)
1. Fold the piece of paper so that one half is longer than the other.
2. Using a simple pencil, mark the numbers 23 (see picture). You can simply draw numbers and cut them out, or you can cut strips, from which you can then fold the number 23 neatly.
3. Prepare quilling paper. Make blanks - twist the spiral with a toothpick.
4. Glue quilling elements to your postcard.
5. Glue the number 23 on top.
6. You can decorate the card a little more, for example, by adding a red star, made using the quilling technique, or simply by cutting it out of paper.
DIY postcard for February 23

You will need:
Colored paper (color: brown, red, golden)
Scissors
Adhesive (can be replaced with double-sided tape)
a printer
1. Make a blank by folding thick paper in half, drawing and cutting out a place for the star. You can print the image of a star, cut it out, circle it on the blank and only then cut the star on the blank itself.
2. With the help of scissors, you need to cut a postcard along the contour, as well as an asterisk on the front side. Next, fold the card in half.


3. Prepare a sheet of red paper and cut an asterisk out of it. You need to make the star three-dimensional. To do this, bend the gluing "ears" inward. In this case, the star itself must be bent so that its outer edges go outward, and the inner ones, on the contrary, inward.


* You can use scissors to fix the ribs and prevent them from straightening.
4. Glue the star inside the hole you made on the front of the card.
5. Now we need to decorate the postcard a little. To do this, prepare a golden sheet of paper and cut out a small star, as well as vertical and horizontal stripes.
Glue these elements of the postcard to the front side of it, namely to the places that are marked with a dotted line.
Card ideas for February 23 (video)
Poems from February 23
1.- Congratulations to you today
- From 23 February
- This holiday is very significant
- And it was not invented in vain.
- May the spirit be healthy in you,
- You are the defenders of the country!
- Be a firm support for her
- And they are always faithful in everything!
- You are a man, which means you are a defender!
- Your family hearth and peace,
- Like a strong granite wall,
- You shield yourself from adversity.
- Be wise - the mind matches men.
- Wisdom is dearer than a crown.
- Not the sage who is higher in rank,
- He is higher in rank, who is a sage.
- I want to congratulate my beloved
- I'm since February 23rd,
- I cannot leave you -
- You are the best I have.
- Congratulations, beloved husband,
- Happy 23rd February!
- Always be fearless
- And also - love me.
- Good health,
- Many happy days
- And a fun feast
- And decent friends!