Antipyretics for children are prescribed by a pediatrician. But there are emergency situations with fever when the child needs to be given medicine immediately. Then the parents take responsibility and use antipyretic drugs. What is allowed to be given to infants? How can you lower the temperature in older children? What medications are the safest?
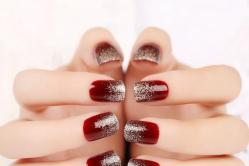
Recently, red gradient on nails has become especially popular. This is a manicure in which one color smoothly transitions into another. Red color always looks impressive. If you combine several shades, you can achieve a truly royal manicure. When talking about red nails, it is important to understand that these are not necessarily bright, saturated plates. Fashionable shades include burgundy, strawberry, terracotta, pink, raspberry. Well, let's try to figure out how to create a fashionable red gradient manicure.
Ombre or gradient?
Gradual lightening or darkening of the tips of the nails by several tones is called not only a gradient, but also the fashionable word “ombre”. They also use the complex name Dip Dye, or Both ombre and gradient mean the same thing - a smooth flow from one color to another. For the red range, it is possible to transition from burgundy to raspberry, then to pink. Ombre refers to a flawless transition of tones. Some tonal boundaries may be visible in the gradient. Dip Dye is used when mixing completely different shades, for example red and black or red and white.

Red gradient with transition
The easiest way is to make red stripes with a transition. What does that require? Take 5 red polishes, but different shades. Cover each plate from thumb to little finger in turn with different shades with a smooth color transition. If you don't have 5 shades of red, create them with white polish.
Cover the first nail with burgundy polish. For the second nail, use a special palette to prepare a mixture of dark red and white. You will get a shade that is a shade lighter than the previous one. For the third nail, add more white polish to create a light red color. The last nail will be a soft pink shade.

Options for red ombre nails
There are other types of red gradient. We invite you to get acquainted with horizontal, vertical and geometric ombre. To perform any of the above methods, you will need the following equipment: 2-3 shades of varnish in different tones, a sponge or sponge, toothpicks, cotton swabs, a thin brush, a finishing coat.
To create a horizontal red gradient, make a smooth transition on the nail, starting from the cuticle and ending with the tip. The red color scheme is used in different ways, the main thing is that the transition is gentle and smooth. Some people like a contrasting transition, which gives the manicure an extravagance. Fashionable combinations are red with white, pink, gold, black, burgundy. Most often, strips of varnish are applied to a sponge or sponge, and then to the nail plate. Some artists make the transition using a thin brush.
A vertical gradient differs from a horizontal one in that the transition of tones is performed from one side of the nail to the other vertically. It can use up to 5 shades. An option is possible when the gradient is performed on only one or two nails, and the rest are simply covered with red varnish.
A geometric gradient on nails looks very original, as shown in the photo above. To do this, use special stencils for nails in the form of cells, each row of which is filled with a red color one tone lighter than the previous one.

Black and red gradient on nails
To add variety, many girls use a combination of blood red and black. This gradient is also called diabolical. To do this, two stripes are applied to a small sponge - red and black. The border of the flowers is slightly compared with a toothpick. Then the sponge is pressed onto the nail. Get a spectacular black and red ombre. Available in matte and glossy finishes. Red gradient manicure is always stylish and unusual!
Gradient is a relatively new trend in nail design. A smooth transition from shade to shade or a rainbow tint makes it possible to combine this type of manicure with almost any style of clothing.
Content:
What is most attractive about this technique is its simplicity of execution. You can create a gradient manicure yourself; the effect of such a design is not inferior in its attractiveness even to complex techniques that can only be performed by a professional master.
If you want to create a bright image, but lack practical skills, a gradient will be the most suitable.

Simple Gradient
A simple and accessible way to apply a gradient is to use a sponge. With its help you can create smooth transitions that cannot be done with a brush. Sponge prints must be made carefully. Their number on one nail depends on the desired intensity of coloring: the more sponge imprints, the richer and brighter the manicure will be.
After applying the gradient, the top of the nail is immediately covered with a fixing compound. This will help avoid transferring its porous structure from the sponge to the nail.
The disadvantage of this method is that before treating each nail plate, it is necessary to reapply the varnish to the sponge, because most of it is quickly absorbed.
Despite some inconveniences during the procedure, the results are worth it.

Gradient brush
To apply a gradient manicure with a brush, you will need the same materials as for the sponge technique. But the peculiarity of this method is that the varnish can be applied both vertically and horizontally.
By following the algorithm, you can even create a gradient on your nails yourself:
- At the first stage, you need to select the shades of varnishes so that when they are combined, you get a smooth transition from light to dark or from rich to muted.
- In order for the manicure to last longer, the nails must be properly prepared: do at least the simplest manicure, carefully polish the nail plate.
- The first layer of base is applied to the prepared nail. Give it time to dry.
- It is better to treat the skin surrounding the nail with cream. This will make it easier to remove excess polish after a manicure.
- The selected color of varnish is applied carefully, trying not to go beyond the edges.
- Varnish of a different color is applied so that it covers half of the nail from the cuticle to the tip.
- Until both layers of varnish have dried completely, create a gradient. They do it with a sponge. Use it to carefully blot the border between the two shades of varnish. The movements should be fast and jerky.
- When the nails are a little dry, the final layer is applied with a fixer.

Gradient manicure options
- White gradient
The white gradient is similar to a French manicure. Smooth transitions of soft pink or cream and white varnish give special grace to the hands. A white gradient looks good against a tanned skin background.

- black gradient
Black color is universal; it goes harmoniously with many colors. Combining black and white polish on one nail will add rigor and elegance to the look. And the combination with a rich scarlet color simply cannot fail to attract the attention of others.

- red gradient
A gradient manicure made in red tones can include varnish from bright to almost black-burgundy. This design is ideal for an evening event.
Sometimes a red gradient is made with transitions to another color scheme.

- Pink gradient manicure
Makes any look gentle and feminine. It suits women regardless of status and age, and is appropriate in any setting.

- blue gradient
Blue varnish is an excellent alternative for those who find the classics boring and uninteresting. The advantage of blue is its versatility, the presence of a large number of different and interesting shades.
Beautifully and neatly made, it is suitable for both everyday life and festive occasions.

- Shiny Gradient
Gradient manicure can be not only in the form of a color transition. A stretch effect can be created using confetti or sparkles.
At the first stage, the nail is coated with varnish of the main color. Then glitter is generously applied to the edge of the nail plate, and with the help of a brush they are stretched towards the nail hole, thinning the layer.
Glitter will create a festive and spectacular manicure. In this case, glitter can be used in the same color as the main varnish or, on the contrary, focus on contrast.
Using confetti in nail design, they focus on its size. For example, place larger confetti at the end of the nail plate, and smaller ones towards the middle.

- Gradient with design elements
The most impressive, but at the same time the most difficult to implement, is a gradient with design elements. There may be several options. A manicure is widespread when the accent in the form of a pattern or gradient of a different color is placed on one or several nails of one hand. A pattern located on top of color transitions requires special skills of the master, since there is a high risk of overloading the nail plate or making it bulkier.
A shaped or geometric gradient, which implies the presence of shapes and outlines of the stretch line, always looks original.
A gradient using foil tape or rhinestones has an equally impressive look.


Gradient manicure cannot leave anyone indifferent. Among all the variety of its types, every woman can choose the one that will suit her mood.
Posting ads is free and no registration is required. But there is pre-moderation of ads.
Gradient manicure. How to make a gradient on your nails
Bright and unusual color combinations, smooth transitions of shades on the nails - a fashionable manicure with a gradient effect has not lost its relevance for several seasons. Despite all the apparent complexity, the gradient manicure technique is quite simple, and making a manicure with a gradient effect at home is quite simple. Read our article to learn how to make a gradient on your nails correctly, what techniques for creating smooth color transitions on your nails exist, and what shades are best to choose.
What is a gradient manicure?
Gradient manicure (ombre, degrade) is a type of decorative nail coating with the effect of a smooth transition of colors. A manicure in a gradient style can be done in shades of one color (the color changes its intensity from light to dark shades), or it can be a transition of two or more colors. Both similar shades and contrasting shades can be combined - both versions of the gradient on the nails look impressive.


There is another gradient option - in this case, each nail on the hand is painted in different shades of the same color, from the lightest to the darkest, or a gradient manicure in different colors is possible.


When making a gradient, you can choose any color combinations - it all depends only on your imagination. A gradient manicure looks equally good on short nails and long nails of any shape.
Gradient manicure techniques
A gradient style manicure can be done in several different ways. The gradient on the nails with a sponge is done in the first two methods, and in the third using a brush.
1. The first method is one of the easiest. It requires several shades of nail polish (2 or more) and a small piece of sponge. Strips of varnish are applied to it in the required sequence. Then the sponge is gently pressed onto the surface of the nail - the colors are transferred to the nail plate. To achieve maximum brightness of colors, you can first apply a thick white varnish to your nails. Excess color is removed from the skin with nail polish remover, and the nails are covered with a topcoat - a finishing coat that fixes the color and gives a glossy (or, if desired, matte) finish to the manicure.
Gradient manicure (photo) is performed step by step on each nail:

2. The second method allows you to achieve the smoothest color transitions. This gradient is performed step by step: varnishes of different shades are first mixed on a flat surface, and then the colors are transferred to a sponge, and only then to the surface of the nail. This is the most common way to make a gradient manicure with varnish (step-by-step photo):

3. The third gradient technique allows you to do without a sponge. This is the easiest way to make a transition from one color to another, but achieving smoothness in this case is very difficult. The surface of the nail is covered in one or two layers with a base shade of varnish, after which has dried, another varnish is applied to part of the nail plate in the usual way. Gradient manicure with a brush is simple and quick to perform, but often it does not look neat enough.

What is needed to perform a gradient manicure?
To make a gradient varnish, you will need:
1. Several varnishes of suitable shades. There can be two or more of them - it all depends on your desire.

2. Sponge for gradient manicure. The smaller the pores of the sponge, the more accurate and smooth the shade transitions will be. An ordinary sponge for washing dishes will do, but it is best to use a cosmetic sponge to apply foundation, cutting it to the required size.

3. A working surface for mixing varnishes - this can be a piece of plastic or film.
4. Toothpick or needle for mixing shades.
5. Nail polish remover - with its help, excess color is removed from the skin around the nail.
6. Finishing coat - top coat to fix the color.
How to make a gradient on your nails
It’s not difficult to perform a gradient manicure at home; you just need to prepare all the necessary materials and be patient. It is necessary to perform a gradient manicure step by step:
Step 1
Before you do a gradient manicure, you need to take care of the shape of your nails and the skin around them. Give your nails the desired shape using a nail file and scissors, remove the cuticle and polish the surface of the nail plate, that is, do either a classic edged manicure or a European unedged manicure.

Step 2
Apply a layer of base coat to your nails. This can be a clear primer, a thick white varnish, or one of the shades used.

Step 3
Apply strips of varnish of different colors onto a flat surface so that they touch. Gently mix the colors at the junction using a needle or toothpick.

Step 4
Press a piece of sponge or sponge onto the painted surface, then press the sponge onto your nail and transfer the color onto it. Try to do this as carefully as possible, in one movement, so as not to smudge the colors.

Step 5
Remove excess polish from the skin around your nails using nail polish remover. The easiest way to do this is with a small cotton swab.
Step 6
Wait until the color coat dries and cover your nails with topcoat - it will fix the color and prolong the durability of the manicure.
Gradient manicure at home step by step:

Gradient manicure with gel polish and shellac
You already know how to make an ombre and gradient manicure at home yourself, using regular nail polishes. But this method has a small drawback - the beauty you create on your nails will last for a maximum of a week. What to do if you want to extend the pleasure of a beautiful manicure for several weeks?
There is a way out - make a gradient on your nails with shellac or using gel polishes. In this case, a beautiful manicure will delight you for at least three weeks without losing its original characteristics. How to make a gradient manicure with gel polish? The execution technique in this case is not very different from the usual one, however, the peculiar properties of durable coatings require special care, thoroughness and professionalism. In addition, each layer of durable coating requires polymerization under a UV lamp.
Gradient manicure with gel polish (step by step photo)

If you are not sure that you can complete all the steps correctly, you should entrust this work to a nail service specialist, then the result will be of the highest quality.
Gradient on nails with gel polish (photo):

Some gradient nail ideas
We invite you to evaluate interesting gradient manicure ideas. Perhaps some of them will inspire you to recreate this beauty yourself.

White gradient on nails
The closest “relative” of French manicure. Delicate transitions of white, cream or light pink colors give the hands a special grace. A tan will perfectly set off a white gradient manicure.


Black gradient on nails
The dramatic combination of black and deep scarlet is sure to turn heads in your hands. A black gradient manicure in combination with white will give your nails rigor and elegance.


Red gradient manicure
A gradient in shades of red - from bright scarlet to almost black burgundy - is ideal for an evening out. A red gradient on nails can also be made with a transition to other colors.


Pink gradient on nails
The combination of delicate pink shades will suit everyone - from a young girl to an accomplished lady. Pink gradient manicure makes the look feminine and delicate.


Brown gradient manicure


Blue gradient on nails


Blue gradient on nails


Green gradient on nails


Summer gradient manicure
Create a summer gradient on your nails in bright, rich neon colors. Even the brightest rainbow on nails will look appropriate in the sun, by the pool or on the beach.


Gradient manicure with glitter


Here are just a few ideas for creating a gradient on your nails. For even more combination options, as well as professional gradient manicure lessons, watch the video.
Gradient nails with a pattern


Vertical gradient manicure
It is performed using one of the described methods, only the colors are applied not horizontally, but vertically.

Gradient manicure photo tutorial

Gradient manicure for short nails
On short nails, the gradient is performed in the same way as on long nails. In this case, it is better to use only two colors and make the transition as smooth as possible.

Gradient manicure: photo


Rainbow gradient manicure


Now you know how to do a gradient manicure at home. Any manicure requires practice, so don't be upset if your first experience isn't perfect. Experiment with colors, try different techniques - and soon you will be able to get a result that is indistinguishable from a professional one. Video tutorials from beauty bloggers and professional nail technicians will help you perform a gradient manicure as correctly as possible.
Modern fashionistas know absolutely exactly what a gradient is. From a scientific point of view, it is an indicator of the direction of growth. From the point of view of the beauty industry - the gradient, like a weather vane, indicates the course of development of all fashion trends. And manicure is precisely that branch of the beauty industry in which the technique of obtaining a gradient cannot be bypassed.
A soft, flowing color transition can be easily achieved with ordinary varnishes. As a rule, this The technique is quite dirty and expensive(in terms of material consumption). In gel polishes, it is quite difficult to repeat the application of the gradient with an impressive sponge due to the greater viscosity of the gel polish itself. And such material is too expensive to waste a valuable product and then wash it off your fingers. That is why many people wonder how to avoid unnecessary expenses and, in general, whether it is profitable to apply a gradient with gel polish on their nails. It turns out that it is beneficial if you approach the issue professionally.

A gradient on nails with gel polish is often done with a thin flat brush or a tiny sponge applicator for applying shadows. Such performance requires more skill and patience, but the effect is ensured for a longer time.
Fashionable gradient ideas on nails with gel polish
The history of gradient manicure does not stand still, and now fashionistas are trying a new option - vertical flow of color. Color in this manicure distributed not from the hole to the tip of the nail, but parallel to the axis of the nail. The horizontal and nail techniques are similar, but the effect is completely new, which is what nail art innovators are striving for.

Bright colors - always a field of activity for brave and creative people. And with a gradient on the nails there is room to roam. The combination of color diversity and imagination when mixing several colors are perfectly combined in the ombre technique.

Discreet, calm color combinations never do not go out of fashion and are highly respected among women. A beautiful transition between colors from the layout of one palette will significantly diversify the options for beige, coral and amethyst manicure. An excellent office option, masterfully performed by a nail design master.

Today it is popular not only in school textbooks. Drawings of triangles, squares and clear straight lines are now depicted on nails, in jewelry and in prints on clothes. Geometric play on nails is also a combination of straight lines and color transitions. Only the color does not transition smoothly, but gradually changes from figure to figure. A unique facet effect on a gemstone.

Restless manicurists have come up with a design whose name you won’t even immediately understand – radial gradient. Apparently, inspired by the same geometry and remembering that in addition to angles, it also contains figures with a radius. Radial manicure being performed only on rounded nails, and the color changes from the middle to the edges of the nail. Just like that.

I love it version of the manicure can be turned into an extraordinary one, if you supply it with glitter. And also, you can combine different techniques on different nails, and you will have several options for a beautiful ombre shimmer with gold, patterns and floral patterns.

Another intrigue in mixing several techniques in manicure and again hitting the mark is the combination of ombre and matte top coat. Soft transition of color in a muted design looks even more mysterious. But in a matte manicure you cannot create a gradient that is too contrasting - in this case, combining colors and textures will not be beneficial. A layout of colors from the same palette is ideal.

If you are not satisfied with multi-colored nails, manicurists offer a different technique - multi-colored fingers. In this manicure, the gradient is displayed not on the surface of one nail, but moves from finger to finger. For example, sapphire blue gel polish on the thumb, denim blue on the index finger, and so on to cornflower blue on the little finger. Here's some interesting arithmetic and a fairly simple technique using gel polish and a gradient of the same color on different nails.

How to make a gradient on nails with gel polish at home
To work, you need all the tools and materials for a regular manicure with gel polishes. A selection of favorite shades and a good coating for drying. And also - imagination and the desire to understand exactly how to create a beautiful gradient on nails with gel polish.
Application technique step by step:
- Remove previous covering.
- With a soft nail file lightly file the surface of the nail, remove the glossy layer. We process the edge and correct the shape of the nail.
- We clean the nail from dust and degrease it using a dehydrator.
- Apply primer(substrate) and dry it in a lamp.

- Cover the nail with a colorless base gel. It is absolutely necessary - it is this layer that protects your nail from the pigment of the color coating. Dry it in a lamp.

- Covering the nail base color in one layer, dry.


Technique for applying multiple colors with a brush
- Selected colors for the gradient apply to the nail in stripes close to one another.


- Immediately, without drying, use a flat brush to gently tightening the transitions between flowers.


- With light touches blurring all boundaries


Technique for applying one color with an eyeshadow applicator
- On foil add a few drops of the main color(purple, for example) and one drop of white.
- Toothpick or thin brush transfer a portion of white gel to a drop purple and mix.
- To the next drop of purple transfer two portions of white and mix.
- As the concentration of white color increases, we get several dots with a gradual decrease in violet pigment - these are kind of blanks.

- After that, one by one transfer the color to the nail.
- Lightly blend the transition in color with the applicator.
- Finishing your nails. Let's dry it. Remove the sticky layer.
- Lubricate the marigolds aromatic oil and are proud of our craftsmanship.

Video tutorial on how to make a gradient on your nails with gel polish and a brush
The video shows a simple basic technique for working with gel polish and a brush (in some cases the brush can be replaced with a small sponge), as a result of which the author gets a great bright one-color gradient on your nails. The master explains what kind of brush should be used for shading gel polishes and demonstrates the correct positioning of the brush while working.
Spectacular, eye-catching design is ideal for summer manicure. Such lessons with videos will help even beginners in working with gel polish to be guaranteed to get the expected result - a gradient on the nails.
Combination of gradient on nails with other types of design solutions
- Gradient manicure, like a monochrome coating, can be match with any wardrobe.

- Main - choose the right colors and a palette to display on the nail.

- Ombre manicure in a palette of pastel shades suitable for office, for everyday wear and for everyone who simply loves a calm color and well-groomed hands.

- Bright colors are the lot of bright and daring experimenters and innovators in fashion. Pairs with any outfit and with incredible outfits taken from the catwalks, and just for those who doesn't want to be like others.

- Contrast gradient, which displays the transition between too contrasting colors - red and black, for example, also finds its active followers. To match the color of your wardrobe, this color combination can be quite appropriate at a party or for a romantic date.

- Color flow technique effective but simple. So it won’t be difficult to display it on a pedicure, and such an ensemble will look great and attractive.

Gradient manicure is one of the most popular manicure methods that can be easily done at home. It became popular a few years ago, but for several years now it has remained one of the leading trends in each season. For the most part, this is due to the fact that it looks beautiful not only when performed independently, but also together with additional design: painting, rhinestones, etc.
Some time ago I already wrote a short review on gradient manicure with photo tutorials on how to do it, but its information no longer covers all the methods and techniques for creating it, so I decided to create a separate large tutorial with a description 6 ways to perform a gradient manicure with step-by-step photos.
What is a gradient manicure?
Gradient manicure is the creation of smooth transitions from one color to another. It can consist of at least two colors, it is better to limit it to a maximum of four nail polishes, it will no longer look organic. The advantages of this manicure include the fact that it visually lengthens the nails, so it will look beautiful on short nails.
Gradient manicure can be found not only under this name. This is the same as an ombre, degraded manicure or stretching on nails. Therefore, further I will use them all.
What do you need to do?
 Gradient manicure on natural nails and on nail extensions or gel polish can be created in different ways and using different materials, so here I will look at the possibilities of performing a gradient manicure on natural nails.
The most popular way to create an ombre manicure is using a sponge. With the growing popularity of this type of manicure, special fine-grained sponges for gradient manicure of a convenient shape have even appeared on sale, which make it easier to create a transition between colors. However, a regular dishwashing sponge will do the job very well.
Before use, the sponge is cut into pieces convenient for use so that the working surface is comparable to the size of the nails. To prevent dust from interfering with contact with the varnish, it is better to wash the sponge first and dry it.
Methods for performing nail designs with a sponge
Using a sponge, a gradient manicure can be created using different techniques: working with varnish directly on the nails, on the sponge itself, or on another surface, such as foil or film. Let's consider each of them separately.
The first common step for everyone is nail treatment before design: removing the cuticle and giving the nails the same shape and length with a file. I also recommend applying a base coat to protect your nails from coloring pigments.
Next, you can apply white polish or the lightest one selected for the gradient to all nails. This will make the coating more dense, the natural nail platinum will not show through the gradient, but you need to wait until the varnish is completely dry. Do not apply a large number of layers of varnish, otherwise the manicure will turn out to be very bulky.
Method 1: ombre manicure using a sponge

- Apply the selected varnish to the sponge, alternately in strips, joint to joint. We wait a couple of seconds for them to absorb a little.
- We reprint the sponge onto the nail several times until the colors are noticeably smoothed out.
- The procedure is repeated several times until you think that the effect has been achieved. If bubbles appear, make the first two prints not on the nail, but, for example, on paper.
- Cover the finished design with topcoat or clear varnish.

Method 2: gradient manicure with a sponge on foil

- Here the varnishes are applied in strips, end to end, on foil (you can use film, glossy paper, etc.), and the joints can be mixed with an orange stick. Then it is transferred to the sponge by simply reprinting. The varnishes should not have time to dry.
- Next, the algorithm is similar: the varnishes are reprinted from the sponge onto the nails.
- The process is repeated until the desired gradient effect is achieved.
- We complete the design by covering the nails with a top coat.

Method 3: degrade manicure using a sponge on your nails

- In this method, there are also differences only at the first stage: the varnishes are applied joint to joint directly on the nail plate.
- Immediately, before the varnishes begin to dry, spread them with a sponge using the same light pat as in the first two methods. The sponge should not move along the nail, otherwise the transition line may shift.
- The first two steps are repeated until you think the effect has been achieved.
- The final step is to apply topcoat varnish.

When performing a gradient manicure with a sponge, difficulties often arise: the skin around the nails gets very dirty, the varnishes bubble, and the transition fails. There are some tricks to resolve them. To perform a gradient manicure as accurately and quickly as possible, I will share some secrets for creating it.
To prevent the skin around your nails from getting too dirty, you can use different ways to protect it:
- Place tape around your nails and remove it when the gradient is done. Then all the varnish that does not get on the nail will remain on the tape and will not stain the skin.
- Apply rich hand cream to the skin around the nails. This is exactly the method I use. After completing the design, it can be easily removed from the skin with a regular cotton swab along with the varnish imprinted on it. The main thing is that the cream does not get on the nails during application, since the varnish will not be able to imprint in this place. The cream should not be absorbed quickly, otherwise the varnish will not be easily removed.
- Use special products around the nails. With the popularization of gradient manicure, auxiliary materials appear to simplify its implementation. One of these is a product for applying to the skin around the nails, which is easily removed along with the printed varnish. The most popular products in this series that I know of are Kiesque Liquid Palisade and Skin DEFENDER. By the way, this product is also convenient to use for other designs where the skin may get dirty, for example, in water manicure.
As for complaints that bubbles appear on the nails when imprinted with a sponge, this problem is also solved:

If there is a problem with receiving a transition, then please note that:
- Perhaps the colors are not chosen very well, for example, they are too contrasting, and it is difficult to smooth them out. We will talk about the combination of colors in a gradient manicure below.
- Try making more layers of prints, waiting a little for the previous one to dry. This should help smooth the transition.
- Cover the final design with a clear finishing varnish: it gives a smooth gradient and evens out the surface.
- Use a colored base. To make the gradient clear and rich, apply one or two layers of white varnish or varnish of the lightest color chosen for the gradient. This way your nails will definitely not show through the gradient.
When performing a gradient manicure, it is worth considering that there will be a fairly large consumption of nail polishes, especially if the sponge is coarse-grained.
Other techniques
In addition to the sponge, there are other options for creating a gradient manicure at home.
Method 4: glitter stretching
This method of gradient manicure consists in the fact that on a single-color varnish coating, part of the nail is covered with sparkles, and there are more of them at the tip, and by the middle of the nail they disappear. To make such a transition, no additional materials are required, only two varnishes, one of which has glitter.

- We cover the nails with background varnish and wait for it to dry.
- Using varnish with glitter, we make a stretch: we draw a brush from the free edge to the middle, leaving more glitter at the edge, and in the middle there are almost none. Stretching can also be done in the opposite direction - from the cuticle to the center of the nail.
- We cover the design with topcoat.

It’s better to use small sparkles here, and it’s better to make the transition border uneven - it looks more organic, and it’s a bit difficult to arrange the sparkles in one row :)
Method 5: ombre using thermovarnishes
There is no step-by-step algorithm for performing a manicure, since it is enough to purchase a thermal varnish and simply cover your nails with it, as with regular varnish, and the thermal effect itself will do its job and create a gradient. However, there is a nuance here: the ombre transition effect will be noticeable, only if there are nails that have at least a small free edge, since it works due to the difference in temperature on the nail bed and without it. Read more about thermovarnishes.

Method 6: gradient manicure with acrylic paints
A gradient transition can be created and. To do this, you will need a brush (fan or other volumetric) and a set of colored acrylic paints.
- First, a light color is applied to the tip of the nail and distributed until it decreases.
- Then the second color is mixed with the first on the palette and distributed side by side, overlapping the first and forming an even transition.
- In the third step, the second color is applied independently and goes onto the common part in order to also harmoniously combine with it.
- If there are any flaws left, they can be improved with any of these colors, “stretching” it across the entire nail.
- Here you can make a drawing or cover it with top varnish.

Varnish colors and their combinations
The issue of choosing colors for a gradient manicure requires special attention. To learn how to combine them correctly, I recommend using the color wheel and standard combinations.
The smoothest transition will be created by analog colors - those that are located next to each other on the color wheel. The classic version of a gradient manicure implies that the cuticle will have a lighter color, although this is not a panacea.
Other color combination schemes shown in the picture will also look beautiful and organic:

Here you can see which colors will go together and which will not from the color wheel. You can use from two to six colors in this way, getting from two-color to six-color harmony. Most often, gradient manicure uses 2 or three colors. The figure on the right shows which colors can be combined in this way (funny, similar, intermediate), and which cannot (incompatible and complementary).
To select colors, you can also use special online services, for example. Of course, it will be difficult to choose varnishes in accordance with the colors defined on the circle, but it should help you find a beautiful combination.
Do not use very dark varnishes to create a gradient - this effect will be practically invisible on them. It is best to use highly pigmented, dense varnishes to create a gradient manicure - this will require fewer layers to achieve the desired effect.
Types of gradient manicure
The gradient manicure discussed above is its classic look, but there are other options to create a degraded effect on the nails.
Gradient manicure can be vertical: here the transition boundary between colors is not horizontal, but vertical - this is their only difference, since all the execution methods described above are applicable to creating such a vertical gradient. Here is an example of such a manicure, which is what we looked at in the third method:

Another manicure option with an ombre effect, when the transition between colors is created not on one nail, but between all nails, that is, each nail is painted a separate color, but together they create a beautiful gradient. Here it is important to choose varnishes with the same texture (ideally there should be 5 of them), which differ from each other by several tones, but all have the same base color (for example, 5 tones of beige - from light to brown). Bright and very different polishes will not create a gradient, but will be associated with tastelessly painted nails. This is how this type of ombre manicure on nails might look:

Gradient French manicure It can also be distinguished as a separate type of ombre manicure. Its difference is that white colors are used here, so it turns out that the free edge of the nail is painted white, as in, and closer to the cuticle the nail is almost transparent. This is a very subtle design, but it won't look good on short nails. The technique of performing a French gradient manicure differs from that described above only in that it uses one color. That is, first the nails are covered with transparent varnish, and then a gradient is made with a white accent on the free edge of the nail.
It looks like that's all that can be said about gradient manicure. I hope you will find answers to all your questions in this article. I was with you, subscribe to the blog newsletter and leave your comments if you have something to say. I'd love to hear your opinion!
If you found this page useful, please recommend it to your friends: