Antipyretics for children are prescribed by a pediatrician. But there are emergency situations for fever in which the child needs to be given medicine immediately. Then the parents take responsibility and use antipyretic drugs. What is allowed to be given to infants? How can you bring down the temperature in older children? What are the safest medicines?
Child development includes more than just physical formation.
Crafts for children 4 5 years old broaden their horizons, enrich their imagination and thinking.
At this age, they enthusiastically learn the world, interests and hobbies appear and form.
By this time, most children are attending kindergarten, where they are taught to make crafts from a variety of materials. Often, contests are held for the best work created at home, together with the parents.
 In addition to being interesting and educational, creating something new and unusual for a child is a real achievement.
His confidence in his own capabilities and strengths increases. Fine motor skills of the fingers develop, which is important.
Plus, interested children develop their thinking better, they can offer non-standard solutions to tasks. What can we say about limitless fantasy?
If you do not get hung up and always offer your child new textured elements, then in a playful way he will be able to study the properties of natural materials, paper, fabric, and will be able to understand the difference between them.
You can invite him to come up with a craft by providing several types of materials. It can be a twig, a few sheets of colored paper, chestnuts or cones - anything that can be found in the park for a walk or at home.
What can be used for crafts?
If you think about it and take a closer look, then every parent will understand that there is a huge amount of materials around that can be used for children's crafts. Most often these are the little things that are in every house or yard.
Craft materials:

- plasticine;
- felt;
- paper;
- plastic bottles, plates, cups;
- natural materials - leaves, cones, shells, stones, branches;
- solid bulk food - cereals, pasta, nuts, coffee beans.
- household items - buttons, cotton pads and sticks, clothespins.
You can come up with a huge number of applications and crafts not only from the above materials, but also from improvised things that can be found at home.
The main thing is that parents strive to maintain the child's interest in creative activity and take an active part in the process of creating a children's masterpiece.
DIY crafts with children 5 years old from plasticine
 Almost all kids love to sculpt from plasticine.
Due to the fact that the mass is pliable and soft, you can easily make whatever your heart desires from it.
Multi-colored plasticine sets will be a great gift for a little creative person.
In addition to the fact that it is easy and fun to make crafts from plasticine, there are also positive qualities in modeling that parents pursue:
- Attention to the smallest detail develops.
- Perseverance and hard work are instilled.
- Figurative thinking is being formed.
- Fine motor skills of the hands and fingers are sharpened.
In the store you can buy regular colored or granular plasticine. The latter differs in composition and consistency. If ordinary plasticine is a homogeneous mass, then granular consists of small polymer peas, interconnected by a viscous substance. It is easy to deform and dries quickly in air. An important fact is that when sculpting with such plasticine, a light finger massage is provided.
If parents do not know where to start working with a 4-5 year old child, then you can try to blindfold a few simple and basic elements first:

- sausage;
- balloons;
- cone;
- cylinder;
- rectangle;
- pancake;
- a drop;
- egg;
- ribbon.
Then, when the basic elements are mastered, you can begin to form from them, such complex shapes as:
- vegetables;
- cars or dolls;
- animals;
- flower meadows.
Origami
The process of making paper craft is very fun and exciting, especially for children aged 4-5. By creating an applique, the kid will be able to learn not only about the types of paper, but also about its properties.
Since paper is pliable and accessible, children get to know it almost in the first place. From the first years of life, they are intrigued by its rustling and rustling, they like to crumple it and tear it into small pieces. At an older age, when the child is already consciously deforming the paper, from small pieces or separate fragments, you can create real works of art.

Crocodiles made of paper
As a rule, at the age of 4-5 years, children have already mastered the skill of gluing and know how to handle scissors. Therefore, the use of paper in crafts can attract even more attention and interest the child for a long time.
Colored paper is most often used in children's crafts. But in addition to her, you can also offer the child:
- colored cardboard;
- white paper;
- napkins;
- wrapping paper.

Snail valentines
All this directly depends on the parents - on their personal imagination and desire to captivate the child, trying to diversify as much as possible the materials used to create the craft.
Engaging in creativity with the baby, parents not only introduce him to the beautiful and stimulate the development of non-standard thinking, but also become even closer to their child. After all, for every child, the closeness of parents and common interests are very important.
 If a child is only 2 years old, this does not mean that he will not be able to make something with his own hands. can be done with adults.
You will find options for DIY acorns.
Have you vacationed at the sea in the summer and brought seashells? So that they do not lie idle, you can make a craft out of them. You will find options for crafts from shells that can be made with children.
Crafts from bulk food
Among the numerous materials from which you can make something interesting, unusual and beautiful with your child, cereals and pasta take a separate place. Most often they are used when creating paintings, as they adhere perfectly to paper and look very unusual.
You can use cardboard as a starting material, paint an autumn landscape or still life on it with your child, and then give the child the opportunity to independently select the available cereals to paint the picture.

Simple crafts from cereals
The use of bulk products is not only interesting for the baby, but also useful.
- Fine motor skills of fingers develop.
- Massage is in progress.
- Parents can tell their child about a particular type of cereal, talk about its properties and benefits.
- Spatial thinking and imagination develops.
Such paintings can be taken to the kindergarten for the exhibition, take part in competitions with them, or you can decorate your home kitchen - the child will be very pleased.
Crafts from natural materials
From the first years of life, when a child is just starting to walk, he is interested in absolutely everything during a walk. Sticks and twigs, leaves, chestnuts and even stones - you want to touch everything, take a closer look.
At the age of 4-5 years, interest does not go anywhere, but only intensifies, since by this period, the child knows about the change of seasons and what happens to the leaves and grass, sees the bright colors of the autumn landscape and a huge variety of leaves.

Hedgehog made of leaves and cones
Using natural materials to create crafts is the easiest and cheapest option. All that is needed, the child, together with mom and dad, can collect for a walk in the park:
- chestnuts and nuts;
- colorful leaves;
- twigs;
- small stones;
- cones, seeds, dried flowers;
- bark of trees.
It is important that when collecting leaves, parents explain to the child from which tree he fell. Thus, even preparing for the creation of crafts will be useful and informative for a growing baby.
Crafts from plastic bottles, plates, cups
There are plastic bottles in every home. It is not necessary to throw them away - you can use them as a source material for creating crafts. Depending on the size and color of the bottle, you can come up with a lot of different options using other materials.
After a picnic in nature, you can save a few plastic cups and disposable plates - they will also come in handy. Thus, you can show the child that anything is used for creativity. The main thing is to have desire and imagination.
 From plastic materials, you can create various crafts with children 4-5 years old.
For example:
- animals and birds;
- rattles and musical instruments;
- little men and fairy-tale heroes;
- bird feeders, houses for domestic rodents;
- tunnels, garages, buildings;
- cars, trains and even ships.
Together with your child, you can give plastic products a new and bright life.
Crafts from buttons, cotton pads and sticks
Do you want to diversify applications and children's paintings? Then it is enough to simply add a few materials that have not been used before.
You can offer your child a lot of multi-colored buttons that differ in size and texture. The child will definitely find a use for them, for example, creating a panel, a hot stand, beads, etc.

Button applique
Often, when creating appliqués, cotton swabs and discs are used. It is especially convenient to work with them when creating a winter applique. Due to the pliability of the material, the disc can be cut or simply broken into small pieces that will imitate, for example, snow.
You can offer your child to sculpt a snowman, just not on the street from snow, but at home - from scrap materials... Even old children's tights or white socks, cotton wool from a home first aid kit and a few buttons can be used.
If you turn on imagination and correctly direct the child, then under parental guidance he will be able to create stunning toys and pictures.
Seasonal crafts
Each season has a different color. Winter is snow-white, summer is bright green, autumn is yellow-red, and spring plays with delicate colors of flowering trees. Depending on what time of year it is outside the window, you can collect several natural materials that will complement those already available.
It is necessary to do seasonal crafts with the child, since in the process of such activities, you can talk with him about the current time of the year, tell him how beautiful it is and what is its peculiarity.

Summer crafts
During the calendar year, the child must make at least one craft from each category:
- spring;
- autumn;
- winter;
- summer.
These can be applications made of paper and natural materials. You can create toys and figurines. In a word - whatever the child's heart desires.
Holiday crafts
How can you do without the holidays? And, as you know, it is customary to give gifts on holidays. For mom and dad, there will be no better gift than a craft created by your own child. Since there are enough holidays in the year, the baby will have a chance to please all relatives - parents, grandparents.
Depending on the upcoming holiday, you can invite your child to create a thematic craft:
- New Year's;
- By March 8;
- By February 23;
- Mother's Day;
- Family Day;
- Easter.
Of course, one should not forget about the upcoming birthdays of close relatives. Everyone will be pleased to receive a homemade gift from a baby. And how happy the child will be, seeing the admiration for his work.
In order for a baby to grow up inquisitive, skillful, creative and intelligent, you need to spend a lot of time with him. The main thing is that this time was not wasted. Accustoming to amateur performances plays a huge role in the process of personality formation.

Christmas trees
Therefore, parents should devote as much time as possible to their child, inviting him to tinker with a wide variety of things. You need to start with simple applications from colored paper and sculpting elementary figures from plasticine, ending with more complex volumetric models from a wide variety of materials.
Video on the topic
The idea of making a bouquet of flowers out of paper is very good. For paper crafts, we need to purchase colored paper, cardboard, felt-tip pens, a stationery knife, tape, scissors and PVA glue.
Bouquet of paper
First you need to make three blanks for each flower, two of which should be the same color, they should have six petals.

Place one blank in front of you, on top of which stick a circle.

On the mug, pre-make holes for the eyes and mouth in the form of a smiley.

After gluing the mug with a flower, you need to paint your eyes with a black felt-tip pen, and then bend the petals inward.

The next step is to cut out the stem, which we further attach to the flower, and on the other side of the flower, attach the same blank.
You can also make leaves for a bouquet, which can be made from green paper.

First you need to draw an oval and cut it out, and then use scissors to make notches.

In order for the individual pieces of paper craft to become a single whole, tie the flowers with a ribbon or some other fabric for decorating the bouquet.

Such a bouquet will never fade and will be a great decoration for your home.

Simple crafts from plastic bottles
The simplest crafts for children include crafts from bottles.

For example, you can make a piggy bank from a bottle, for which you only need a marker, a clerical knife, dice (4 pieces), a small bottle, glue and colored paper.

The first step is to cut a straight line, the width of which can be 5 centimeters, and the length of this line should be enough to grip the bottle.


Draw eyes with a marker, and draw nostrils on the bottle cap. Using a clerical knife, cut a hole for coins.

As legs for the pig, you need to attach the dice with glue.
Note!


This craft develops the child's imagination, and is also useful in everyday life.
Ball of threads
The craft can be used as a lampshade for a lamp or simply hung as a decoration.

A ball of threads is made very simply, for its manufacture you will need colored threads, a ball, transparent glue.

First, we need to inflate the balloon and tie the tip so that the air does not come out.

Then the inflated ball must be wrapped with threads, after which glue is applied to the surface of the ball and wait until it dries.

Note!

Now you need to separate the ball from the threads, to do this, just pierce it with a needle and everything is ready for the craft.

Plasticine gnome and cones
As a simple DIY craft, you can make a gnome. For crafts, you will directly need a pine cone, light-colored plasticine, pieces of fabric, glue and a brush.
First of all, the child should roll a ball out of a piece of plasticine, after which it is necessary to make indentations for the nose, eyes and mouth on the ball using a brush.


At the next stage of our craft, you need to attach the resulting head to the top of the cone.

Then the child should cut a triangle out of the fabric and glue it on the sides, as a result, a cone should be obtained. The cone will play the role of a cap for our character.
Note!


At the end, you need to make mittens from fabric, and then attach them to the cone using plasticine and our gnome from the cone is ready.
Paper bookmark
As a simple craft for kindergarten, a paper bookmark is perfect. For children to be able to make such a simple craft, they will need a pencil, a ruler, colored paper, scissors and glue.

To begin with, children should draw a square measuring 20 by 20 centimeters.

Then divide the resulting square into 4 identical parts using a pencil and a ruler, in the end there will be 4 squares measuring 5 by 5 centimeters.

The second step is to divide the upper right and lower left squares in such a way as to get triangles, that is, you need to draw a line diagonally from the upper corner to the lower corner.

We do not need triangles with the outer side and can be crossed out.

Then it is necessary to cut out a figure from paper without taking into account the crossed out triangles.

The upper triangle needs to be trimmed. If everything is done correctly, then the paper will be in the shape of a diamond, to which two triangles are glued.

The next step is to fold all the triangles in half, and then alternately put them on the tip of the rhombus. You should have a pocket that fits over the end of the book page.

To make the bookmark original, children can be advised to cut some kind of applique from colored paper.

Photo of simple crafts


Any interesting and beautiful paper craft is a cheap and very easy way to keep kids entertained for a while. In addition, such paper crafts perfectly develop the fine motor skills of children’s hands, teach them to act in stages, select colors and do something with their own hands.
All boys love cars and the more racing cars, cars, trucks and tractors each boy has, the better. Therefore, today we will show you how to make a racing car with your own hands, using cardboard, toilet paper rolls, as well as scissors and felt-tip pens.

The toilet paper sleeve can be pasted over with colored paper, or you can paint with felt-tip pens. Cut a hole about the middle between the two ends of the bushing, this will be the place for our rider.
Try to cut 4 circles out of cardboard, these will be wheels. Color them in with a black felt-tip pen. You can also cut and color the wheel circle for our racing car. Glue the wheels and steering wheel to the car, and you can put a little man inside. You can play with such a hand-made machine, and if you make a lot of cars, you can arrange fun competitions and other games.
How to make a paper machine with your own hands in 3 minutes
For girls
For girls 7-8 years old, you can make an interesting kind of craft out of paper - the crown of a real princess. Every girl wants to be a beautiful princess at least a little, so it is worth giving the baby that opportunity.

Small cardboard tubes are best suited for creating crowns; using toilet paper rolls should be fine for this purpose. In addition, craft crowns will need to be decorated with something. To do this, you can use paper of different colors, original beads and much more, everything is limited only by your imagination.
Crowns from toilet paper rolls should be carefully cut. You can use scissors to cut out the most common crown with pointed peaks, or you can cut a circle at the end of each peak, so the crown will look more interesting. These beautiful crafts will need to be painted in different colors and an elastic band should be attached to the base of each crown made of toilet paper rolls.
It is necessary to decorate such crafts with the forces of girls. For children aged 7-8 years, it is important to do everything on their own and with their own hands, so show the little ones general decoration schemes, help them, and they will do the rest themselves.
Modular origami crown assembly diagram
Paper flowers
The most beautiful and lightest paper flowers are made from corrugated paper. Such crafts will greatly delight children of 7-8 years old, since with the help of corrugated paper, glue, scissors, a stapler, colored paper and a satin ribbon, you can make a beautiful decoration for a room or a gift.

So that you can make a lot of beautiful flowers from colored corrugated paper, you can arrange a master class for several children 7-8 years old, so you show the children the templates for creating flowers with their own hands and you can make not one, but 3-4 crafts.
So, how to make beautiful voluminous flowers with your own hands using scissors and corrugated paper:
- Cut 12 circles of the same diameter from corrugated paper.
- Place each cut out circle on top of another and fold them like this in one pile.
- Use a cross-to-cross stapler to fix the middle.
- Now, using scissors, start making cuts along the edges of the circles, be sure to leave room for the middle.
- Cut a circle out of colored paper, which will be our middle.
- Now you can fluff the edges of the resulting flowers and attach a satin ribbon to the flower to hang it in the room or on the panel.
Postcard for grandmother and mom / DIY paper crafts
Master class with photo
Children get amazing and original crafts in the form of a mosaic applique from colored paper. It is quite possible to use corrugated paper of different colors for application.
Ask the children to draw on a blank piece of paper the outline of a fish, bunny or flower, which they will make in the form of a mosaic applique. Prepare strips of bright, possibly corrugated paper, which we will cut with scissors into squares for applique. Try to cut the squares correctly, only then the DIY applications will be neat and even.

For children, it will be better to choose a glue stick that can help to stick the appliques quickly and without problems. Begin glueing the appliqué squares, trying not to go beyond the outline. For children, this task will not be difficult to cope with, and the applications will be cute and neat.
Volumetric crafts
Very cute voluminous crafts are obtained if children of 7-8 years old are interested in the origami technique. For example, you can try to make a volumetric modular origami butterfly, it will be very simple and interesting. It can be folded even from corrugated colored paper, while the schemes will be very light and original:
- First, we make a module, for this we fold a piece of paper in half.
- Turn over and fold the leaf in half again.
- After that, we bend the corners to the middle.
- we turn the workpiece over and bend the small corners up, after which we bend its entire lower edge up.
- Bend it in half again and the module is ready.
To make a butterfly, you need to make a large number of modules that will form the body and wings of an origami butterfly. At the initial stage, you need to correctly form the body of the butterfly from the modules, if everything works out correctly, then wings will need to be attached to the extreme modules. In fact, it is not necessary to adhere to the exact assembly scheme, it is quite possible to fantasize and apply different original steps to make your origami unique and cutest.
Modular origami butterfly assembly diagram
Animals
Animals are the favorites of absolutely all children, so we will try to make animal applications using toilet paper sleeves. First you need to choose what kind of animal you will make. For example, you can choose a tiger, elephant or hippo.

You can print one of the paths on a leaf and cut it out with scissors. Children should be able to do everything with their own hands, so let them work with the templates completely on their own.
After cutting out the animals, bend them in the same way as shown in the picture. Be sure to bend the animal's head along the dotted lines, so it will rise and will be positioned in relation to the body correctly.
Under the body of the animal, after it is bent along the lines, you will need to start gluing the toilet paper sleeves. Using a toilet paper tube will help thicken the animal's body. This makes very original toys.

To make the toy heavier and not fall from the wind, you can print the image on cardboard, and the toilet paper tube will need to be filled with the same toilet paper. You can decorate the toy with a corrugated paper bow, which is easy to make from a rectangle folded like an accordion and tied with thread.
As you can see, a wide variety of applications and crafts made from bright, corrugated and even toilet paper will help you keep your child busy for a long time, and it will cost you mere pennies.
Any kind of creative activity develops the child's imagination, the perception of colors, textures and shapes, contributes to the formation of spatial and imaginative thinking in general. Thanks to the work with appliques, kids learn diligence, patience and perseverance. Application is the simplest and most accessible form of creativity for a child, because kids from 2 years old can glue cut-out figures onto cardboard.
Colored paper appliques
For most crafts you will need:
- Colored paper or cardboard
- Scissors
- Markers
For children under 3 years old
- Finger crafts
 For such a lamb or dandelion you will need:
- Pre-cut blanks of muzzle, eyes and legs or stems for dandelion.
- White non-toxic paint: watercolor or gouache.
Glue the blanks to the background, mark the borders - the circle of a flower or a lamb. First, you show what needs to be done, and then let the child himself dip his fingers in paint and leave prints on paper, without going beyond the drawn line.
- Crafts-stamps from pom-poms
Another type of crafts that even the smallest can do.

For the manufacture of such crafts are used:
- Pom-poms as stamps,
- Paints.
Craft Ideas: Christmas tree, Easter eggs, ice cream balls, clouds, tree crown, yellow chickens.
- Caterpillar made of circles
First, you will need to draw a line on paper - the basis of the future caterpillar, and then put the circles you cut out on this line. After that, remove them and show the child where to glue the mugs.
- Ice cream

For this ice cream you will need:
- Stationery sequins,
- Cosmetic cotton pads.
We cut out an ice cream cone from paper or cardboard, paint cotton sponges in yellow, blue and pink. The child's task is to stick the ice cream cone and "balls" on the paper. Sprinkle cotton pads on top with multi-colored sequins, which can be found in any stationery store.
- Rabbit from cotton pads and plasticine
 Materials:
- Plasticine,
- Spaghetti optional
- Cotton pads - 4 pcs.
You cut one disk in half - these will be the ears, and the second into 4 parts - these will be the rabbit's legs. Spaghetti is used as a mustache, but it can also be made from plasticine. Form balls from plasticine or you can ask your child to make them. Then the kid simply glues the details of the craft to the paper, and you make the antennae for the rabbit.
- Layered applications
 At the age of 2-3 years, children are especially fond of multi-layer applications.
Cut out the details, show them in what order they need to be glued, and entrust the child with the execution.
There is a second option for this craft - to print a stencil, cut out details from it and paint them with paints.
 For them you will need:
- Green felt-tip pen or marker,
- Cotton pads.
Cut two cotton discs in half - it will be snow, then cut out the snowdrop flowers from the discs and green sheets of paper. And the child is already gluing the details of the flower on the paper.
For children from 3 to 5 years old
These applications are already more complex, the child will need to cut out simple parts on their own and glue them on paper.
- Bunny

For him you need:
- Colored paper for background,
- Green for the grass
- Pink or red for the ears and nose.
The child cuts out the details according to the template, pastes them on the background and draws the mustache and bunny eyes with a felt-tip pen (if there are no blanks).
 To make ladybugs, we will use red and black paper or cardboard.
Cut out 4 circles from red paper and 1 oval from black paper. We cut the oval in half, glue its parts to the background, then glue one red circle, as shown in the image, - the ladybug itself, and on top of the fold we glue the second circle, which will be the wings. We do the same with the second insect, then draw points with black markers. The eyes can be made out of paper or drawn with a felt-tip pen.
What you need:
 Colored paper - dark blue or black for the background, red for apples, brown for the basket and green for the leaves.
Cut apples out of red paper. Cut the brown paper into 3 long strips and 2 a little shorter. Cut out leaves for apples from green paper. First, we glue two apples, then 2 short strips on the side - the edges of the basket. Then we glue two strips, one on top of the apples, the other on the bottom. We glue another apple. And the final touch is a strip from the basket in the middle.
 First, we cut out an oval, which will be the penguin. Then two black hearts - these are wings, one white, which will be the belly, two orange - paws and one pink as decoration.
Now let the kid simply glue the details onto the background step by step.
- Goose from cotton wool and seeds
 Goose materials:
- Cotton wool,
- Colored orange napkins or white napkins and orange paint,
- Pumpkin seeds.
First, draw the outline of the goose on paper.
We glue cotton wool along the contour, glue pumpkin seeds on the wing of the goose.
We tear the napkin into small pieces and make lumps out of them. We glue these lumps on the goose's beak and legs.
Draw eyes with a felt-tip pen or marker.
- Lamb made of paper
You can draw such a lamb yourself, cut out parts from cardboard and stick them on a stencil, or print a stencil and paint it. Using this method, you can make other animals - a rabbit, a cat, a dog or an elephant.

We draw the outline of a peacock on cardboard with a simple pencil, cut it out.
Cut out several circles from colored paper (how lush the tail will be depends on their number), cut each of them into 4 parts.
We make an accordion from one such part, repeat the same with the rest and glue them into a lush tail.
- Cactus

Necessary materials:
Paper: white for the background, green for the cactus and red for the flowers and thorns.
In order to make such a cactus, you need to cut out: 3 large circles are the largest part of the cactus, which is located at the bottom in the image, 12 circles are slightly smaller in diameter and 3 small circles are the upper part of the cactus. We glue one large circle from below, on both sides of it from above we glue two middle circles. From the right middle circle up to the left one more middle one “grows” and from it up to the right - the smallest one. When the base of the cactus is ready, on these circles we glue the rest of the corresponding size and bend them in half. We repeat this procedure a third time and bend the circles in the middle again. Cut small thorns from red paper and cut out flowers. We glue all the details on the cactus - and you're done!
- Apple tree
Cut out about 20 green stripes and 10 red stripes from green and red paper. Draw the outline of the tree on brown cardboard, cut it out and glue it onto the background. Glue the ends of the strips together to form a circle, and glue it on the "tree trunk".
- snowman
 The technique for making a snowman is similar to the previous one: we cut out several long strips from white paper, connect their ends - we get a circle. We connect several such circles together to form a sphere - this is the body of a snowman. We do the same with the head, but for this we use the strips a little shorter. We make a scarf from a red strip and wrap it around the snowman's neck. With a felt-tip pen, draw eyes, mouth and buttons. To make a carrot nose, cut out 1/4 of the circle as on a stencil and roll it into a cone. For the hat, cut out a circle and cut it like a sun.
- Bouquet of flowers using quilling technique
 At this age, children are already able to create more complex crafts, such as this bouquet.
Quilling is a technique for creating volumetric appliqués from curled strips of paper.
To create such an application you will need:
- 4 green strips of paper for the stems,
- 10 shorter ones for leaflets,
- 1 long pink for a bow,
- 5 strips of red, yellow and blue.
First, we glue the long strips-stems on the background, glue the bow on top. For shorter green stripes, glue the ends, squeeze the resulting circle a little to form an oval out of it - these are the leaves of flowers. We twist the yellow, red and blue stripes to get flower buds, and glue them to the craft.
- Rose from lace doily
 This craft looks very nice and is extremely easy to perform.
All you need to do is cut off the edge of the lace napkin and gently twist it into a flower, so that you get a rose.
- Rose made of colored paper
 Draw a spiral on red cardboard, cut a strip along the line and begin to twist it with your fingers until you get a bud.
A flower stem can be made from colored wire.
Cut the leaves out of green paper and stick to the stem. The rose is ready!
- Fish - chess board
 This applique is done without glue. To begin with, draw the outline of the fish on colored paper, cut it out. Bend the fish in half and start making cuts in the middle. They begin approximately after the head and end before the tail. Then we cut out strips of different colors and different lengths that form the fin.
A strip of the same color, for example, orange, we push in “waves” so that one part is above the incision, and the other is below it. Likewise with other stripes. The result should be a checkerboard pattern.
- Volumetric machine
 Another quite interesting appliqué, which is also very easy to implement.
All you need to do is print out the template, color in the typewriter, cut it out and make two notches on the protruding part at the end.
 This article contains 25 of the most interesting applications and diy paper craft templates for children. It's no secret that any form of creativity develops the baby's thinking. Paper crafts are a wonderful activity that develops perseverance and patience. In turn, working with scissors, glue, plasticine and cutting out parts of crafts develop fine motor skills of the hands.
These crafts are suitable for both home games and for kindergarten or classroom activities. The smallest children can make simple appliqués, which require several figures to be pasted onto paper. From 3-4 years old, when children begin to master scissors, they can already cut out simple objects from paper and glue them. Starting from school age, children are already able to make more complex crafts: for example, perform quilling applications or cut out small figures with a lot of details.
Perhaps the most enjoyable activity for children is making crafts. Children are happy to create something interesting and attractive. In this article, we decided to offer you wonderful crafts for children, which will be very easy to do with your own hands. We will offer you all the novelties in this area and we hope that your child will enjoy making with his own hands and getting unreal pleasure from this process.
New crafts for children. Bright ideas
Interesting crafts from disposable plates.
Fish.
To enlist a pleasant mood, you need to create something bright and at the same time unusual. Tropical fish are a great option for you. To create them, you must purchase paper plates. Of course, you will need bright colors to paint them. Describe them as you see fit. It can be some interesting stripes or fancy patterns. And when your bright colors dry on a plate, then glue the fins to your fish.


Aquarium.
Disposable plates are also suitable for setting up an aquarium. In this case, you already need a pair of plates that are connected to each other. Moreover, it is necessary to cut the bottom of one plate. Glue the underwater characters to the other plate. And for greater effect, use cellophane. It is worth saying that when creating the underwater world, your child should definitely use the shells that he collected on the beach in the summer.

New Year's wreath.
Are you actively preparing for the New Year? Then an ordinary paper plate will help you make a beautiful wreath for home decoration without unnecessary worries.

Dr. Aibolit.
It is very easy to make your favorite cartoon character - Doctor Aibolit from a paper plate. In addition to the paper plate, you should prepare the following materials:
- pink and white cardboard,
- marker and glue,
- wire glasses,
- buttons for the eyes.
Progress:
- Of course, you need to show your skills in creating such a craft. First, draw the character's head on a piece of pink cardboard and cut it out.
- We start working with a paper plate. It must be folded in half and cut. One part of the plate must also be cut in half.
- Mark the beard on these pieces. Also, don't forget the mustache. Cut out these details.
- We take a white sheet of cardboard and make a hat for our hero out of it.
- Then glue all the pieces to the pink cardboard. Draw a cross on the hat, and do not forget to attach the glasses to your craft.

Button appliques.
Buttons of various colors and sizes will help you create an original composition. There are a huge number of button applications. They are not difficult to create. First, choose something suitable for yourself, and only then pick up the buttons. Make your markings, be patient, and don't forget the glue. As a result, you will end up with a lot of interesting crafts.


New items of handicrafts from pumpkin seeds.
Crafts can be very diverse. But in this article you will only find new items. It is impossible to forget in this article that today there are many natural materials that are quite successfully used to create crafts. Pumpkin seeds help create the most interesting crafts. These can be any compositions or even interesting exhibits.
For example, if you use bright plasticine, you can create interesting flowers. Place them in the vase, and the vase itself in the most prominent place. The child will be very happy with such a product.

And you can also make an applique from pumpkin seeds - a goose.

Pumpkin seeds can help you make an original Christmas tree toy. You simply glue the pumpkin seeds to a Styrofoam ball. And in the end, decorate it with golden paint.

Pencil shavings for original crafts.
For their crafts, every child can use pencil shavings. It is worth noting that many interesting products can also be obtained from it. The chip handling technique is very simple. On the sheet, you simply depict a drawing, but you decorate it not with paints, but with beautiful and even shavings.
See what ideas for crafts we offer you.


Simple crafts for kindergarten made of paper and cardboard.
In our article, in addition to complex products, you can find crafts for kindergarten, which children will make with their own hands. Of course, kids like to work with paper and create something interesting out of it. For such children's crafts, be sure to choose bright cardboard and colorful colored paper. Check out all the best new cardboard and paper crafts for kindergarten.


A simple craft for the garden. A basket of a hare.
If you show a little imagination, you can create an interesting craft. Take for this purpose a cylinder and tape of pink and white color. Cut the ears out of the cardboard.

Cover them and the cylinder with tape. Attach the ears. Don't forget to draw the facial features of your hare.

Chicken with chickens.
Making this craft is very simple. To create it, you may need disposable cups, which you must glue with bright yellow paper. It is also worth attaching separate body parts to the chickens, such as the beak and eyes. Separately from sticks and cardboard, make legs for your craft.

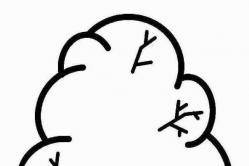
Hedgehog.
The next craft is also simple in its execution and absolutely all schoolchildren can make it. For crafts, you need ordinary plasticine and seeds. We make the base of a hedgehog from plasticine, and then we make needles from seeds.

Finally
As you can see, today there are a huge number of crafts, among which there are new items. In this article, we have collected only the best crafts for you. And if you do not know what to do with your child, then take note of our ideas and then your child will be carried away by an interesting activity and pleasant impressions.