Antipyretics for children are prescribed by a pediatrician. But there are emergency situations with fever when the child needs to be given medicine immediately. Then the parents take responsibility and use antipyretic drugs. What is allowed to be given to infants? How can you lower the temperature in older children? What medications are the safest?
Many masters (including our contemporaries) have improved the technique so much
folding flowers from different materials that the crafts they created look like real creations of living nature!On the website there is a separate category of materials dedicated to the production flowers made from satin ribbons using the kanzashi technique . Master classes and video lessons on making crafts using this technique found a wide response among our visitors. In continuation of this topic, we have posted here interesting photos and video lessons for those who like to create original flowers with your own hands from different types of fabrics. For example, from satin fabric you can make graceful rose petals , which are easy to fold into a large beautiful flower.
If you are planning to start making artificial flowers from fabric , then try to carefully examine the detailed structure of a flower, an individual petal, stem, sepal, leaf. Try to find distinctive features in the structure of different types of fresh flowers. Examine the petals especially carefully, paying attention to their shape, color, geometry of bends, and location relative to other petals. All these observations will definitely be useful to you in your work and over time you will learn make unique crafts with your own hands , not inferior in beauty to the masterpieces of experienced professionals.
Bright bouquets of artificial flowers often serve as the compositional center of the interior. Such bouquets can decorate a room for many years - after all, fabric flowers do not fade, unlike their living counterparts. Any craft in the form of a flower, skillfully made with your own hands from a piece of fabric or from a piece of satin ribbon, can liven up the atmosphere of even the most dull interior!
Before moving on to the paragraph with lessons for beginners and master classes, let me recommend materials and tools with which you can create beautiful flowers from fabric with your own hands.
Tools for forming the components of an artificial flower:
gurgles.
Using these tools (it is advisable to have several different rolls on hand, differing in size and shape of the working surface), you can quickly make a convex surface on a piece of starched fabric (for a petal, for example);
rings and hooks.
Very practical tools for forming neat bulges, crimping and curling the tips of flower petals and leaves;
cutter knives.
Using this tool, you can beautifully press through the veins of the elements of an artificial flower and make corrugation of the petals;
rectangular hard rubber pad.
An ideal basis for decorating a pattern with cutter knives on sheets of fabric,
corrugating the front side of the flower petal and for carefully making holes with a needle in the corollas;
pad made of foam rubber or soft rubber sponge, covered with a thick piece of fabric, is perfect for deeply corrugating the surface of leaves and petals of large flowers;
cotton fabric pillow with fine-grained sand will be needed for convex corrugation of the petals of flowers such as tulips, peonies and roses;
hole punch and awl.
For forming holes in the corollas of flowers made of satin fabric;
tweezers.
For crimping fabric and for gripping small parts;
round nose pliers and pliers.
For twisting and bending wire (frame for leaves or petals);
blotter paper.
For drying painted parts of an artificial flower;
cardboard, ruler, pencil.
To design a pattern for each element of the craft;
Materials for making artificial flower parts from fabric:
Satin, velvet, velor, brocade, panvelvet, kid, leather.
For making boutonnieres for the groom’s lapel, for decorating decorative bouquets in the interior;
Plain pieces of fabric (old clothes, curtains)
For decorating blankets, pillows, upholstery;
Batiste, satin, crepe de Chine, silk, calico, satin.
For making bridal bouquets, balloons with artificial flowers, decorative ornaments for hair clips.
Technique for making a flower from fabric:
√
first, cut out a flower element from a piece of fabric according to a template or pattern (the pattern is best made on a sheet of cardboard);
√
white fabric can be dyed with aniline dyes; a gradient can be made on colored fabric;
√
processing of individual flower elements. Petals and leaves made of fabric must be dried, covered with gelatin, corrugated, and given a convex shape;
√
assembling the flower elements together (thread and needle, PVA glue, wire).
2. INSTRUCTIONS FOR MAKING A SIMPLE FLOWER FROM COTTON FABRIC WITH YOUR OWN HANDS
Prepare unnecessary scraps of cotton fabric, PVA glue, and thin wire.
- fold a square cut out of fabric, fold it as shown in the photo, cut it;
Use a thin wire to twist the workpiece (as in the photo) to form a flower;
Cut a rectangular piece from green fabric, glue a piece of wire and glue another rectangular piece of fabric to form a flower leaf. Cut out the leaf with scissors after the glue has dried;
Take a piece of floral tape and wrap it around the flower and fabric leaves.

3. MASTER CLASSES ON MAKING ARTIFICIAL FLOWERS FROM DIFFERENT TYPES OF FABRICS
Master class No. 1:
HOW TO MAKE A VERY BEAUTIFUL CRAFT FROM FABRIC IN THE FORM OF A HYDRANGEA FLOWER WITH YOUR OWN HANDS. TO MANUFACTURE THIS AMAZING DECORATION, WE WILL NEED SOFT AND NOT VERY DENSE FABRIC (FOR EXAMPLE CHINTON), PAINTING PON, AND BEADS. STEP-BY-STEP MK WITH PHOTO.
Master class No. 2:
THIS CRAFT MADE FROM FABRICS CAN BECOME AN ELEGANT BROOCH FOR CLOTHES, A DECORATION FOR A HAIRPIN, AND A DECOR FOR CURTAINS OR CURTAINS. MAKING SUCH A FLOWER FROM FABRIC IS VERY SIMPLE! LOOK AT THE LESSON WITH PHOTOS OF ALL STEPS.
Master class No. 3:
HOW TO MAKE A BEAUTIFUL PEONY FROM nylon FABRIC. SUCH FLOWERS CAN DECORATE NOT ONLY A DECORATIVE TOPIARY, BUT ALSO A FASHIONABLE WOMEN'S HAT.
Master class No. 4:
LEARNING TO MAKE ELEGANT ROSES FROM SILK OR SATIN FABRICS WITH YOUR OWN HANDS. STEP-BY-STEP DESCRIPTION OF ALL STAGES OF WORKING WITH PHOTO.
Master class No. 5:
HOW TO MAKE ROSES.
Master class No. 6:
HOW TO QUICKLY MAKE A SIMPLE FLOWER FROM A PIECE OF FABRIC WITH YOUR OWN HANDS. STAGED MK WITH PHOTO.
Master class No. 7:
WHAT DYES TO CHOOSE AND HOW TO CORRECTLY DYE SUCH FABRICS FOR MAKING FLOWERS SUCH AS SATIN SILK, CHIFFON, CREPEDE CHINE, DUCHESES, SHANDUNG, VELVET.
Master class No. 8:
WE MAKE A MAGNIFICENT PEONY FROM LAMBISTE FABRIC WITH RHINESTONES AND BEADS FOR DECORATING HANDBAGS OR HAIR HEADS. LESSON WITH PHOTO.
Master class No. 9:
HOW RIGHT.
Master class No. 10:
HOW TO CUT CORRECTLY
Wedding celebrations, anniversaries, and children's parties are not held without decorations made from textile materials. Fabric flowers are a wonderful addition to bouquets of living plants, with which they decorate rooms, cars, and are also used as accessories.
Nowadays, salons are opening in which such accessories are created. It should be noted that their cost is high, so most beginning craftswomen learn this art of creating flowers from fabric with their own hands. For beginning needlewomen, there are a lot of instructions and recommendations in understanding this creativity.
Textile embellishments
Decorating with flowers is very popular in additional items of clothing, bags, jokes, and in creating stylish compositions. Experienced needlewomen use fabrics of different structures and colors, knitwear and yarn to make such jewelry.
Modeling compositions from silk ribbons, satin or denim is an interesting creative activity. From identical pieces of material various and exclusive things are obtained. Today, a large number of ways to create flowers have been invented, and each of them is completely unique. To start creative work you need a little time, trimmings of satin, chiffon, linen or organza, scissors and glue.
Mastering the art of creating flowers allows you to:
- elegantly wrap gifts;
- update interior items;
- make jewelry items yourself;
- serve festive tables;
- make presents;
- design albums, magazines.
Instructions for Beginners
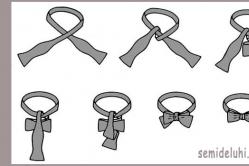
In order to make a simple flower out of fabric on a dress with your own hands, using two equal-sized ribbons of different colors, you need:
- Place the ribbons next to each other and bend a corner at one end.
- Twist the strip in a spiral.
- When the tape ends, glue its edge to the formed bud.
- Form the base of the flower, cut off four identical stripes of the same color and three of a different color, only shorter in length. Coat the ends with glue and bend them towards the middle. Place the resulting parts in a stack, on top of each other.
- Glue the bud to the center of the product.
Such a product can decorate the hair, neck, hand, and can be used as a decorative decoration for gift packaging.

An artificial organza flower looks unusual and elegant. After all, this material is very often used for sewing wedding dresses and veils.
Flowers made from fabric for decorating a bride's dress are combined with a festive outfit and complement it. Working with this type of fabric is easy and pleasant, and the available palette of shades will allow you to choose the desired and suitable colors.
To create an aerial masterpiece you will need:
- pieces of organza;
- threads, needle, scissors;
- wire or fishing line;
- beads;
- candle;
- paper for sketches, drawings.
 How to make a flower from fabric?
A step-by-step master class will help you understand the process:
- Preparation of patterns. Cut out drawn round geometric shapes of different diameters from paper. Templates can be made using glasses of different sizes or other objects of similar shape.
- Place the cut parts on the fabric. Using ready-made templates, cut out several round elements of each size from the prepared organza - you get blanks for the petals.
- Using a burning candle, melt the edges of the workpieces.
- It is recommended to start assembling with the lower petals, which are larger in size, then add the rest one by one. In the middle of the flower, glue a bead, seed beads, you can sew them on or string them on a fishing line. It turns out to be a beautiful flower - a peony.
- To create a rose, at the beginning of work, make shallow cuts in a round fabric blank. During the process of scorching with fire, carefully observe that the petals curl in one direction. In this case, the delicate rose will turn out beautiful and elegant.
Flowers and ribbons
Decorative embellishments made from ribbons of different fabrics look completely natural. This is a rose twisted from a single satin ribbon, realistic bouquets, textured buds, lace specimens with leaves.
If you understand the technique of twisting the simplest product - a rose from ribbon strips - in the future you can take on more complex creations. To get roses of different sizes, buds, open heads, you need to vary the dimensional features of the selected ribbon. The composition of the tape used is selected according to the creative wishes of the manufacturer.
To work, you need ribbon fabric of the selected color; the resulting large or medium bud will depend on the width and length. To get a small rose, it is enough to prepare a ribbon 2 cm wide. In addition, prepare the necessary tools, namely scissors, thread, needle and glue gun.
How to make flowers from fabric? Everything is ready, it's time to get to work:
- Make a rose from ribbon according to the previous rolling tutorial.
- Form the petals by bending the tape outward along the bias and wrap it around the center of the flower. Hold the workpiece from below; you can secure it with thread.
- Continue growing the petals according to the scheme: bend the ribbon, wrap the bud, and then continue exactly like this
- After a few turns, it is advisable to fix the rows at the base of the bud so that the tape does not unravel. The flower is placed between two fingers (index and thumb) so that the rose is located on the palm.
- As soon as the bud reaches the desired size, press the end of the tape to the base and secure with glue.

Experienced craftswomen fix the layers of fabric tape twice, at the beginning of work and at the end, and beginners are recommended to stitch or glue the petals.
Braid is great for making flowers that can be used to decorate rings, brooches or necklaces. The product made from this material turns out to be very elegant and intricate.
Japanese style in action
In the modern world, fashionistas began to use their toiletries decorated with flowers using the kanzashi technique. This is an old handicraft invented by the Japanese, and is still in great demand today. The most popular model of this style is a flower with different shapes of petals, round or pointed edges, for example, chamomile, rose, chrysanthemum and others. The girl's image becomes more feminine and eye-catching thanks to the decoration in the form of a delicate flower with bright colorful petals created from fabrics.
Connoisseurs of decorative art say that fabric products in the kanzashi style will never go out of fashion and will always bring charm and individuality to women.
 Before you begin the creative process itself, you need to remember a few important points:
- Choose the right fabric.
- Connecting flower parts.
- Slicing methods.
- Heat treatment of fabric.
The most suitable and convenient material to use would be a regular satin ribbon. It can be heat treated, easily cut with scissors, and holds the shape of the finished product well. This is the best option for beginner needlewomen. More experienced craftswomen can work with natural silks, nylon and other varieties.
When connecting individual parts of a flower, kanzashi prefer the process of stitching with a needle and thread. You can use glue, but the requirements for it are as follows: dry quickly, leave no marks, hold individual parts of the craft as a whole.
For even and accurate cutting, there is a convenient way to wrap the tape several times around a cardboard template, pull it off and cut it into several pieces at once. The edges are trimmed with sharp scissors. There is another simple way: bend the tape diagonally and cut it. Using the finished template, cut out the required number of blanks.
To melt pieces of fabric and give individual parts a shape, matches and a regular lighter are used. A wax candle will help beginners.

Japanese specialists glue the edges of textiles with rice adhesive, which leaves no marks, and does not use fire treatment.
The disadvantage of this method for inexperienced needlewomen is that such glue takes a long time to dry. If you use a candle to melt the tip of the strip, you need to trim it a few millimeters and then process it at the base of the flame.
Step-by-step instructions for creating an aster
To get a beautiful aster flower from fabric in the kanzashi style, you need to follow these steps:
- Prepare satin ribbon, scissors, candle, cardboard, tweezers and glue.
- Make a petal from a satin ribbon 5 cm wide, folding it several times and singeing the ends of the petal with a candle. You will need 20 pieces.
- Collect the flower from the middle, which will require 4 petals. Glue the parts together.
- For the second layer you will need 6 petals.
- Glue the petal of the third layer between the two petals of the second. The third row also has 6 petals.
- Glue the 4th row in the same way as the third.
- Make 12 more petals of a different larger shape and glue them to the main flower in the same way.
- In order to cover the wrong side of the product, cut out a small circle from thick cardboard, place it on a piece of fabric, wrap it inside the edge, and secure it with glue.
- Glue the flower to the base.
The graceful aster is ready; you can decorate any object with it. This simple tutorial is for a single color aster, but you can experiment with multiple colored cuts.
 An accessory consisting of a fabric flower is universal. With such decoration you can appear both at a magnificent celebration and in the office, at presentations and business receptions. The flower must be correctly selected, depending on color and size. Professional craftsmen who are fond of the “silk floristry” style use classical methods to create textile flowers.
Even if it’s raining outside, decorating in the form of an elegant fabric flower will help make this day bright and memorable. And if you make it yourself, then wearing it will become more desirable and enjoyable.
In a work environment, in the office, appropriate decorations are selected. If you wear a brooch to work with a bright and large item that attracts everyone's attention, this is inappropriate. At a fun friendly party, a strict and stylish accessory will not suit the frivolous image of a lady.
For a working business suit, floral brooches made of fabric that matches the set, such as tweed, are suitable. A formal, formal dress will be brightened up with a small, modest rose. If such a cold dress is complemented with a lush chrysanthemum, then in such an outfit you can go anywhere after work, for example, to a restaurant.
A small bright aster looks great with a white office blouse.
When choosing accessories while walking, you can relax and give free rein to your imagination. You can use products of any size that are bright and original. Poppies and orchids made from fabrics will be combined with this image.
 In summer, there are no restrictions in choosing bright jewelry; you can safely wear the most unusual jewelry.
When going for a walk, you don’t need to add sparkling items to your wardrobe that are more suitable for the evening.
A feminine, delicate image is emphasized by products made from airy and light materials.
In winter, the decoration palette becomes calm and pastel.
Autumn is characterized by a warm range of colors that will make the dull season brighter and more cheerful.
In addition to the festive outfit, elegant bouquets made of silk are suitable.
The option looks original when the textural properties of the flower are completely opposite to the structural fabric of the outfit.
A wonderful contrast will be obtained by combining sparkling accessories and the dullness of the festive toilet. Textiles have the excellent ability to transform a simple modest dress into an elegant festive outfit. You can try attaching a homemade flower to a work dress, and the image of its wearer will change radically.
Decorations for children
Children can create flowers from fabric with their own hands according to patterns using templates, of course with the help of adults. Every child looks forward to holidays, especially birthdays. Parents are more worried than the hero of the occasion, because they want to make this day unforgettable for their child.
You can start preparing for the holiday by decorating the birthday boy’s room. This is where knowledge on creating appliqués and crafts from different fabrics comes in handy. And the best thing is to make everything yourself, and the kids will be happy to do needlework with their parents.
Homemade crafts decorate chairs, festive tables, and other interior items. And your daughter’s new dress will become very elegant and sophisticated if you attach a beautiful tulle flower to it.
To make a delicate accessory, you need to take a few centimeters of satin ribbon, a piece of tulle, and sewing supplies. Fold the ribbon in half and sew it, prepare round elements from tulle, and connect them together, carefully pulling the thread, give the shape of a flower. Glue a bead to the center, and sew the finished copy to the dress.
Flowers decorate children's dresses and skirts, making them more festive. Handmade decorative items make our lives more joyful and bright, and the fact that they are made with our own hands adds uniqueness and soulfulness.
I
. Fabrics:
Silk, crepe de chine, poplin, satin, chiffon, lining, velvet, brocade, etc. synthetic and natural
II . Tools:
- Fabric scissors (large and small)
- Scissors for cardboard and paper.
- Small wire cutters (pliers, preferably duckbill pliers) for cutting wire, for bending and twisting wire
- Tweezers for gripping petals during dyeing, for crimping and assembly.
- Hook or knitting needle for curling petals.
- Awl.
- Preferably a set of tools (“bulks”).
8.Pads:
Hard rubber for corrugating leaves and petals, piercing holes (such rubber can be cut from an old car tire and at least 2 cm thick and 15 cm wide (square)
Soft rubber (you can use a porous sponge or thick foam rubber at least 4 cm thick) for squeezing out petals and deep corrugation
A sand pad 15x20 cm (wash the sand, dry it and put it in a bag) is used for convex corrugation of rose petals
Cover all pillows with cotton fabric covers (or simply cover them with fabric)
III . Tracing paper, cardboard for making and making patterns
IV . PVA glue (attention!!! The glue must be transparent after drying)
V .Brushes for painting petals.
VI .Dyes:
Aniline for fabrics of all types and colors (Batik is very good)
Food colorings
VII . Paper:
Corrugated in all colors
Cigarette paper
VIII
. Edible gelatin
better to use this one
X .Wire:
from 0.3mm to 2mm. It must be plastic (now often sold in handicraft stores for beadwork, in radio goods)
XI .Colorless varnish
XII . Semolina (tinted) yellow, orange, brown, red, green, gray...
Semolina color:
in 1 tbsp. semolina, add a grain of aniline dye (dry) of the desired color and pour in 0.5 teaspoon of alcohol (or cologne). Mix everything thoroughly. If you dilute liquid paints in alcohol and mix in semolina. Let dry (on paper). Grind so that there are no lumps. Store in small closed jars.
Treatment of fabric with gelatin:
Before gelatinizing the fabric, it must be ironed.
One tbsp. gelatin per 1 glass of water. Pour ½ cup of gelatin with water and let it swell for 40 minutes, then add another ½ cup of cold water and put on low heat, stirring continuously until the gelatin is completely dissolved and bubbles appear on the wall (but not bringing to a boil). Place the fabric on glass or a table with plastic and soak it in gelatin (moderately so that it does not drip). Impregnation is carried out with a hot gelatin solution removed from heat using a wide brush. Cooled gelatin reheat. The fabric must be soaked through. It is better to dry on a line, on safety pins and make sure that it does not curl up.
After drying, iron (without steam).
.
Treatment of velvet and panvelvet with gelatin .
Prepare a gelatin solution for thick fabrics and cool to a thick jelly. Before processing, steam all pieces of velvet with the lint facing up and stretch it onto a frame or hoop. Quickly gelatinize the reverse side and remove excess. Gelatin should not bleed through from the front side of the velvet.
The gelatinized fabric should rustle like paper. But if you have gelatinized the fabric, you need to wash it and gelatinize it again.
This is a “bulka” tool with which petals are processed.
The tool is heated and the corolla or leaf is processed.
Making patterns:
The petals of the corolla and leaves can be made by disassembling (any) living flower, transferring it to tracing paper, and then transferring the outline to cardboard - making a template (pattern)
We transfer the contours of the template (details) onto the already prepared fabric, trace it with a simple pencil and carefully cut it out (be sure to cut off the pencil line)
ALL LEAVES AND PETALS ARE CROSSED STRICTLY ON THE BIAS THREAD (i.e., the center of the petal and the middle of the leaf lie along the bias thread of the fabric).
Master class on making a fantasy MAKA.
This flower version is made without " bulek" (cold corrugation) Only with the help of hands.
Patterns of fantasy POPPY petals and cores (without teeth, the velvet poppy in MK is presented from satin)
Making a bead core:
We string beads onto a wire and form a center of the required size, leaving the ends of the wire free, onto which we then screw the stamens and secure them with a thread, tightly wrapping them around. We make the stamens from wire or gelatinized thick thread (you can use fishing line).
It is made from threads like this: On a flat strip of cardboard (or on a finger, or on two pencils), gelatinized threads are wound in the amount of stamens needed. Then the threads are removed from the cardboard (hand), tied in the middle and cut on both sides to the required length. You can cut the threads directly on the cardboard. To make pollen, the ends of the stamens are dipped 0.5 mm in PVA glue, then dipped in semolina, white or tinted (microbeads can be used).
We form any core you like (beads, threads, lurex, beads, feathers, etc.)
In this MK, for clarity, I use thick fabric. But it’s better to make poppies from thin fabrics, then they will be light and airy.
This photo shows a version of the middle of a velvet poppy (see pattern). We cut the part along the dotted line and wrap each petal with scissors (stretching it out), in a checkerboard pattern... face - wrong side.
We tie the curved petals to the core (whatever you can think of) in a checkerboard pattern.
This is what the middle of a velvet poppy looks like.
Organza fabric (you can use gauze) is used to corrugate the petal of the corolla. Corrugation is done by hand, take a piece of fabric 25 x 25, fold it along an oblique line and insert the petal bent in the middle (right side inward). With your left hand we press the petal to the table, and with your right hand we pull and twist the fabric. It is better to do all this on the edge of the table.
The result is crumpled fabric and corrugation.
And this is how the corrugated petal turns out. This is how you need to process all the petals of the corolla.
We take the petal with the front side facing us (if there are no “bullets”), process it with our hands, as shown in the photo, bend it (stretch it), we get such a convexity.
We process the edge of the petal with our hands: we stretch it with our fingers, while bending it in different directions (inward and outward).
The result is a petal like this (pink)
We process all the petals of the corolla in this way. The number of petals is usually 6 - 8 pieces
The processing of velvet poppy petals (from satin) is the same, only it is cut out according to a pattern without teeth (see photo of the pattern above).
Here is a photo of the front side, side view and back side (satin)
Flower assembly:
We take the finished core and, one by one, lay and tie all the petals at the base with threads of 5-7 mm (for strength, you can also glue them with PVA glue). The petals must be tied at the same level. Each petal should be placed on top of each other by approximately half a petal if there are 6 of them, and by 3/4 if there are 8 of them.
It turns out to be a flower that we attach to a hairpin (pin).
lilac poppy made of thick organza, fancy poppy made of kashibo 

Master class on making a fantasy flower
based on rose.
A variant of colors with minimal use of “bullets” or replacing them with a knife and spoon (something at hand).
In MK, for clarity, I use thick fabric so that it is better to see what and how...
Ideally use thin fabrics (silk)
Making a pattern
Production of litons:
Take corrugated paper, cut it 5mm wide, cut the tip of the paper at an angle of 45 degrees.
Place the wire parallel to the cut just below the tip of the paper, attach the end of the wire with PVA glue and bend the tip and glue it to the paper, then twist the wire with your right hand, and with your left hand pull the paper at an angle of 45 degrees to the wire (the sharper the angle, the thinner and neater the liton will be ) and twist to the end of the wire (you can periodically coat it with glue). At the end of the stem, secure the paper with glue. Keep your right hand at the top of the stem all the time without letting go. Tint the finished lithon in color and coat it all with glue.
Sheet processing:
The sheet is cut out using a template from gelatinized fabric.
We take the prepared lithon (the wire should not be thick and flexible), spread it with glue and glue it from the inside of the sheet in the center. It is advisable to tint the lithone in advance to match the tone.
Here I am showing an unpainted lithone for clarity, to make it clear.
We carry out the processing with a heated knife. We make the central vein with a double knife from the front side (holding the tip of the leaf).
Then we make lines on the leaf from the front side (single) at an angle of 30-45 degrees and cuts from the wrong side (in the spaces between the lines)
Here's what we get:
We make the core you like: beads, bugles, feathers, etc.
We process a small whisk (for pendants) with a hot “bulk” (a ball-object suitable in size) from the edge to the center (on rubber) from the inside out.Before processing, you need to moisten the petals a little (put them on a damp cloth for a few minutes) from the front side, from the edge to the center and in the center (the “bulks” can be replaced with a spoon or other object of suitable size)
If during the process of processing the “bulks” the edges have unraveled a little, they can be twisted again.
Flower assembly:
We put the petals on the core (be sure to glue them), in a checkerboard pattern.
And we form the following flower options:
The pendants are made like this: we string the processed small corollas with nalurex thread (in several folds). We make a knot at the end of the thread, put on a bead, then pierce the treated whisk in the center and stretch it to the bead. At the distance you need, we make the next knot, put on the bead, the whisk, and so on until the end.
We form a flower.
Such flowers can be made based on one pattern, just various additions and decorations. Here for clarity, I used thick fabric.
If you take thin artificial or natural fabric, you get light and beautiful decorations!
Of course, these roses are made using boules, but if you wish, you can do something similar with a knife and spoon
Silk was used for flowers, artificial silk, satin, green leaves, batik paints were used for interior roses;
for brooches natural silk, satin. and hand tinting with batik paints.


Plasticine cactus
For more details, see Tags - Plasticine cactus
There is nothing easier than making flowers from fabric. Such crafts can serve as independent decoration or as an addition to clothing, hats and interior elements. To make them you need very little: fabric, patience and desire. As a result, it will be possible to create truly unusual and beautiful products.
There is nothing easier than making flowers from fabric
Roses made using this simple method are difficult to distinguish from real ones. They look as natural and original as possible. Ready-made flowers can later be used as a part of more advanced crafts, used to decorate pillows, floor lamps, clothes, for example, hats or a baby cap. A voluminous large flower made of knitwear can decorate a headband, large flowers can become details of decorative panels. You can make patterns and diagrams yourself, or if you are a novice needlewoman, download them from the Internet.
What is necessary:
- scraps of fabric;
- scissors;
- hot glue.
Step-by-step instruction:
- Cut the fabric into strips about half a meter in length.
- Fold the strip in half and coat it with a little glue.
- Roll the workpiece into a roll.
- After the fabric bundle becomes dense, begin to form the first petals. Fold the strip so that it protrudes slightly upward and wrap around the center.
- Using this principle, form all the petals, periodically fixing them with glue.
- The tail that remains must be lowered to the base and secured there with glue.
Cut a circle from the remaining fabric and glue it to the bottom of the product.
Gallery: fabric flowers (25 photos)


Fabric flowers for beginners (video)
How to make flowers from fabric circles
This technique is best suited for beginners just learning this craft. In this way, you can make flowers from different materials, but fabric ones look the most impressive.
What is necessary:
- felt;
- threads;
- scissors;
- needle.

This technique is best suited for beginners just learning this craft.
How to make a flower:
- Cut out circles from felt.
- Sew the prepared parts together, twisting the petals as tightly as possible.
- Twist the last circle into a tube.
- Sew it in such a way that all stitches are covered.
DIY textile flowers
Materials such as fabric make original decorative products. Each flower is beautiful in its own way. Their production is simple and quick. It only takes about five minutes for the craft to be ready.
What is necessary:
- textile;
- needle;
- threads;
- scissors;
- beads;
- iron.

Each flower is beautiful in its own way
Progress:
- Cut the fabric into strips about thirty centimeters long and up to ten centimeters wide.
- Fold the workpiece in half lengthwise and iron it clearly along the fold line.
- At the bottom, baste the tape with fairly wide stitches.
- Gather the fabric into an accordion, carefully tightening the thread.
- Close the workpiece in a circle, making an additional couple of stitches and tying a knot.
Attach a bead in the center.
Artificial flowers made of gelatin fabric
Fabric treated with gelatin is ideal for handicrafts. It is from this material that simply perfect crafts are made. And work also brings a lot of positive emotions.
What is necessary:
- white chiffon;
- yellow and green fabric paints;
- gelatin;
- scissors;
- pliers;
- glue;
- wire;
- pencil;
- cardboard;
- gauze;
- newspapers;
- white corrugated paper;
- awl;
- beads.

Fabric treated with gelatin is ideal for handicrafts
Progress:
- Draw templates of future petals and leaves on cardboard.
- On another sheet, draw a circle, and in it there are five cloves, visually reminiscent of tongues of fiery flame.
- Cut out all templates.
- Dilute the gelatin in water and place the cloth in it, place in a water bath and leave for about five minutes. After this, remove from heat.
- Dilute the paints in a separate container and place the gelatin-treated fabric in them, immediately remove and place on newspaper, dry.
- Cut out all the necessary parts from the dried material.
- Fold the petals in half, and the prepared piece of gauze diagonally.
- Place a petal in the gauze, then hold this structure with one hand and with the other, move the gauze clockwise, twisting it a little.
- Repeat this manipulation with each of the petals.
- Pierce the backing with an awl in the central part and make a cross-shaped cut.
- Cut the corrugated paper into strips and wind it onto a wire.
- Bend the paper-wrapped wire at the tip into a loop and wrap the first petal around it.
- Coat the workpiece with glue.
- Attach all the petals to the stem one by one, twisting each of them slightly.
- Wrap the upper petals on a match to give the flower a neater appearance.
- Pull the gluing through the stem and secure it with glue.
- Glue the leaves a little back from the top.
Decorate the product with beads and straighten all the petals.
How to make petals from fabric
There are a huge number of ways to make flower petals from fabric. Having mastered one technique, mastering others will be quite easy.
The simplest of them comes down to the following actions:
- Cut circles of different sizes from a piece of fabric.
- Using a candle, melt the edges, causing them to become curved.
- Connect the petals together with glue or thread.

There are a huge number of ways to make flower petals from fabric.
To create more sophisticated colors, you can pre-treat the fabric with gelatin and find a suitable template. In this case, the petals need to not only be cut out, but also corrugated in any convenient way.
Another equally popular method is rolling the tape. In this case, the petals are formed by lifting and bending the strip at certain intervals.
Skilled needlewomen cut out each petal separately. In this case, the shape is given using wire or thread. Such flowers look the most natural, but the work requires some skill. It will be difficult for beginners to create such masterpieces, but if they want, everything is possible.
Making flowers to decorate a hat
The best decoration for a headdress is, of course, a flower. To make it you will need very little time and materials. A hat with such decor will become stylish and fashionable, and its owner will become perfect.
What is necessary:
- scraps of fabric;
- scissors;
- rhinestones;
- needle;
- threads
Progress:
- Cut circles of the required size from the fabric.
- Fold all but one into triangles.
- Sew the blanks to the remaining unfolded circle.
- Attach rhinestones in the central part, with the help of which all seams will be hidden.
- Attach the finished flower to the headdress with threads.
Tip: you can further decorate your headdress by attaching several small green feathers to the flower.
During the times of the Soviet Union and the general shortage, a lot of women sewed, knitted, and made things with their own hands. Now the situation has changed, a lot can be bought, but, fortunately, there are still needlewomen. Only now they sew and do something not because they can’t buy it, but in order to stand out. Moreover, this applies not only to clothes. For example, craftswomen make flowers from fabric with their own hands to decorate a handbag or gift, or even a wall in an original way.
Today we’ll try to figure out how difficult it is. In old Burda there was a master class on making flowers from organza or chiffon.
A simple master class
First, let's prepare everything you need:
- desire to make beauty;
- fabric that we like: artificial silk, organza, chiffon or any other, but always with synthetic fibers;
- threads;
- needles;
- pins;
- soap (or chalk) - for marking;
- candle and lighter;
- patience;
- scissors;
- thick paper and pencil;
- decorative elements - beads, sparkles.
So, the family is fed, watered, no one distracts us - we can start.
On paper we draw quinquefoils of different sizes or just individual petals. The form depends only on your own imagination.

We transfer the resulting blanks to the fabric. To do this, attach the templates with pins, outline them with chalk and carefully cut them out with scissors.

Then we process all the edges with fire, passing it smoothly over the candle flame. This creates a rounding effect.


When all the parts are ready, we begin assembly.
We take a thread and a needle, fasten it in the pad with the eye down, and then string our pieces one by one onto the sharp end. It’s like we’re putting together a pyramid or a Christmas tree. Starting from large five-leaf leaves to small petals. The more layers, the more magnificent the flowers will be.

You can and should alternate different colors and additionally decorate with beads or other elements.


You can decorate a dress, curtains, or, basically, anything with these flowers!

Fabrics for this master class must be artificial, because natural fabrics simply will not melt and hold their shape.
But this does not mean at all that our choice of fabric for making flowers is limited in any way. Although no. There is still a limitation. The flower must be suitable for its purpose. So, a satin rose will not look good on a leather bag, and a denim flower will not look good on a tulle curtain.
Denim flowers
But on a girl’s headband, a denim flower, as in the photo below, would be very appropriate, again, if the outfit is appropriate.
We cut out several squares (6-7) from old jeans. We fold a petal from each square. You can even sew it on a living thread, and immediately tie it with a long fishing line.

Using curly scissors, cut a circle from the same fabric, but about 2 centimeters larger than the resulting flower. If there are no curly ones, then, of course, regular ones will do.
Additionally, cut out a smaller circle from another fabric of a similar shade. Decorate with lace or braid.

We connect all the parts using a needle and thread and Moment glue. We use a bead for decoration.

We attach the resulting flower to the headband using glue and an additional piece of denim.