Antipyretics for children are prescribed by a pediatrician. But there are emergency situations with fever when the child needs to be given medicine immediately. Then the parents take responsibility and use antipyretic drugs.
What is allowed to be given to infants? How can you lower the temperature in older children? What medications are the safest?
How to make a ship out of paper? Every child and his parents were interested in this question. Now we will answer it in detail.
Who didn't let paper boats sail in spring streams? Overcoming many obstacles, they finally reach a huge puddle, where they can calmly drift under the guidance of a little captain. Is this a familiar picture?
But even today, not all children and adults know how to properly make a ship out of paper. There are several ways that allow you to quickly make any model from a regular sheet of paper.
The first option is the simplest

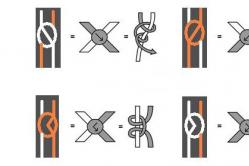
We will now tell you how to make a ship out of paper. You need to fold the sheet in half to form a rectangle, mentally find the middle of the fold and fold both edges to form a triangle. Next, you need to bend both lower edges of the rectangle up, each to its own side. Now bring the ends bent in this way together and tuck them into each other. You will get a rhombus. Raise its lower corner up. Turn the boat over to the other side and do the same. The result is a triangle. Its two sharp corners need to be raised up and folded in the center. And again in the hands of a paper diamond. By carefully pulling the edges of the figure, they should be moved apart and formed into a boat. Now all that remains is to add volume for stability and you can set sail.
Another variant

Then lift the tip up and bend the corner of the resulting small triangle down again. Now fold the entire figure lengthwise diagonally. Turn both bottom sides out and fold them inward. The result was not just a boat, but a real boat. All that remains is to paint the side and draw the windows.
The pinnacle of skill for a child is to make a boat with two sails. To do this, take a square sheet of paper and fold it in half twice. Then, the upper left corner and the lower right corner of the resulting square should be folded towards the center. Then fold the figure in half again. Mentally divide the resulting rectangle into two squares - left and right. On the left side, fold a triangle, bending the top towards the center, and on the right, bend the corner away from you and up. Fold the side wings down on both sides. In the resulting rhombus, fold the right triangle down and return it back up, but with a depth of 1 cm. Fold the bottom corner inward.
Having mastered the simplest techniques, you can build a ship from modules. Such a craft will not be allowed to sail, but it will be perfect as a gift for a friend.
In kindergartens and elementary grades, children enjoy making boats in the form of Many examples can be found in children's books and magazines. During classes, you can tell your child about different ones and invite him to choose from them. Thus, over time you will get a whole collection of applications.
How to make a ship from paper and scrap materials?
But the most interesting type of home shipbuilding is making models from improvised materials - matchboxes, toilet paper rolls, walnut shells. Anything your imagination suggests will do here. To make the simplest boat you will need three matchboxes, a cocktail tube, colored paper, glue, a sheet of cardboard and markers. The skeleton of the ship needs to be formed from three boxes - two glued together, and the third glued on top of them.
While they are drying, you can cut out the food from colored paper - a strip whose width is equal in height to the first two glued boxes. The third box should rise above it in the form of a captain's bridge. When cutting out a strip, you need to remember that it should be several centimeters longer, since it will also have to be used to form the bow of the ship. Having glued the boxes and made the nose, the workpiece should be turned over and the bottom made of thick cardboard should be glued.
Now you can start making sails. To do this, you should put two paper sails, previously painted with felt-tip pens, on the cocktail tube. They can be either the same or different sizes. Glue a flag on top and secure the finished structure in the upper matchbox.

Such activities with the baby will bring pleasure to every parent. After all, many of us, at least mentally, return to our childhood, when we easily ran barefoot through summer puddles and launched boats, hoping that at least some of them would sail all the way to the sea.
Conclusion
Now you know how to properly make a ship out of paper. We offered several options. Although every day more and more new ones are appearing from paper. Therefore, practice, improve your skill.
Today I’ll tell you how to make a paper boat with your own hands. Making paper boats is fun for both children and adults. With the arrival of spring, children quickly run outside to launch their ships, made with small hands from materials found at home, along streams or puddles. The simplest and most affordable option is a paper boat. Every child has a question about this: how to make a paper boat yourself. There are several best ways to model paper ships. All paper crafts can be made from. To make the boat float on the water longer, it is better to make them from coated magazine paper.
Method 1. A simple paper boat. Step-by-step production.
To solve the problem of how to make a paper boat according to step-by-step instructions, you need to follow these steps:
Step 1. Take a landscape sheet, most often it is in A4 format. This material is denser than regular paper, so the product will have a rigid shape and beautiful appearance. We bend this sheet in the middle along the narrow side.
Step 2. Fold the resulting workpiece again along the short side. And then we turn it back.
Step 3. We connect the corners at the fold of the folded sheet together.
Step 4. Bend the rectangle upward at the bent corners.
Step 5. Turn the workpiece on the other side and bend another rectangle. We bend the corners of the folded strips on both sides to form a triangle.
Step 7. Bend one of the separate corners up. We perform similar actions with the other angle to form a triangle.
Step 8. Open the bottom again and connect the opposite corners. Now you need to pull the corners at the top of the triangle to open the boat. To do this, one hand takes one bent end, the other takes the second.
Step 9. For stability, you can slightly expand the base of the paper boat. And now the amazing paper ship is ready!
Step 2. We bend the corners of the square again towards the middle to get another square. We turn the workpiece again and bend the corners to the center again.
Step 3. Turn the square over one more time and perform similar actions with the corners.
Step 4. Turning the paper ship over one last time, straighten the two opposite corners until you get a rectangle. The result will be a kind of ship's pipes.

Step 5. We take the workpiece by the remaining corners and unfold the boat, while the pipes are connected.
A steamer with two funnels is ready to set sail. A more detailed diagram of how to fold a paper boat can be seen in the video below.
Method 3. Making a boat from paper.
To answer a child’s question of how to make a paper boat with your own hands, you also need the best step-by-step instructions.
To work you will need a square sheet of paper. You can take a regular landscape piece of paper and make a square out of it. To do this, connect the top of the sheet to the left side, and cut off the remaining part. Here we follow the instructions:
1. Bend the square in half, connecting the top and bottom of the workpiece.
2. Now we bend the free edges of the workpiece towards the middle to make a rectangle like this.
3. Then we place the resulting figure in a vertical position and bend one edge. But we connect the corners of the long rectangle from both ends together.
4. Bends the future boat in half so that the connected corners are inside.

In kindergarten or primary school, every child learns to fold various figures out of paper. This knowledge can be taught by teachers, or other children, and, of course, the parents themselves. The ability to create different figures from paper develops attentiveness, diligence and perseverance in children.
For the rest of his life, a child remembers the figures that he made the very first - cranes, airplanes, frogs, tulips, etc. The art of creating various crafts from paper is also called such a popular word as origami.
The easiest thing is to make a boat out of paper. For this, it is best to use either a landscape sheet or an A4 sheet.
How to make a simple paper boat (steps):
1. Fold a sheet of paper in half lengthwise. Then fold it in half again and smooth out all the folds with your hand.
2. Bend the sheet back once - a clear strip should remain from the fold in the middle. Bend the upper corners of the sheet to this line so that you get a triangle with right angles. Make sure that the sides are folded evenly and that they overlap neatly with the fold of the sheet, without forming overlaps or gaps. After all, to make the boat stable, all the folds need to be neat.
Step 1-2
3. You are left with a strip of double paper at the bottom. It needs to be folded up, placing it on the triangle. Do this with each of the strips on one side and the other. The corners left protruding from the folded strips along the edges. They should be folded over the triangle. The end result should be a figure that looks like a cap.
 Step - 3
 4. Grab the bottom edges of this cap in the middle and pull them in different directions, opening the cap. The result should be a rhombus (a rectangle with equal sides) on one side the top is closed (blank), and on the other it is open and somewhat similar to an “envelope”. The corners of this envelope need to be folded to the top on both sides. Your cap has come out again, but now of a smaller size.
 Step - 4 (a)
  Step - 4 (b)
 5. Open the cap again. To do this, grab the edges of the formed diamond and pull them to the sides. Now our boat should be made from a rhombus. Gently straighten the core to make your boat more stable.
 Step - 5
 So you have made a simple paper boat. Then you can decorate it with drawings, draw funny eyes, and paint it in bright colors. As a flag, you can use a toothpick to which you attach a cut out flag using thread. Carefully insert the flag into the “core” of the boat. But just be careful not to accidentally tear the paper. You can also attach a small fabric or plastic anchor to the side of the boat using thread.
How to make a two-pipe boat?
 Two-pipe boat
 1. To make a two-pipe steamboat, you need to use a square-shaped sheet of paper. To do this, cut off an extra strip from a regular A4 sheet.
2. To mark the center of the square, fold the sheet in half diagonally. Now fold all four corners towards the center.
 Step - 2
 3. You should end up with a square that is half the size of the starting square.
So you have learned how to make a simple and two-tube paper boat!
Good luck making a paper boat.
Useful tips
Many of us have loved making paper boats since childhood and let them flow in streams. This fun is still popular among those who love to craft.
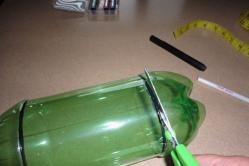
You can make a boat using plain paper or cardboard. But you can also try materials like tree branches, polystyrene foam, walnut shells and plastic bottles.
You can build several boats and launch them race. Whose boat floats the longest will win.
Let's look at several ship options, starting with two types paper boats.
How to make a boat (diagram)

You can prepare both a sheet for printing, and a landscape or notebook sheet.
Here's how to make a regular paper boat.

This is how you can make a sailboat/frigate

And this is another type of paper boat

How to make a paper boat
The diagram below shows how to make origami boat.
How to make a boat (photo)
Prepare a sheet of A4 paper.
1. Fold the sheet in half lengthwise.
2. Bend and straighten the sheet again to mark the fold locations in advance.
3. Fold the top corners towards the line.

4. Fold the bottom edges up halfway (this must be done on both the front and back sides).

5. Now bend the bottom corners 90 degrees to the top. Do this on both sides.

6. Also, on both sides you need to bend the bottom edges to the end.

7. Taking the folded piece by the center, begin to stretch it.

8. The bottom edge of the square needs to be folded up.

9. Again, grab the workpiece by the center and begin to stretch it.

10. The bottom edge needs to be folded.

11. Holding the workpiece by the tips of the corners, begin to stretch it.

That's all!
This is another type of boat, or rather a steamship with two pipes. This steamer is very easy to make - follow the photo instructions.

Prepare a sheet of A4 paper (or a simple landscape sheet) and scissors.
1. First you need to make a square from a rectangular sheet.

Fold the top corner of the sheet so that the top side is on the left side.
Fold and cut off the excess bottom of the sheet and unfold it.
Since one fold line is already there, it remains to make a second one. To do this, fold the sheet as shown in the image, i.e. connect opposite corners diagonally. Next, unfold the sheet.

2. Fold the corners towards the middle.


3. Turn the workpiece over and repeat the same thing, i.e. bend the corners again towards the center.

4. Turn the workpiece over again and repeat the same action a third time.

5. Turn the workpiece over one last time and straighten two opposite corners as shown in the picture. These corners should turn into rectangles, which will act as the pipes of your steamer.

6. All that remains is to take the product by the tips of the opposite corners and simply unfold it. The steamer's pipes must close together.
How to make a boat with your own hands

As was already said at the beginning of the article, boats can be made not only from paper. Here's what you can do if you use, for example, bottle caps.
Such a craft is not at all difficult to make. Simply glue three or more bottle caps together using superglue, add a toothpick mast and a sail.

If you wish, you can tie a string with a reel to your boat so that you do not lose it and can return it.
But what a cute boat you can make using walnut shells.

To make such a boat, you first need to carefully split the walnut into two even halves and clean it of the insides.
Light a candle and then drip paraffin into the shell.

While the paraffin is in liquid form in the shell, insert a toothpick to serve as the ship's mast.
Once the paraffin has hardened, you can decorate the ship. For example, add a paper flag or sail.
Here's how to make a boat from tree branches.


DIY paper boat made from candies
1. First you need to trim off the excess from a piece of foam to give the shape of the future ship.

2. For a good poop, glue on a few flat pieces.

3. So far the ship is not very level, which means we will correct the situation with the help of papier-mâché.
All children love to float boats on the water. If you don’t know how to make a paper boat for a child or want to make a paper boat with him, our article will help you with this.
We will look at the most interesting and simple options that can be made only with paper using the origami method, using diagrams and step-by-step instructions.
In order to make a simple paper boat with your own hands, you will need the minimum amount of available materials. Or rather, just paper. This can be either colored paper or a regular piece of paper from a school notebook.
Simple paper boat
Prepare a sheet of paper. It’s very good if it’s a sheet of A4 size - then the boat will turn out to be large, dense, and, of course, stable. This means that it will stay afloat for a long time and still defeat its opponent.
The steps for creating a paper boat are as follows::
Fold a sheet of paper prepared in advance in half. Place the folded side up and fold it in half again.
- Bend the upper corners at right angles towards the center.
- Fold all free edges of the sheet up on both sides.
- Carefully tuck all free corners inward. You will get a triangle.
- Bring the corners at the base of the shape together. This should create a square.
- Fold the bottom corners of the square on both sides so that you again form a triangle.
- Bring the corners at its base together - you get a square. Take it by the upper corners and gently pull it to the sides until the figure is completely revealed and the boat is formed.
- Smooth out the sides of the boat to give it maximum stability.
It’s better to figure out how to make this boat, a visual diagram will help you:

Congratulations, your simple paper boat is ready! If you wish, you can paint it with pencils, felt-tip pens and paints and even make additional applications on the walls. And small handmade masts, sails and flags, carefully placed on board, will certainly delight children and make the boat even better. Playing with such a paper friend is a pleasure!
For greater clarity, we invite you to watch a short video that shows in detail the process of creating a paper boat with your own hands
The process of creating a two-pipe boat is not as complicated as it might seem. You will again need a familiar sheet of paper and an additional tool - scissors.
So, in order to make a two-pipe boat, you will need:
- Fold the bottom left corner of the sheet of paper so that its top side lies completely on the right side. Cut off the resulting excess part. Having completely unfolded the sheet, you will see a square in front of you.
- Since there is already one fold line on it, it is necessary to make a second one intersecting with it. To do this, the square should be bent diagonally.
- Fold all four corners towards the center to form a small square.
- Turn the resulting figure over with the bent corners facing down. Next, repeat the third point - bend all corners towards the center.

- A square sheet of paper (it can be easily made from a rectangular one by folding one of the corners and cutting off the excess) needs to be folded along the central axis and diagonals in such a way as to obtain 16 small squares.
- Bend all four corners of the square towards the center, and then align the two edges of the workpiece with each other and with the center.
- Do a similar procedure with all corners. Turn the workpiece over and bend it in half diagonally.
- Connect the small triangles on the right side of the figure to each other. They will appear in the form of a sail.
Second way
This method is traditional for the Japanese. To implement it you will need:
- Take a square sheet of paper and bend it diagonally.
- Also carefully bend two corners along the center line.
- Next, you need to bend the bottom corner and align it with the top, thus forming a horizontal line.
- Also bend the two sides along the axial vertical line.
- Carefully bend the side with an obtuse angle and bend it at an angle of 90 degrees to the horizontal sheet.
- For greater persuasiveness, bend the vertical sheet slightly on the sides.
Japanese ship - the sailboat is ready!
Usually it is recommended to make a sailboat from colored paper, because it is much brighter and more beautiful this way. Don't forget to paint and decorate it as you wish, and also make several more similar products. After all, the more of them, the more interesting.

The process of creating a paper boat - a sailboat - is shown in the following video
Paper boat
The boat creation scheme is also simple and will only take a few minutes. All you need is patience, accuracy and attentiveness.
In order to create a paper boat, you need very little time and effort. Fold the A4 sheet in half, first lengthwise and then crosswise. Pay close attention that the closed edges should be on top.
The next step involves working with the corners - the top ones need to be folded towards the center line, and the top and bottom edges, which are currently open, need to be folded up.
Then you need to bend the triangle. Once you do this, you will have a square in front of you, the bottom corners of which are open. Now fold the front and back corners up.
From the resulting triangle, make a square again. Now slowly pull the ends of the upper corners of the square in different directions, and a real paper boat will appear in front of you.