Antipyretics for children are prescribed by a pediatrician. But there are emergency situations for fever when the child needs to be given medicine immediately. Then the parents take responsibility and use antipyretic drugs. What is allowed to give to infants? How can you bring down the temperature in older children? What medicines are the safest?
Educator:
Today we will talk about space and make an application from colored paper.
I suggest you become an astronomer. We will study outer space and observe comets and planets.
You have telescopes (a paper tube) on your table, take them and look into the distance. What do you see? (galaxy)
Guys, this is a galaxy - a cluster of millions of different stars and planets.
Who will tell me the name of our planet on which we live? (Land).
Educator: In the vast expanses of space, our planet Earth rotates.
She is one of the planets in the solar system.
The earth and other planets are shaped like a circle.
The solar system is a collection of planets and their satellites.
Revolving around a star - the sun. There are only 9 planets and they are all different
(Put down the telescopes we'll be looking at the planets).
Clusters of asteroids move between planets - boulders
1. Mercury is a small burning ball.
2. The planet Venus is the brightest point in the sky.
3. Earth is the third planet from the sun, it is a huge stone ball, most of the surface of which is covered with water.
Earth is the only planet in the solar system that has life. Our planet is in constant motion: it revolves around the sun.
4. Mars is called the red planet.
Since from the ground it is visible in red.
Educator: I'm tired, I want to play, and you?
Mobile game "Stargazer"
Teacher: Well, shall we continue? (children's answers)
Educator: We know that spaceships fly into space. And when the astronauts visited Mars and photographed it, people learned why this planet seems red. It turns out that the Martian soil is red-brown in color, the Martian sky is not blue, as above our planet, but dull pink due to numerous particles of reddish dust.
5. Jupiter is the largest planet
6. Saturn is easy to recognize by the rings, thanks to which this planet seems unusual and beautiful.
7. Blue Uranus, this planet is gas.
8. Neptune is also blue and also a gas planet.
9. Pluto is a small ball of greenish color.
Teacher: Do you like riddles? (children's answers)
Guess my riddle?
I walk in the sky at night
I dimly illuminate the earth
I'm bored, I'm bored alone
And my name is ……….moon.
The moon is a satellite of the Earth, it revolves around our planet and illuminates it at night.
Carpet is laid
scattered peas
No carpet to lift
Gather no peas………..(stars and sky)
Educator: Stars appear to us as little luminous lights. Because they are very far away.
In fact, a star is a giant ball of gas similar to the sun, which radiates heat and light.
A constellation is a pattern of stars that creates a shape.
There are 88 known constellations.
The first person who flew into space was Yu.A. Gagarin, a Soviet cosmonaut
On the ship "Vostok" He made one revolution around the Earth in 1 hour 48 minutes
Today, the study of outer space continues
For research, people are on the orbital station for a long time in space.
Living on an orbital station is not easy, so people have been preparing for flights for a long time.
The famous cosmonaut - artist Alexei Arkhipovich Leonov painted many pictures about space.
Educator: I will once again admire the night sky.
I'll take my spyglass and have a look.
You see stars of unusual beauty sparkling, a comet rushing, its tail spread across the sky.
What else did you see in the night sky?
Practical part
And now I propose to complete the application "Rockets, comets and planets."
For the lesson, we need squares, rectangles of colored paper of different colors, PVA glue, glue brushes, blue cardboard, scissors.
First, let's repeat the rules for using scissors.
Rules for safe work with scissors.
1. During work, put the scissors on the right with the rings towards you,
In order not to prick on their sharp ends. Blades of scissors in non-working condition must be closed.
2. Pass the scissors to the comrade with the rings forward with the blades closed.
3. When working with scissors, do not swing your arms, make sure that they do not fall to the floor. Do not put on the edge of the table.
Rules for safe work with glue.
1. Glue is a dangerous chemical. Care must be taken when working with it.
2. When working with glue, use a brush.
3. If the adhesive gets on the skin or eyes, rinse with water.
4. When finished, wash your hands and brush with soap thoroughly. with soap.
5. Take the amount of glue that is required to complete the work at this stage.
6. Remove excess glue with a napkin.
PHYSICAL MINUTE.
Get in the circle again
Let's play in the sun
We are cheerful rays, (Children raise their hands up)
We are frisky and hot. (They blow on their hands and hide them behind their backs)
One two three four.
Expand the circle wider. (They take four steps and clap their hands.)
Educator: Well done, well rested, but we need to continue our work, do you agree with me? (children's answers)
And so we have a dark sky background.
Educator: consider how you can make a rocket core out of paper.
The core consists of two, three circles, the tail is made of broken strips of multi-colored paper.
COMET
1. Cut out the head of the comet from a paper square, cutting off the corners.
2. We tear the paper into strips of various colors - the tail of the rocket, you can use foil and serpentine.
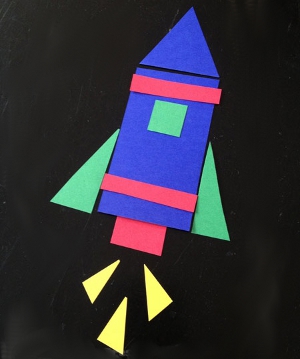
ROCKET
1. We take a rectangle of yellow or green color, this is the rocket body
And we stick it obliquely at an angle on the night sky, as if a rocket is flying into space.
2. We take a square and cut it diagonally into two triangles, one triangle is the nose of the rocket. Glue it to the top edge of the rocket body.
The second triangle is cut in half and glued to the rocket body
From two sides.
3. We simulate the fire that escapes from the rocket nozzle. Tear the paper into strips and pieces. Glue below the body.
4. We complete the design of the rocket by gluing the porthole into which the astronaut is looking.
We decorate the stars and planets with small circles.
The teacher hangs children's work on the board tightly to each other
It turns out the starry sky.
An application for Cosmonautics Day for kindergarten is a great opportunity to tell the kids about a huge breakthrough in the development of all mankind - the first flight of our, Soviet, man into the vast and unexplored space.
While the children are working on the application, the teacher can read them interesting passages from the biography of Yu. Gagarin, tell them about the process of preparing him for a rocket flight. Or you can arrange a thematic exhibition from applications and ask the children to prepare a short story about space on their own.

This option is appropriate if only the senior group created an application for Cosmonautics Day. The older group of kids already has the skills to prepare and deliver messages.
To create an application, we suggest using different materials - then it will be much more interesting for kids to work. So, you may find it useful:
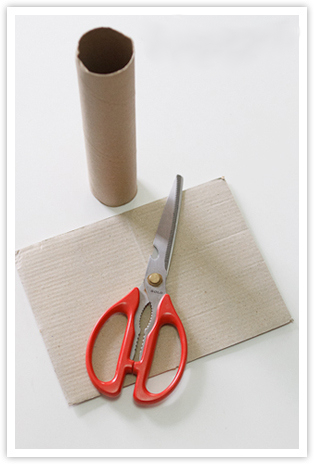
- cardboard (plain or coated, as well as golden foil);
- cylinders from disposable towels or toilet paper rolls;
- colored paper;
- semolina;
- stationery glue (PVA);
- scissors, pencils, stationery knife, ruler and other auxiliary tools.
Let's get started!
We take a sheet of black cardboard as the basis of our application.

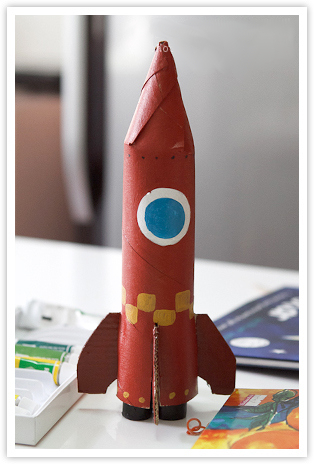
We arm ourselves with a clerical knife, take a cardboard roll in our hands.

We cut the roll into two halves - thus, one roll can be used to create two works.

From blue paper we cut out narrow triangles (about three pieces), bend them in half (along). You can immediately cut triangles from a bent sheet, then they will turn out smoother.

Glue the triangles to the base of the roll half.

We make the free part of the cardboard roll a little pointed.

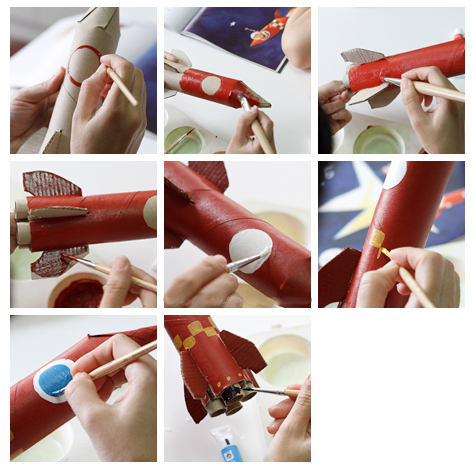
Glue the rocket onto a black cardboard sheet.

Cut out a petal from golden foil cardboard or foil. A petal of the same shape, but larger, cut out of red paper.

Glue the golden petal inside the red one.

Now we fix this composition at the base of our rocket - we get flames.

Cut out a ring from red paper, stick it on the front of the rocket.

We take a sheet of golden cardboard. You can replace foil, but cardboard is easier to work with.

Cut out the sun from this sheet.

Glue the sun to our picture.
From silver cardboard we make another planet - with a ring. Glue it on too.

Armed with semolina.

For convenience, scatter it on a flat surface (for example, a plate).

Lubricate the surface of our space with glue and sprinkle with semolina.

We got a wonderful landscape - a rocket, striving into the distance between the planets and placers of the Milky Way.

Application for Cosmonautics Day is ready! The preparatory group of the kindergarten can easily cope with this work, because they already know how to handle all materials and tools.
Watch how to make a wonderful application for Cosmonautics Day on the video:
Paper application "Rocket" for Cosmonautics Day (video)
Applications for Cosmonautics Day from plasticine and salt dough
Very beautiful applications for Cosmonautics Day can be made from plasticine and salt dough. For applications from plasticine, the background is also made from plasticine smeared with a thin layer.

We glue the application from salt dough onto a sheet of cardboard.

There are a lot of options for making rockets from salt dough!

The order of work: - we take black cardboard - with the help of white gouache and splashes from a toothbrush, we make a star background, cut it out according to the pattern of the part. It uses decorative cardboard and pages from magazines. Arrange as you like and stick the details. You can use double-sided tape of medium thickness, then your craft will be voluminous - with the help of threads (we used "Iris") we lay the trajectory of the missiles. It remains to choose a place for congratulatory inscriptions.

First we make the background. It can be plain, drawn, or in the form of an application. You can print your favorite space photo for the background on a color printer or cut out a suitable picture from an unnecessary magazine. On the background we paste planets, stars, rockets and so on. Before gluing, let the child lay out the details of the application and think about what to glue first.

Paper application - "Rocket in space" (performed on a sheet of dark blue or black cardboard).
Before cutting, it is necessary to paint the parts in the indicated colors.

"Rocket" (3D application).
You will need: black or blue cardboard, yellow paper, pencils, scissors, glue, colored strips.
What to do: cut out a detail from yellow paper (see step 1 in the picture). Color it, draw portholes, decorate with striped appliqué. At the bottom of the reverse side of the rocket, glue the "fire" - colored stripes. Glue the rocket to the blue cardboard by applying glue in two strips to the edges of the rocket and slightly shifting them towards each other - you will get a three-dimensional rocket!

Collective application for the Day of Cosmonautics "Let's fly".
You will need: photographs of children (you can simply print on a color printer), a sheet of colored cardboard (blue, cyan, purple) A1 size, colored paper, scissors, glue.
Invite the children to imagine that they are going to space. What would they see there? Stars, planets, comets. How would kids go into space? On a common rocket? Children cut out a rocket, stick it on the background, cut out their faces from photographs, stick them on the rocket, and circles cut out by adults from colored paper should be glued on top of the photos - these are portholes. Next, the children decorate the application with stars, images of the planets. You can use glitter and markers.
Summary: Cosmonautics Day. DIY crafts for Cosmonautics Day. Children's crafts on the theme of space
In recent years, many schools and kindergartens have begun to organize exhibitions of children's crafts on the theme of space on the eve of Cosmonautics Day. In this article we will tell you about what interesting crafts you can do with your children for this holiday. The most popular material used for crafts for Cosmonautics Day is the so-called. waste material: plastic bottles, cardboard boxes, cardboard rolls from toilet paper, parts from broken toys, etc. When making space crafts, it is also good to have a glue gun on hand.
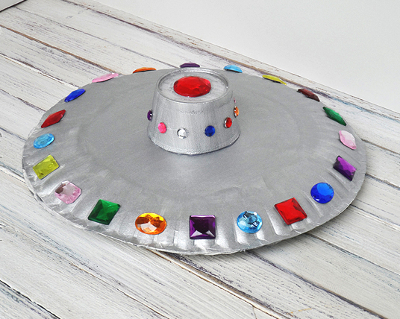
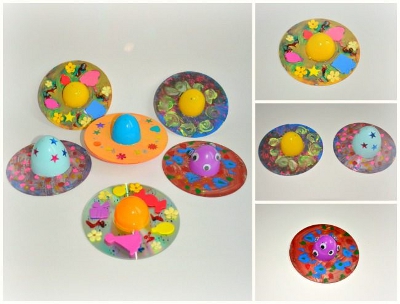
1. Crafts for the day of cosmonautics. Flying saucers
It is very easy to make a flying saucer from plastic or paper disposable saucers. Choose plates of different diameters and depths for this craft for Cosmonautics Day.
Ready flying saucer can be wrapped in foil
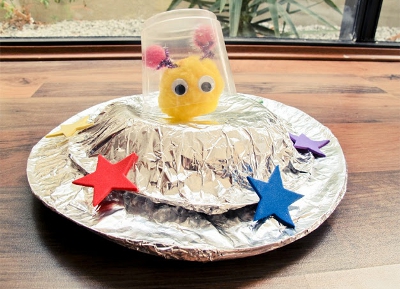
or paint with silver spray paint. Do not forget to make signal lights for the flying saucer, for example, from buttons or rhinestones.
You can also make a flying saucer from an unnecessary CD and half a kinder egg.
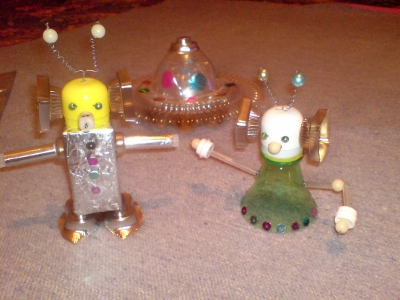
2. Do-it-yourself Cosmonautics Day. Starships, space stations
In this section, we will tell you about one interesting way to make DIY crafts for Cosmonautics Day. A beautiful starship or space station can be made from scrap material that you can easily find at home. Using a glue gun or double-sided tape, fasten all the details of the craft together. At the end, paint your Cosmonautics Day craft with silver spray paint. Additional details can be painted with acrylic paints.
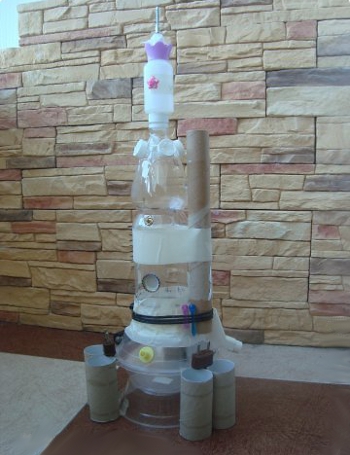
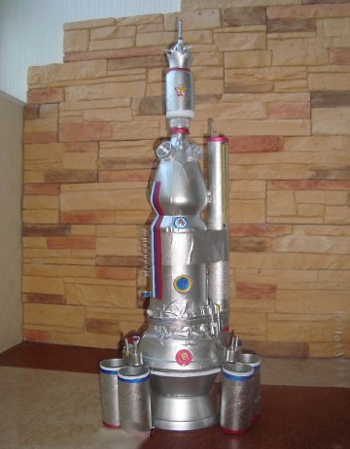
Here is another example of a similar craft for Cosmonautics Day. The body of the space station is made from an old aquarium filter, a wheel from a typewriter, a plastic bottle, leftovers from pens and all sorts of broken toys, the wings are a cut floppy disk. Everything is spray-painted. Link .

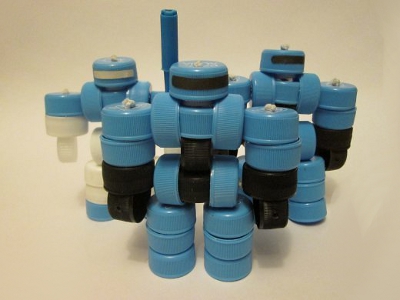
If your craft on the theme of space, made from junk material, has few small details, then at the end you can simply wrap it with foil. See what kind of lunar rover turned out from a plastic jar and bottle caps.

3. space crafts. How to make a rocket with your own hands
The easiest way is to make a rocket for Cosmonautics Day from a cardboard roll. In the photos below you will find a detailed master class on making this space craft with your own hands.
Make cuts on one side of the roll. Twist the strips in the form of a cone, glue them together.

From an additional piece of cardboard, make a stand for the rocket and engines.

Paint the rocket with paint. Space craft is ready!
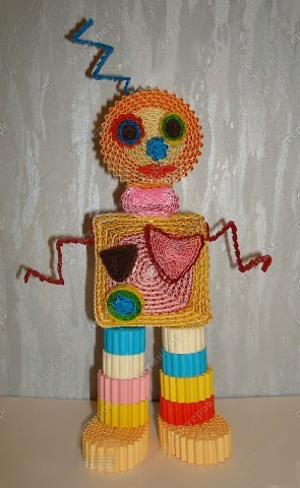
Corrugated cardboard robot. Link
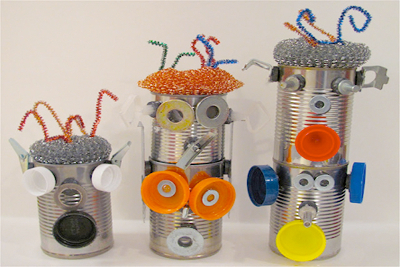
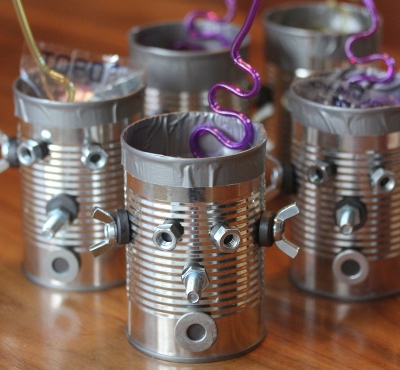
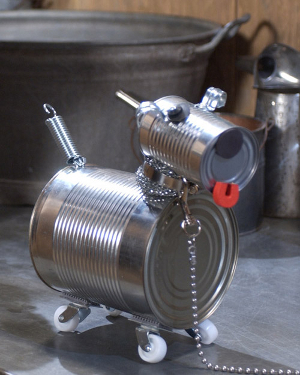
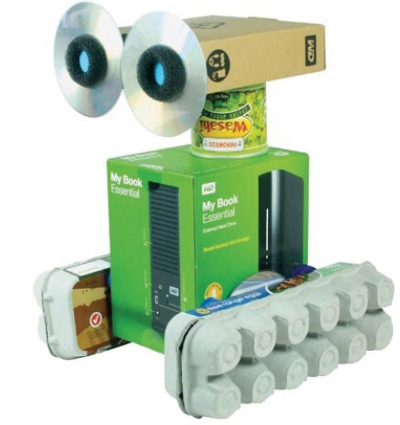
Canned robots

Robots made from cardboard boxes

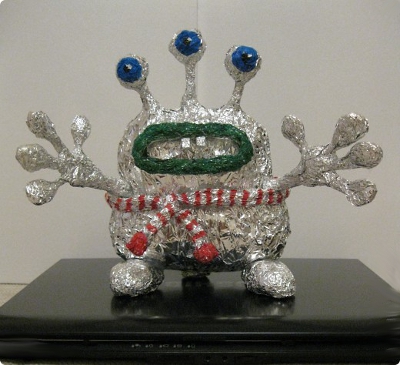
5. Children's crafts on the theme of space. aliens
You can make a humanoid out of newspapers and napkins by wrapping them on the outside with foil.
You can mold an alien from plasticine

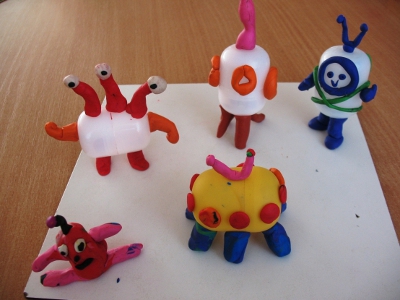
or made from waste material.
6. Crafts for the day of cosmonautics. Paper application on the theme of space
A simple craft for the day of cosmonautics for children is an application made of paper.
Geometric applique rocket
Origami paper rocket
Even kids in kindergarten can do how to interest a child in studying the planets of the solar system and what means to choose for this, read in our material with a selection of photographs of original crafts on the theme of space for children.
The topic of outer space is more popular than ever - unmanned launch vehicles are being successfully launched, new space technologies are being developed, and even new planets with possible life on them are being discovered. This is a great opportunity to start your baby's acquaintance with the cosmos and the mysteries of the universe. We have collected for you interesting space craft ideas for kindergarten so that the study of this difficult topic turns into an exciting game.
It is better to strengthen the child's acquaintance with space, where the baby learns in an accessible form what is happening "where the moon and stars are." Do not forget about - reading together will have a beneficial effect on the baby. Well, so that the child does not get bored with theory, offer interesting crafts and applications on the theme of space, which are easy to do both at home and in kindergarten.
Planets of the solar system: a hint for crafts on the theme of Space in kindergarten
To get started, invite your child to memorize the names of the planets in the solar system. Of course, this will not work out quickly for the baby, so please be patient. Tell him where each of the planets is located, who is closer to the Sun, and who is farthest from all, what else besides the planets is in space.
DIY crafts for children on the theme of Space
Invite your child to make planets out of paper - the lightest planets in the universe. The principle of this craft is similar to how to make, which we wrote about earlier. Everything you need, you can see there. This craft is also perfect for creativity lessons in the kindergarten.
.jpg)

Does your little one want to fly into space? Easy! Invite him to draw himself as an astronaut who explores the planets of the solar system. When the drawing is ready, have him paste his photo into the astronaut's helmet. So the kid went to space! Complete this with other details by cutting them out of colored paper.
.jpg)
Great for developing fine motor skills in toddlers. Crafts on the theme of space: stars, the moon and even planets - you can also decorate with buttons. Beautiful and useful for the baby!
Invite your child to make these and attach them to the windows. You and your baby will see how beautifully these crafts of planets or rockets will catch the rays of the sun and glow from it. Kids can easily repeat such crafts on the theme of space with their own hands, even in the kindergarten.

Little children operate with simple concepts, therefore, space for them at this age is associated primarily with the moon and stars. Creating with a child various crafts about space and stars can be accompanied by interesting stories from astronomy, of course, in a language accessible to the child. Stars on sticks decorated with beads and sequins, a star withribbons, month and star—interesting on the topic "Space", which will appeal to young astronomers.

If your little one really likes the theme with the stars, the constellations are also a great option. Preparing for such a craft is very simple: select a few constellations, redraw them with dots on cardboard sheets and make holes in place of the dots. The task of the baby is to connect all the dots with a string. The creation of such crafts is excellent for a child.

Drawings on the theme "Space" are the same DIY crafts, especially when it comes to. In addition, kids really like this type of creativity, because you can get your hands dirty and no one will scold you for it. Invite your child to draw planets or a rocket with their prints - the pleasures will be through the roof.

A craft about space in the form of a personal book that will always be with a child even in kindergarten is a good option to maintain his interest in the topic and repeat with the baby, for example, the names of the planets. And if you create one about space with your own hands together with a child, where he can paste planets, rockets and even his own photo in the form of an astronaut, the benefit will be double.

Craft about space, which you can also wear on yourself - yes, this is the dream of any child! Especially girls should like this craft in the form of a cute one. You will need string and beads of different sizes and colors, which at least slightly resemble the planets. If you don't have beads in the colors you want, just paint the ones you have. Such beads of your child will make a splash even in kindergarten, you'll see.

Probably every child who is fond of the topic of space dreams of flying there when he grows up. Pick up this theme and let the kid dream up, because kids love to imagine themselves as someone during the games. Invite him to make a rocket from toilet paper rolls for his flight and let him play with such a paper craft, imagining himself as an astronaut who flies to the moon.

Another craft idea on the theme of "Space", which will help the child with the stars and constellations. Download constellation charts, print and cut them out in a circle. Choose the patterns you want, make holes with a needle at the points of the constellations and stick them on different thick paper cupcake molds. Cover the working flashlight with one blank and secure with a thread. Now you can show the children different constellations in the evening, changing the blanks, through the included flashlight.

We hope that our selection of different ideas for crafts and applications on the theme of space, which you can do with your children with your own hands, will bring variety to the study of this interesting topic at home along with watching cartoons, and will also help the kid surprise everyone with his creativity in kindergarten.