Antipyretics for children are prescribed by a pediatrician. But there are emergency situations for fever when the child needs to be given medicine immediately. Then the parents take responsibility and use antipyretic drugs. What is allowed to give to infants? How can you bring down the temperature in older children? What medicines are the safest?
Learning the basics of sewing is not only useful, but also interesting. To achieve good results, you need to learn a lot. Learn how to sew a simple product according to all the rules. An apron pattern for a girl does not contain complex elements, and therefore it is best to start learning sewing art from her.

Bright, floral colors - cooking today will be fun!
Apron - types and features
By appointment, they are kitchen, school, special. Application, embroidery, facing, braid can be used as decoration. By type of cut, they are divided into:
- one-piece (the lower and upper parts are one piece);
- with a bib;
- on the belt.
For many nations, the apron is part of the national costume and is decorated with braid, embroidery, ribbons, and hemstitch. A variation of it is an apron, it does not have a bib and is a rectangle of fabric with a belt attached to it.
It is interesting. At first, only men wore them. Richly decorated with patterns, noble people put on, simpler aprons were intended for servants. Over time, this garment changed and even became part of the gymnasium uniform.

In Russia, as in all European countries, an apron is an important part of the national costume.
We sew an apron with our own hands step by step
Preparing a pattern for cutting is the application of constructive and shaped lines. On the drawing, you must indicate the amount of allowances, sign the middle of the apron, the fold line, indicate all the details and their number.

Everything is like mom's!

You can complement the outfit with a ladle cap

Pattern in patchwork technique
Taking measurements and building a drawing
Measurements are carried out on the figure of a person dressed in light, tight-fitting underwear. When taking measurements, you need to stand straight and without tension, with your arms down, while a thin belt is tied at the waist.

The correctness of the drawing depends on how correctly the measurements are taken.
Half-girth measurements, as well as distances between centers, are recorded in half size.
The main lines needed to build a pattern run along the waist and hips. Therefore, it is necessary to measure the half-circumference of the hips (HP) and the half-circumference of the waist (WOT). Additionally, you need to determine the height of the upper part of the bib (TG) and the length of the lower part of the apron (TN). TG is measured from the waist to the chest line. TH is measured from the waist to the knees.
A POT measure is needed to calculate the length of the belt, POB is needed to determine the width of the apron. The width of the bib is determined at chest level.
- Draw a vertical line on graph paper - this will be the middle line of the product and the fold line.
- Mark an arbitrary point T on this line (slightly above the middle of the sheet). Up from this point, set aside the distance TG, down from the point T, measure the distance TH.
- From points G, T and H to the right, draw horizontal center lines - the line of the chest, waist and bottom.
- Set aside the segment ГГ1 (it is equal to half the width of the bib).
- TT1=POB/2+6. From point T1, draw a vertical axis to the intersection with the bottom line. The intersection point will be H1.
- From point G1, lower the vertical axis to the intersection with the waist line, set aside 4-5 cm from the intersection point to the right and mark point T2.
- Draw a vertical line down from point T2 and mark the segment T2K=6 cm. Distance KK1=KK2=18 cm.
- Circle it with a thick line.
- To build straps, draw a rectangular strip 4 * 45 cm. The length of the belt is (POT * 2) + 30 cm, its width is 6 cm.

Cutting and preparation of parts for processing
On the drawing put down the part numbers, indicate the line of share and fold. The direction of the lobal should be parallel to the edge of the fabric. If the pattern has grooves, they are cut out. Since cotton and linen material shrink after washing, the fabric must be washed, dried and ironed through a damp iron. All these operations are called preparation for cutting.
Important. If the pattern consists of several elements, the direction of the pattern is also taken into account.

It is important to choose the right fabric
The allowances should be the same size, then when the sections of the cut parts are combined, the seam lines coincide. Allowances are marked using a centimeter tape and chalk. For the bottom of the product, an allowance of 4 cm is left, for the remaining sections - 1.5 cm. The details of the pattern are pierced with pins on the wrong side and cut out.
Tailoring and finishing
Fabric for home "workwear" should be durable, as it will have to be washed often. Linen, cotton and jeans are fine.
The amount of fabric needed is calculated based on the length of the product (equal to the length of the bottom and the length of the bib). Don't forget to add 4 cm for allowances.
All details are swept away, after which they must be tried on. If there are no defects, all the details are sewn on a sewing machine.
Children's apron - patterns for every taste
Building a blueprint seems too long and tedious? We offer three ideas on how to sew an apron easily and simply.

Patchwork
patchwork apron
- From colorful shreds you can create an unusual apron. Here you do not need a pattern for a children's apron; for sewing, you need to cut out multi-colored squares from the fabric.
- First you need to decide on the size of the components. From squares with a side of 10 cm, you can sew a large apron. Smaller flaps are suitable for a children's apron (or the same size, but then there will be fewer of them in each row).
- The product consists of 6 rows. First, the squares are sewn into stripes, and then the stripes into a whole canvas.
- There are 6 squares in the bottom three rows. In each higher row, the number of squares decreases, in the topmost row there are only 2 of them.
- When all the stripes are sewn, all that remains is to trim the product with braid and sew on the ties at the top and sides.

Towel apron
For sewing an apron, you can use a tea towel with a thematic pattern. If the base is sewn from a fabric of variegated colors, it is better to make pockets and trim in plain colors.
"Alterations" from old things
A men's shirt will make an excellent apron for the kitchen. Cut off the sleeves and back, process the cuts with a seam in the hem. Sew on a thin belt at waist level. Now you can go cook dinner!

You can sew it from an old dress or jeans.

The applique can be cut from scraps of fabric, or you can buy it ready-made in a store for sewing lovers.

Can be sewn from laminated cotton, in which case you do not have to waste time removing stubborn stains


Video: building an apron drawing - an open lesson in grade 5
Without an accurate pattern, it is impossible to sew a quality product. Build a base pattern according to your measurements, and you can model a variety of styles. And you can find a suitable version of the finished drawing and cut the product according to it. Now you can be stylish and fashionable even in your own kitchen!
The article contains patterns and photographs of aprons that you can sew with your own hands.
What material, fabric is better to sew, sew a home apron, apron: tips
An apron is exactly the “mandatory” thing that every housewife should have. It can be purchased at any store or sewn on your own (this will not only testify to your skill, but can also be the most practical thing, as it will be made taking into account all your features).
It is customary to keep several aprons in the house, for example, for each family member or in the case when one apron gets dirty and another one is needed “for safety net”. An apron (or “apron”) is needed not only for working in the kitchen, but also in those cases when you take care of the flowers in the garden, “dig through” old things, do the cleaning or even fix the car.
There are many styles of women's and men's aprons that perfectly protect clean clothes from dirt, dust, and wear. The apron can be attached to the waist or neck, covering the chest. If you have enough aprons, you can sew one to present as a gift to a loved one.
INTERESTING: In an apron you can not only feel comfortable, but also work with convenience, because it is equipped with many large and small pockets for placing improvised things.
When creating an apron, remember that it should be not only good, comfortable, but also beautiful. In order for a do-it-yourself apron to come out very “successful”, you should choose its style in advance, find patterns and purchase practical material.
The material for sewing an apron should be taken just the one that can “take over” all types of pollution and not stain the material of clean clothes. In addition, the apron gets dirty too quickly and very often, and then it is important that the material withstands frequent washing well.
What materials are best suited:
- Teflon fabric(capable of passing water, but not absorbing stains, the only drawback of this material is that it is relatively expensive).
- Linen(well absorbs and passes moisture, perfectly lends itself to repeated erasing).
- Cotton(lightweight fabric, which is practically not felt on the body, absorbs moisture well and is perfectly washable, withstands high water temperatures).
- Denim(a very unusual material, quite dense, but heavy and its weight is immediately felt on the body).
Other Tips:
- Fabric for an apron is best to choose a color. On such material, spots will not be so noticeable than on plain and light.
- Another option is to sew an apron from a dark fabric, for example, blue, black, purple.
- You can diversify such aprons with different color inserts.


 Loft-style home apron made of denim or linen


How to make a pattern for an apron, apron 46, 48, large size?
In fact, an apron is a dimensionless accessory, as it has neither fasteners nor buttons. In cases where the apron "turns out to be small", it should only be tied looser at the waist or lengthen the tape that holds the bib around the neck.
How to make a pattern and sew an apron:
- In order to sew an apron correctly and accurately, you will need paper, fabric, scissors and thread (or a sewing machine).
- First, draw a pattern on paper (it consists of two large squares, three ribbons and two pockets).
- You can cut out a pattern from paper such as whatman paper, wallpaper or a sheet of newspaper (large spread).
- After that, the pattern is superimposed on the fabric and the apron blank is cut out.
- Each edge is tucked and stitched, after which pockets and ribbons are sewn (on the neck and on both sides for tying on the back).
- The decorative finish of each apron is made to your liking.
Pattern:

How to quickly and step by step sew a simple apron, an apron without a bib for a fabric kitchen: sewing technology and instructions for beginners
Sewing an apron without a bib for the kitchen is very simple. To do this, you should use one large flap and one ribbon that would hold it and with which you could tie the apron at the waist. Such an apron must necessarily have several pockets for improvised items, and any decorative finish of the product, such as frills or ruffles, is done according to preferences.
IMPORTANT: This apron is easy to sew from starched cotton fabric.
Advice:
- Make a pattern from a sheet of paper, put it on the fabric, cut it out.
- The tape should be stitched from each side so that the fabric does not fray and the belt is tight and strong.
- You can sew two elements of the apron with your hands or with a sewing machine.
- The pockets are already sewn to the finished product and are best with a few stitches so that they can withstand even heavy loads.


How to sew the details of the apron, apron?
Advice:
- It is best to sew the details of the apron with a double line so that the product is durable.
- The skirt of the apron can be folded in a small fold and stitched so that it is fluffy and voluminous. This will add elegance to the product.
- The tape that holds the bib should be exactly the length that suits you, so take measurements in advance.
- The length of the belt on both sides is not so important, so you can make it with a margin. It is better to cut off a belt that is too long or tie it around the waist twice.
We sew aprons, aprons for the kitchen are simple: ideas, styles and patterns
You can choose exactly “your” version of a home apron by examining all possible ideas and patterns. Choose exactly the style that you think will be beautiful and practical. The fabric for the apron can be taken from old flaps, leftover clothing, or you can buy special material.
Apron patterns:


 Patterns of aprons of different types No. 7

We sew aprons, aprons for the kitchen ourselves with frills, ruffles: ideas, styles and patterns
Aprons sewn with frills, decorated with embroideries, lace, inserts from other materials, pockets and complemented by an unusual cut always look much more interesting and pleasant than a classic apron.
IMPORTANT: You can take ideas for sewing and get acquainted with the patterns of "interesting" aprons in this article.
Options:


We sew aprons, aprons for the kitchen ourselves with bibs: ideas, styles and patterns
Advantages of this apron:
- Fits well on the body
- Additional pockets can be sewn on the chest for storage.
- Covers most of the body, preventing clean clothes from getting dirty.
IMPORTANT: You can find options for beautiful, simple and unusual aprons with bibs in the photographs and sketches below.
Options:

 Patterns and models of aprons No. 1


We sew aprons, aprons for the kitchen themselves are stylish, beautiful: ideas, styles
The more interesting the apron is, the more attention it deserves, the more pleasant it is to wear, the more such manual work costs. Check out the ideas and styles of unusual, very stylish aprons for the kitchen.


We sew aprons, aprons for the kitchen ourselves with a heart: ideas, styles and patterns
Aprons with a heart are a fashion accessory for the kitchen that women love so much. The secret of the apron is that the bib in this case is cut out in advance with a heart and sheathed with frills.
Photo and pattern:
 Apron with a heart
 We sew aprons, aprons for the kitchen ourselves in large sizes: ideas, styles and patterns
To sew a large apron, you will need the appropriate pattern.


We sew aprons, aprons for the kitchen for men themselves: ideas, styles and patterns.
Even men need aprons in the kitchen. They can be in the form of an apron or one-piece, covering the chest.
Patterns and photos:


We sew aprons, aprons for the kitchen ourselves without a pattern: technology, ideas, styles
Even without a pattern, you can quickly make a practical apron for the kitchen or gardening with your own hands.
Options:


The best models and styles of kitchen aprons, do-it-yourself aprons for the kitchen: photo
Each needlewoman has her own view of things, creativity and work, and therefore there are many original aprons sewn by hand according to unusual patterns.
Video: "How to sew an apron with your own hands?"


Little princesses do not like to sit still), plasticine modeling, drawing with felt-tip pens and paints, playing with sand in the garden, eating chocolates or helping mom in the kitchen - all this leaves marks on blouses and dresses. In order to avoid spoiling a new clean thing, I suggest you sew a cute apron for the girl. At the same time, teach her to be neat and tidy ... I’m already a very big girl))), and I don’t have a single apron, I can’t stand them. Maybe if my mother had taught me to them at one time, I would have looked like a more domesticated housewife in the kitchen) Below you can view a photo of a sewing master class and find an apron pattern for a girl aged two to three years

A useful digression from the topic for everyone who uses taxi services in the direction of the Kuntsevo district. The Good Taxi company offers its services at the most reasonable prices, even students can afford it every day, because they do not count mileage here and do not deceive their customers. Polite drivers, safe and comfortable traffic, without violating traffic rules... you will arrive at the right address on time, in a good mood) Read all the details on the company's website dobroe-taxi.ru.
For sewing an apron, we need cotton fabric with a cheerful pattern. For work, you can use an old thing that has long gone out of fashion and takes up extra space in the closet.

Here is a pattern that you can reshoot right from here by printing it out on a printer and enlarging it so that the square is 10 cm on a side. Or you can draw tracing paper 50 by 40 cm into squares yourself


For sewing an apron, you can use two types of fabric, different colors

We bend the fabric, fold it together - there should be 4 parts in total (with a fold in the center - 2 parts)

The pattern is given with a seam allowance, so we cut it straight along the edge

Received two pieces of apron

Put them together with the right sides facing each other.

We pin with pins

Now cut out the strips for the frill

Sew together and twist

Ironing with a hot iron

Lay in folds


Sew the top of the apron and turn inside out

Sew on the frill


We sew straps 
That's all) We get a double-sided apron
Parents of children attending municipal kindergartens often receive tasks from educators: sew or knit clothes for dolls, paint the veranda, make various accessories for role-playing games, mental and physical development.
Let's say the teacher asked mom to sew a children's apron for an impromptu kitchen. But how to do it without special skills in needlework? It turns out that it's not all that difficult. You just need a little patience and have at least some working sewing machine.
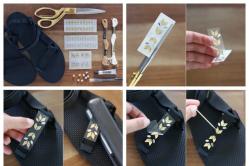
To create a children's apron with your own hands you will need:
- cotton material - 0.5 m;
- ribbon or braid for decoration - 1 m;
- thread, scissors, sewing machine.
We cut out the blank of the future apron on the material. In this example, it is for a boy. The dimensions (in mm) indicated in the photo are suitable for making a finished apron for a child 4-6 years old. You can adjust the dimensions of the pattern, and sew a product for a younger or older child. Do not forget to add allowances of 1-1.5 cm for filing. We sheathe the edges of the apron with a double hem, paying special attention to the corners.


We prepare three blanks in the form of wide ribbons. Two of them (8x30 cm in size) are designed for waist ties. The third blank (8x45 cm in size) is for the neck. We fold the "ribbons" along the length and iron them with an iron. We fold each half again along the inside with the wrong side. We sew by hand and then on a typewriter. We get blanks 2 cm wide. The one that is longer is sewn at the top of the apron, the other two are at the waist.


I will make a reservation right away that needlework is not my vocation. I rarely do this, and only if circumstances force me to. Now that's exactly what happened.
A children's apron was needed by our eldest girl in kindergarten for duty. It had to be submitted by November 5, 2013.
Several options ran through my head:
- At first I thought about buying this product. But, unfortunately, either they do not exist in nature, or I was looking in the wrong place. The result was sad - I did not buy an apron.
- Then I decided that the children's apron can be made to order. The idea for me was dubious. I didn’t know at all how much and what kind of fabric to buy, where to get the pattern and who to give it to. And most importantly, what will it cost me.
And when November 3 came, I decided to sew an apron myself from what I had at home. That is, make it without any financial investment and with your own hands (since I don’t have a sewing machine).
To make an apron, I needed:
1. Unnecessary, but beautiful fabric measuring 43x40 cm. For this, I used my favorite, but hopelessly damaged sundress, which for some reason I kept in the closet and put on periodically to assess the degree of corruption
2. Two strips of fabric 130 cm long and 4 cm wide. Of these, I made a border for the bottom of the apron + ties on the belt and neck

3. Pattern. This is probably where I should have started. A good pattern is 90% success. I honestly admit that I borrowed the pattern and simply drew it in accordance with the indicated dimensions.

4. Paper size 43x40 cm. Since I did not have such a sheet, I made half of the pattern. My sheet was 43x20 cm
Read also: Why do children need daytime sleep or how to put a child to sleep during the day?
5. Pencil or pen
6. Ruler or centimeter
7. Scissors
8. Needle and thread of the right color
9. 2-3 hours of free time
10. Good mood
So, let's begin…
1. pattern making
According to the dimensions indicated in the diagram, I drew half of the apron. Then I carefully cut out the pattern. On my sundress, I chose the most suitable area for the apron and circled the paper pattern everywhere, except for the junction of the halves on both sides. On the fabric, an image of an apron was obtained as in the diagram.

By the way, the pattern is perfect for my girl. Height is 110 cm. If the child is taller, it is better to add 3-5 cm in length. Also, these sizes are for rather petite fashionistas. This should also be taken into account when cutting.

If the apron is for a boy, then the pattern can be made even, that is, do not cut corners. So, by the way, it’s easier to sew on the edging.
2. Making two strips of fabric
Carefully looking for some ribbons lying around, I did not find anything suitable. I also cut out two strips of fabric from a sundress.
3. Product tailoring. Bottom edging
First, I decided to make the bottom edging of the apron. The main thing was to come up with so that all the seams were neat or they were not visible at all. To do this, I first folded the front side of the strip of fabric and the edge of the apron and sewed with a machine seam. Then I tucked the raw edge of the edging and sewed it with an invisible seam to the wrong side of the apron.