Antipyretics for children are prescribed by a pediatrician. But there are emergency situations with fever when the child needs to be given medicine immediately. Then the parents take responsibility and use antipyretic drugs. What is allowed to be given to infants? How can you lower the temperature in older children? What medications are the safest?
Shared
Manicure is an integral procedure in the life of every girl and woman, since well-groomed hands are the key to success and self-confidence. Some people prefer visiting a salon, but it is important to know how to do your own manicure. After all, you may find yourself in conditions where there is no professional technician nearby, and you urgently need to get your hands in order.
How to do a manicure on short nails at home: detailed instructions
Long nails are not only unfashionable, but also inconvenient: they cause many problems when performing ordinary actions, they catch, bend, and break. Therefore, now manicures for short nails are becoming more and more popular. Many professions require women to have a neat, short manicure. Another plus is the minimal likelihood of breaking a nail. Of course, judging by many surveys, men also prefer short nails because they look more natural and natural.
Manicure for short nails is easy to do yourself at home. To do this, you will need devices that everyone can find at home:
Once you are sure that you have all these items, you can begin the procedure itself. It is worth noting that all actions need to be performed only during the day, when there is sufficient lighting. If you have a good lamp, you can resort to its help in the dark. Thus, the possibility of missing any shortcomings, due to which the manicure will look sloppy and sloppy during the day, is eliminated. If there is insufficient lighting, you may simply not notice this, but then you will have to redo everything. That is why this factor should always be taken into account, because it is not without reason that in salons the masters always work under bright lamps.
Important! There are many different items among manicure tools. Often, both in sets and individually, you can find the so-called “fork”. This tool cannot be used as it is unprofessional and does not provide any benefit. Initially it was assumed that it would be possible to trim the cuticle, but it does not cope with the task. The “fork” scratches the surface of the nail plate in the hole area, and also damages the delicate skin of the upper ridge, which causes bleeding wounds to appear.
Regular nail polishes became less popular with the advent of shellac
These are the simple tips you need to know to ensure the best possible result.
How to make an original manicure using varnish and water
The “water manicure” that was popular a few years ago is coming back into fashion. It’s not difficult to make, but the result will exceed all your expectations. No one will have exactly the same pattern, since each combination is unique.
In order to do this, you will need the following tools:
The matching circle can be used when choosing nail polish colors
Thus, colors that lie at the same distance from each other are harmonious and go well together.
Manicure made using “water” technology
Let's look at the process of performing a manicure step by step:
A visual representation of the formation of a pattern on the water surface
Even when studying the detailed instructions, beginners may have difficulties and questions. It happens that a drop of varnish does not spread over the surface as it should, but sinks. The reason for this is that the brush is too high above the water. The distance between it and the liquid should be no more than 2 cm. Another factor that can provoke this problem is incorrect water temperature. If you get fuzzy lines, it means that an error was made when forming the pattern: the toothpick was not completely cleaned between dips. Are the different colors distributed unevenly? The problem lies in the different structure and density of the products used. In order to achieve a high-quality result, it is necessary to perform the procedure only with fresh varnishes from one company. Having considered the main mistakes, it will be easier to avoid them.
For those who are just taking their first steps towards learning the art of manicure, there are a number of tips that will make the learning process easier and more enjoyable.
Experienced craftsmen use these tips all the time, because they make their lives much easier.
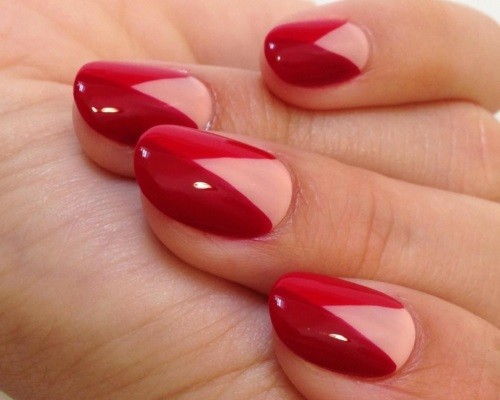
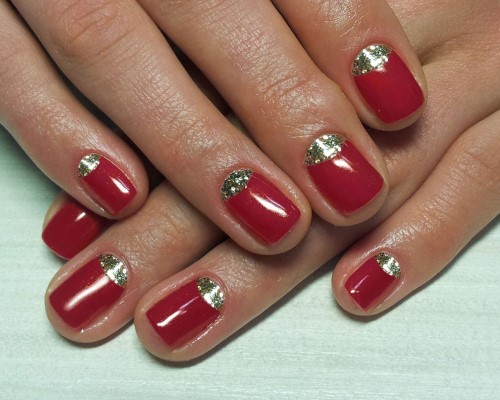
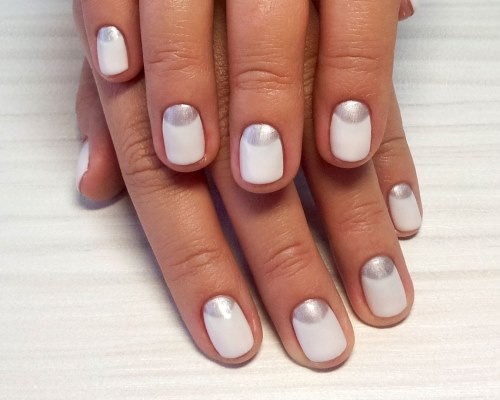
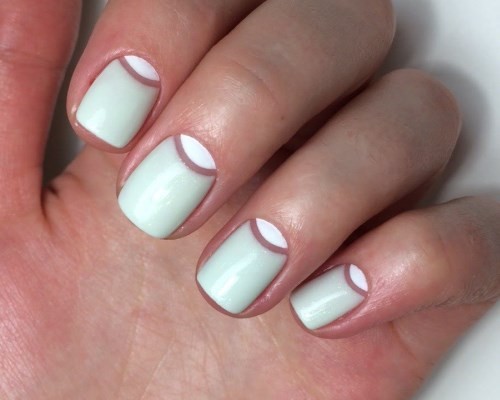
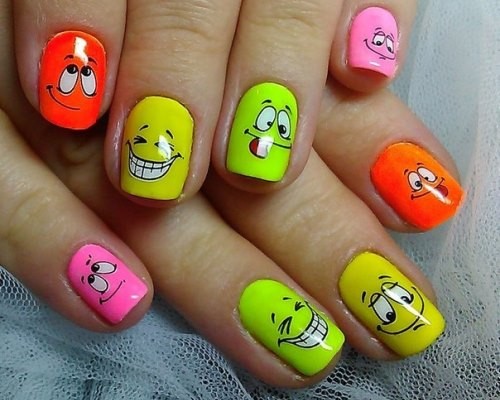
Photo gallery: current nail design ideas 2016–2017
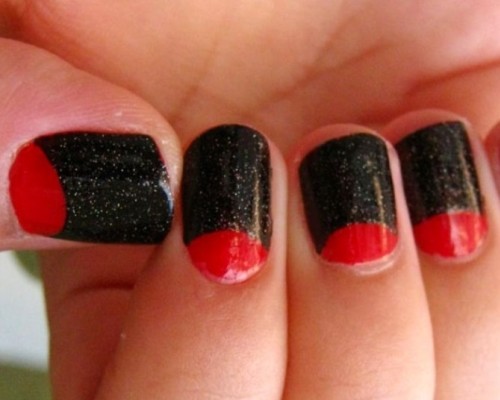
 The combination of red and gray colors looks very cute and stylish.
  Shimmer will never go out of style, especially if the polish is the current color
  This sparkling manicure is perfect for a wedding or prom.
  Blue tints present in pearlescent manicure
  Beautiful manicure with an index finger decorated with shiny crumbs
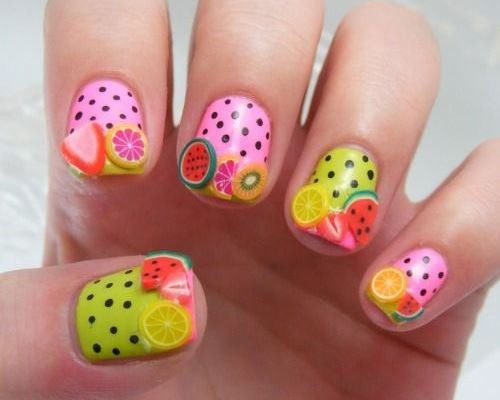
  This bright and juicy idea is perfect for summer days.
  Bright blue nails to match the summer sky
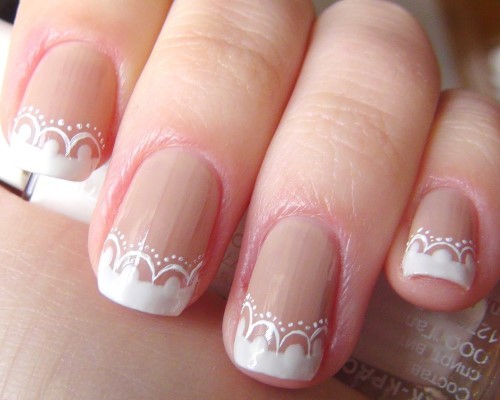
  A lace pattern on the ring and middle fingers makes the manicure delicate and romantic.
  Add more colors to your life, and a bright purple manicure will help you with this!
  A cute design in a picturesque style will complement your usual manicure.
The fashion for the length of natural nails is changing as rapidly as for hairstyles. Many fashionistas first trim the nail plate almost to zero, and then put a lot of effort into growing it. Some professions, due to their characteristics, require only short-cut nails: musicians, cooks, surgeons and nurses, people who constantly work with a keyboard. You can get a manicure on a short nail plate either in a salon or at home.
Features of performing a manicure for short nails at home
Short does not mean unattractive. Short nails have a number of advantages:
- long nails break and “cling” much less frequently;
- recover much faster than long ones, especially in the winter season;
- always have a neat appearance, appropriate for any formal and business event (wedding, business negotiations);
- favorably emphasize the advantages of dark varnishes;
- do not require painstaking care;
- practical at work and at home.
From a financial point of view, short natural nails also benefit from long or extended nails. They do not require regular correction or application of a strengthening coating.
You should not grow your nails if their condition leaves much to be desired (split ends, unevenness, grooves, increased fragility, etc.). Let the nail plate be minimal in length, but healthy, neatly filed and polished.
How to do a manicure on short nails yourself
To perform a manicure on your own for short nails you will need:
- manicure set;
- remover (cuticle remover);
- bath with warm water;
- soft towel or disposable paper napkins;
- essential oils (lavender, lemon, bergamot, ylang-ylang);
- disinfectant (medicinal alcohol, hydrogen peroxide);
- cotton pads or tampons;
- moisturizing hand cream.
Lavender essential oil softens cuticles, promotes healing of minor damage, strengthens nails
The manicure set should include:
- two pairs of scissors (with straight and rounded tips);
- wooden spatula;
- tweezers or nippers - for trimming manicure;
- several files with different grain sizes;
- polishing block.
The layer of varnish should be thin but even over the entire surface of the nail.
Features of applying gel polish
Previously, manicures with gel polish could only be done in a salon. Now this procedure can be successfully carried out at home. To do this you need to prepare:
- base coating, similar in principle to the base;
- top coat (analogous to a fixative);
- a primer that ensures the durability of the coating;
- colored gel polish;
- UV or LED lamp for polymerization (drying) of the gel;
- a special liquid that removes the sticky layer.
The thinner each layer, the neater the manicure will look.
Hand preparation is the same as before a regular manicure. The cuticle is removed and the shape and length of the nails are adjusted. When the nail plate is dry, carefully polish the thin top layer with a buff. After this, the nails are thoroughly wiped with a lint-free cloth, removing any remaining dust and sebum.
The sequence of application will be as follows:
- Primer in an even thin layer.
- The base, which is then dried under a lamp.
- The first layer of colored gel polish is applied to the nail plate, and the cut of the nail is “sealed” with it, then dried under a lamp.
- The second layer of gel polish followed by drying.
- Top coat with lamp drying.
When the top is completely dry, carefully remove the sticky residue with a napkin soaked in liquid.
The accuracy of the manicure depends on the thickness and uniformity of application of the layers of primer, base, gel polish and top coat. The thinner the layers, the more natural the nails look.
Video: step-by-step instructions for applying gel polish
Manicure design options for short nails
All monochrome shades look good on short nails: pastel, neutral, etc. This style of manicure is called nude, since it is as close as possible to the natural skin tone.
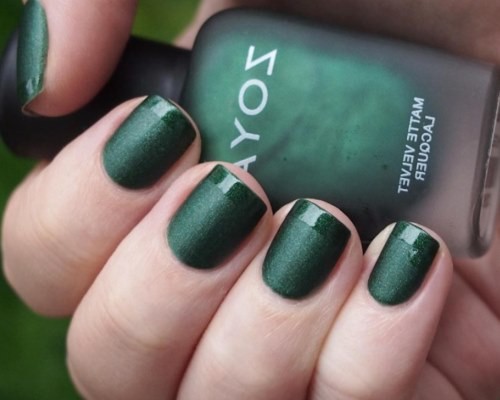
In contrast to nude, dark, rich tones look especially good: burgundy, lilac, brown, etc.
As for the original design, there are many options for decorating short nails. The simplest of them are dots of various sizes; they are drawn using a regular needle or a dot (a special stick for nail art with a ball at the end).
It is better to avoid large sparkles, as they visually reduce the size of the nails.
If it is difficult for you to apply a design on your nails yourself, then you can purchase special stickers. Applying them will take very little time, and in the end you will get a beautiful, bright and neat manicure.
Manicurists warn: short nails are very demanding regarding the length and shape of the cut. All fingers should look the same, the slightest deviation of 1 mm becomes noticeable to the naked eye.
Nails that are short in length require regular cuticle removal. The nail plate grows quickly, and along with it, a strip of thin skin, giving the hands an unkempt appearance. Without a cuticle, the nail looks larger and longer.
Particular attention is paid to the selection of patterns. When choosing an ornament for short nails, several rules apply:
- there should be free space on both sides of the pattern;
- vertical drawing is better than horizontal;
- they try to choose decorative elements that are small or medium in size: one large flower covering almost the entire nail will visually reduce it;
- On naturally wide nails, a special technique of applying varnish is used: an unpainted space is left along the edges, using a brush to draw a wide strip from the hole to the cut of the nail plate.
Sometimes the choice of design and color scheme for a manicure is dictated by the shape of the nails. The classic oval goes well with plant and floral motifs, as well as with all light shades of varnish. The laconic rectangular shape requires the use of rich, deep shades of varnish. But complex geometric patterns look great on such nails.
The choice of colors for varnishes is now huge. However, stylish nail art on modest-length nails is limited to only 2-4 shades. If you use more, it will be too much.
Video: nail design at home
You can easily do a manicure for short nails at home. This will require very little time and a minimum of tools. Particular attention is paid to the removal of the cuticle, as well as the length of the nail plate and the shape of the cuts. Short nails are not at all a reason to refuse bold experiments (bright varnish, intricate patterns). With a high-quality manicure, small nails can become a real work of art that fully meets fashion trends. In addition, they are more convenient in work and everyday life than long overhead or extensions. Well-groomed hands with short nails always attract the attention of others.
Well-groomed women's hands and nails are not only a sign of beauty, but also an important canon of modern fashion, which all girls really like. Every year, international image makers and stylists introduce us to interesting new manicure products. And if previously it was fashionable to wear long nails, then in 2017, more than ever, short nails will be very popular. In this article we will tell you about the variety of nail art for just such nails.
Long nails are certainly beautiful, but not always useful. They will go perfectly with an evening dress or a wedding dress. But, while at work or doing household chores, long nails cause a lot of inconvenience. And here beautiful manicure for short nails and it looks excellent, and does not require painstaking care, and always looks great, because short nails do not tend to peel or break. The owner of such a manicure will not have to strengthen the nail plate with special means every day. You just need to trim their length and file them in a timely manner.
Features of caring for short nails?
Before you choose any manicure design for short nails, you need to know the main features of caring for them:
- For short nails, you can choose any method of care:
- European “dry” - when the cuticle is not steamed or trimmed;
- Classic – with the treatment of each nail and trimming of the cuticle;
- Japanese - involves 5 stages of working with nails: cleansing, moisturizing, nutrition and restoration, treatment of the nail plate and cuticle, hand massage;
- Hot (SPA manicure). To create it, you use a bath filled with a creamy lotion or oil that does not cool down. It contains vitamin complexes that nourish the skin of the hands, cuticles and strengthen the structure of the nails.
- Before covering short nails with gel polish, they need to be trimmed the evening or two hours before the procedure.
- Short nails look best when shaped into a square or oval shape. The design should also be selected in accordance with the shape of the nail - floral patterns will look good on an oval nail, and geometric ones on a square nail. The choice of nail shape will depend on whether your fingers are thin or plump, long or short.
- Despite the fact that the nails are short, you need to ensure that their length does not differ on different fingers. If at least one nail is a little longer, then the manicure will already have an unkempt appearance.
- If the nail plate is wide, it is important to visually make it narrower. To do this, the varnish must be applied so that the cracks of the nail plate remain unpainted.
- Decorating short nails should be small, so any sculpting that involves creating voluminous patterns on the nails will look ridiculous.

Fashionable manicure trends 2017 for short nails
In the new season, the trend will be naturalness and naturalness in everything, including manicure. Therefore, nails must have an appropriate appearance. Those who have been blessed by nature with beautiful, strong nails are very lucky, since in order to be stylish and fashionable, they will not need to do additional procedures with their nails. But girls whose nails are weak and not smooth will be forced to make them look natural with the help of gel polishes.
The length of short nails cannot exceed 5 mm; the best option is 2-3 mm from the free edge of the nail. Those who like the square nail shape will have to slightly round the ends to make it look softer.
As for nail art, many stylish manicure trends of the outgoing year will remain relevant in 2017. However French manicure for short nails with a subtle “geometric smile” of an unusual color and “Assorted” manicure will be a priority.

Your manicure will look very fashionable in the next year of the Fire Rooster if your nails are painted with pink, blue, green, peach, light yellow, white, milky and sandy varnish. To create a design on nails painted in such delicate pastel tones, you can use brighter varnishes, for example, orange, canary, red, lilac and hot pink.
Manicure ideas for short nails with photos
Next year will not tolerate acrylic flowers on nails and sculptural decorations. There is no place for vulgar nail art and provocative, very long nails. Your entire look, from your hairstyle to your manicure, should be discreet and elegant. Based on this, we offer you several interesting ideas that are relevant in 2017 for creating a manicure on short nails.
Manicure with plain varnish on short nails

There is a misconception that short nails painted with a single-color varnish are a boring and uninteresting manicure option. However, we hasten to assure you that this is not the case. The most successful stylists and nail art masters claim that such a manicure is universal and always advantageous in any situation. Due to the wide variety of color palettes of nail polishes that will be popular next year, you can use the following nail designs:
- Black manicure for short nails will look very noble and beautiful:
 If you want your nails to have a pure black color, you need to use a matte polish, and if you want to achieve a result in which the black color shimmers in different shades, then use a regular polish. Only when applying it to your nails should you pre-process the nail plates perfectly and be very careful, since black varnish does not tolerate mistakes and mistakes.
If you polish your nail poorly or file it poorly, the black color will focus attention on these imperfections, so the entire look of the manicure will be ruined.
A French black manicure looks great, in which the entire plate is painted with black matte varnish, and the “smile” is made with ordinary black varnish:

If desired, one nail on one hand can be shaded - make a design on it or glue some decorative elements, for example, beads or small rhinestones:

- Dark manicure on short nails. The technique of its execution is in many ways similar to creating nail art with black varnish, because rich dark colors are also used here, such as burgundy, coffee, dark blue, dark gray, purple and dark green.


- Red manicure for short nails It looks elegant, while on long nails it looks a little provocative. At all times, red has been a very fashionable color, and remains so to this day. You can choose any shade of red for yourself and will never be disappointed in your choice, since your manicure will look perfect

- Blue manicure on short nails Looks good on oval shaped nails. Of course, as an everyday item, you are unlikely to be able to wear it for a long time, unless it is winter outside, for which the blue color and all its shades are very relevant.

- Beige manicure for short nails is the embodiment of sophistication and sophistication. Nails painted with beige varnish always look natural and well-groomed.

- Pink manicure on short nails – This is a universal and at the same time romantic nail design. It has been popular for many years, and 2017 will be no exception. Thanks to the huge variety of shades, not only a young lady, but also a respectable woman can afford a pink manicure.

Shellac manicure for short nails
Shellac is by far the most common nail coating option. This product has gained great popularity due to the fact that it can be applied to nails without pre-treatment; Shellac is stable and practical. Within two weeks after applying shellac to her nails, the girl does not have to worry about the manicure deteriorating; it will have a beautiful and neat appearance.
Of course, to make your own nail art with shellac, you must either contact a specialist who has a special ultraviolet lamp under which this coating should dry, or purchase it personally. This is, of course, expensive, but the quality is guaranteed. Varieties manicure 2017 for short nails with gel polish so many. Here are several nail design options using Shellac coating:


Manicure for short nails with a pattern
In the year of the Fire Rooster, a manicure with an original design will be very fashionable. It can be done on any base, both regular varnish and shellac. The only thing is that gel polish coating will require additional funds. They need to be used to treat the nail plates before creating nail art.
When choosing a design for your nails, follow some simple guidelines:
- If you have short fingers, then drawings made vertically will help to visually lengthen them.
- On a short nail, you should not allow either a large design or a too small one.
- To make your nail design look harmonious, do not use more than 2-3 polishes to create a design.


Manicure with rhinestones for short nails
Rhinestones on short nails can look very catchy and vulgar, therefore, when decorating your nails with such decorative elements, you need to be extremely careful and not overdo it with their quantity. Remember that the main task of any manicure is to emphasize the well-groomed and attractive appearance of your hands. Therefore, when selecting rhinestones, it is preferable to use transparent elements or with a chameleon effect.
Rhinestones can visually expand the nail plate or shorten it. To prevent these mistakes:
- Do not lay out transverse lines from rhinestones.
- Do not completely cover the entire nail plate with rhinestones. It is allowed to decorate only one nail in this way. As a rule, craftsmen make this design on the ring finger.
- Do not glue rhinestones along the contour of a moon or French manicure if your nails are square.


Moon manicure for short nails
In 2017 this simple manicure for short nails will not lose its relevance. Using two pastel or contrasting varnishes you can create an original lunar nail art. No new techniques for performing it will appear next year, unless you come up with them yourself. The following types of lunar manicure will be popular:
- Classical

- Color

- Without cover

- Triangular
- With gold or silver
- Matte

- With an image

- Lunar

- Floral

- White
- Black

- Red
Summer manicure for short nails
In summer, short nails are not just beautiful, but also convenient. When packing your suitcases on vacation, on the road, wherever you are, they will look very feminine and at the same time will not cause you any inconvenience. For summer nail art 2017, you can use any of the above techniques, just choose bright varnishes that match the season. You can use them to create an “Ombre” or “Assorted” manicure, which will also be popular next year.


Wedding manicure for short nails
The tendency to extend nails for celebration has long since become obsolete. Now it has been replaced by shellac, which makes the nails neat and beautiful. It is ideal for wedding nail art. Considering that 2017 is the year of femininity and tenderness, we have selected several options easy wedding manicure for short nails.


Children's manicure on short nails
Today, girls begin to paint their nails at an early age, from the age of 7. And this is a completely normal trend that fully meets the requirements of the time. After all, it used to be believed that painted nails on a little girl were a sign of being spoiled, but now it is a common hygiene procedure. The main thing is that the manicure is age-appropriate and not vulgar or flashy.


Video: Children's manicure
Manicure for school for short nails
Any teenage girl wants to look attractive, and a beautiful manicure is a great way to make her look stylish and at the same time well-groomed. Of course, a manicure for school should be special - no bright colors, patterns or rhinestone decorations. A plain light or clear varnish and a French coat are acceptable. A girl should look modest and neat.


Home manicure on short nails
Not every girl can boast of the ability to beautifully paint her nails, and she often doesn’t have the time or money to go to a beauty salon to get fashionable nail art done. How to do a manicure at home on short nails on your own:
- Steam the skin around your fingers in warm water;
- Wet your hands with a towel and treat the cuticle: first lift it with a manicure spatula, and then tear it off with tweezers only so that the skin is not injured;
- Cleanse skin that is already keratinized;
- File your nails to give them the desired shape;
- Lubricate your hands with oil or a special lotion rich in vitamins;
- Use nail polish remover to degrease your nails;
- Apply varnish.
If you want, you can make a light drawing. This is done very simply: apply a drop onto the nail with a brush, and then use a regular needle to draw a pattern. Below are pictures of a manicure that any girl can do for short nails at home.


As you can see, it is very easy to create a beautiful and fashionable manicure on short nails. You won't have to constantly worry about the appearance of your nails, and they will still look stylish and fashionable.
Video: Manicure for short nails
In the video below you can watch one of the master classes on how to create a manicure on short nails, the design of which will be very fashionable in 2017.
A detailed description of each step by a professional will help you create an original design and get your nails in order.
When doing a manicure, special attention should be paid to the shape of the nails.
To understand how to make a beautiful manicure step by step at home, you should listen to the advice of professionals.
When choosing the shape of your future manicure, you should pay attention to:
- cuticle shape;
- nail shape, finger length;
- shape of the nail bed.
The most common is the oval shape of nails; it is suitable for any type of hands and finger shapes. Oval nails visually lengthen the fingers, especially if the hands are full and the fingers are short.
For owners of graceful hands with thin fingers, who have nails with a convex nail plate and a rectangular cuticle hole, a rectangular nail shape is suitable. The length does not really matter, rectangular shape looks good on both short and long nails.

For those women who have wide hands and large fingers, rounded nail shapes are ideal. In this case, the length of the nail extending from the edge must be at least 3 mm. This way the manicure will lengthen your fingers and give your hands grace.
A pointed form of manicure, it is also called almond-shaped for those whom nature has endowed with thin hand shapes and long fingers. On full hands, such a manicure will look awkward, violating the proportions.
Manicurists believe that the shape of the nails should follow the shape of the cuticle. But everything is purely individual.
There is one more important rule of manicure. All nails must be the same length. If one nail is broken, you will have to shorten all the others to the same length.
Choosing a nail file. Which one and what is it used for?
For a step-by-step manicure at home, you will need nail files. When choosing a nail file, you should pay attention to the material, from which it is made and its rigidity - abrasiveness.
Abrasiveness is the hardness of the file.
It depends on how large or fine the dusting is on the nail file and how many units of abrasive there are per unit area. This value is measured in grits. The higher the grit number, the softer the file., accordingly, a file with a lower number of grits will be harder.

For polishing natural and artificial nails, buffs with an abrasiveness rating from 400 to 1000 grit are used.
Materials from which nail files are made, advantages and disadvantages:
- Metal. They are durable and strong, these are all their advantages. The main disadvantages include the fact that such a file, with its spraying, severely damages the nail plate, which subsequently leads to delamination and brittleness. Metal files can be used for artificial nails.
- Glass. A file that spares the nail plate. If handled properly, this nail file will last a long time. Its only drawback is fragility.
- Plastic. Ideal choice of material. These files are easy to use, easy to wash and disinfect. A large assortment from different manufacturers will allow you to choose a nail file of suitable quality and reasonable price.
- Paper. A budget option for a nail file based on thick cardboard with a coating. This nail file is not very durable and is suitable for one-time use.
- Ceramic. To carefully process the tips of the nails, a glass file is used, and a ceramic one will seal the edge of the nail so that it does not delaminate. Just like a glass file, this nail file is quite fragile and requires careful handling.
Steaming the nail plate
There are 2 types of manicure:
- classic, edged manicure;
- European, non-edged manicure.
For a step-by-step manicure at home, it is better to choose a safe method for treating the cuticle. This is considered a European manicure. With this method, the cuticle is not cut, but is steamed and moved to the edge of the nail. Oils and special gels are used to slow down the growth of the cuticle.

Classic manicure - steaming and removing cuticles. Suitable for those who have some nail art skills.
In both cases, you will need to steam your hands in a hot bath for 5-7 minutes.
First, before steaming, give your nails the desired shape using a nail file. Steaming can be replaced by treating the cuticle with a special gel, which will soften it and make it easier to remove.
Adding herbal decoctions, essential oils, sea salt, and table salt to the steaming bath will strengthen your nails and make your hand skin softer and silkier.
Polishing
Polishing gives a neater look to your nails. When no coating is applied, polishing adds shine to the nails. When applying the coating, the coating adheres better to the polished surface of the nail.

You should follow some rules when applying polishing:
- Doing a manicure at home, Don’t get too carried away with polishing your nail plates. Once a month will be enough. Step-by-step use of nail files coated with varying hardness will allow you to achieve excellent results.
- It is not recommended to polish weakened nails, this may worsen their condition.
- Nails must be buffed before polishing.. This procedure will improve the condition of the nail plate, eliminate irregularities and minor flaws. After sanding, the nails are polished with a soft nail file. If you plan to cover your nails with gel polish or shellac, you should only lightly sand your nails. Excessive sanding will thin the nail plate.
Coating
Any varnish, gel or shellac, when applied over a base coat, has a brighter color and lasts longer. When using a coating of soft, pale tones, a white matte varnish can be used as a base. Using a base will avoid multi-layering.
In order for the coating to adhere well, the nails must be thoroughly degreased immediately before coating.
This advice is especially relevant if fat-containing cuticle removal preparations were used for preparation.

Applying the coating starts from the base of the nail and continues to the edge of the nail. The movement of the brush should be with light pressure in order to paint the maximum surface of the nail in one movement. Next, you will need 2 more light brush strokes to paint the remaining edges of the nail.
Gel or shellac coating requires additional products - a base and top coat. On oil-free nails, first apply the base, then the gel. After drying the coating, a topcoat is applied to strengthen it. If you use regular polish, you don't need a base coat, but using a top coat will extend the life of your manicure.
Materials and tools
Step-by-step manicure at home requires the availability of tools for such work.
You will need:
- nippers or tweezers for removing cuticles; manicurists call them cuticle cutters;
- manicure scissors with rounded ends for those who are not used to using clippers;
- several files, with different hardness. For grinding and polishing buff;
- sticks with a special end for cuticles/pusher (metal tool for working with cuticles).

Additionally:
- nail polish remover/acrylic remover;
- cotton pads;
- To remove the acrylic coating you will need foil;
- cuticle remover (for dry manicure);
- capacity;
- additives such as essential oils, sea/table salt, soap/gel;
- paper napkins;
- cuticle moisturizing oil, hand cream - all this is used to complete the manicure.
Sterilizing instruments at home
The health of your nails depends on how clean the tool you use for manicure is. A minor wound can cause big trouble. At home, manicure tools should also be disinfected.
The number of tool users at home is limited, but this does not cancel disinfection.
To sterilize manicure instruments at home, you do not need to buy a special device that is used in salons.
Home remedies for sterilization:
- hydrogen peroxide;
- pure alcohol;
- vinegar.
Depending on what product is used, the sterilization time also differs. Pure alcohol implies instant sterilization, and using hydrogen peroxide will take several hours. You can sterilize an instrument with vinegar if the liquid does not damage the coating of the instrument.

Methods for sterilizing metal instruments:
- boiling;
- heating over an open flame;
- heating in the oven.
Metal instruments are first washed under running water and then sterilized. Sterilization on an open flame is carried out for 5 minutes, boiling or sterilization in the oven - for 15-20 minutes.
To sterilize nail files, use a spray filled with a disinfection solution.
If someone at home has a fungal infection of the skin and uses the same tools, disinfection should be carried out especially carefully.
Ready-made disinfectants that can be purchased on the Internet, pharmacy or specialized stores:
- sterillium;
- cutasept f;
- octenisept;
- estilodez antiseptic;
- bansolar;
- alaminol.
The manufacturer offers such products in the form of sprays, concentrates, and wipes.
What pharmaceutical products may be useful?
To sterilize home manicure tools, products can be purchased at pharmacies.
These include:
- hydrogen peroxide;
- alcohol;
- octenisept;
- sterillium.
Cuticle removers
To quickly and effectively remove cuticles, salons use special products - removers. They allow you to soften the cuticle in a short time and contribute to its high-quality removal. Some removers contain substances that subsequently slow down the growth of the cuticle.
Such products contain acids or alkalis Therefore, removers are not recommended for use in cases of fungal diseases and people prone to allergic reactions.
There are several types of removers:
- acidic;
- alkaline;
- oil;
- mineral.
Oil and mineral based removers are considered the safest. They are recommended for home use.

The remover is applied to dry cuticles using a brush or directly from a tube with a special spout. After 3-5 minutes, the product is wiped off with a napkin, the cuticle is pushed back using a stick or pusher. The product is not washed off with water. When using an acid remover, it is recommended to cover the skin around the nail with oil.
When doing a manicure at home, you can step by step use olive oil and lemon juice. This combination will allow you to quickly and efficiently treat the periungual space.
Step-by-step instructions for performing a classic edged manicure
Performing a trim manicure step by step has the following steps:
- removal of old coating, if any;
- shaping the nails, this should be done before steaming;
- steam your hands, remove the cuticle/ in case of dry manicure, use a remover to remove the cuticle;
- use a stick to clean the space under the nails;
- grinding, polishing;
- applying nail strengtheners;
- To finish, apply cuticle oil to the nails and around the nails, then apply hand cream.

Unedged manicure at home
European manicure is done in 3 ways:
- Dry method With the use of a remover, your hands do not get steamed. It should be remembered that some types of removers can cause allergic reactions.
- Wet method using a warm bath to steam your hands.
- Hot method Designed for steaming very rough cuticles and hand skin.

Manicure should be performed in the following sequence:
- First you need to shape your nails.
- Steam your hands. If using the dry method, treat the cuticle with a remover. After 5-7 minutes you can work with the cuticle.
- Wipe your hands dry/Remove remover with a napkin or cotton swab.
- Move the softened cuticle to the root of the nail with a wooden stick or pusher.
- Apply oil that slows down cuticle growth and rub it well into the nail plate at the base of the nail. Using this oil will allow you to do manicures less frequently in the future.
- Before coating, thoroughly degrease your nails.
How to do a French manicure step by step
The most popular manicure is French, that is, French manicure. The French jacket is suitable for all occasions: with an evening dress and an office suit.

The classic version of a French manicure is a nude base and a white smile at the tip of the nail.
Modern nail design offers different variations of this manicure.
To do a French manicure at home you will need a little skill:
- Give your nails the desired shape. It is better if it is rectangular or oval in shape.
- Steam your hands.
- Treat the cuticle. For a French manicure, a classic edged manicure is suitable.
- Further buff and polish your nails. These simple procedures will extend the life of the coverage.
- Apply base coat, flesh or beige varnish.
- After drying draw a smile using a thin brush or stencil. The width of the smile should be the same on all nails. A wide smile will visually shorten your nails, so it is not recommended to get too carried away. The width of the contrast strip should be no more than 2 - 3 mm, depending on the length of the free tip of the nail.
- After cover your nails with clear varnish, fixing the smile. You should also coat the end of the nail, this will seal all the layers and strengthen the coating.
- The procedure ends applying oil to the cuticle. Apply a little cream to the skin of your hands, rub in with massage movements.
Gradient on nails
The application technique in the gradient or ombre style has been very popular for many years. This is the use of several colors, the transition from one color to another. This coating looks original and impressive.
Required:
- varnish 2-4 colors;
- sponge;
- nail polish remover;
- cotton buds;
- toothpick;
- foil.

Gradient coating, step-by-step implementation:
- Prepare your nails.
- Before applying the coating, generously lubricate the skin around the nail with cuticle oil. The oil will make it easier to remove any polish that gets on your skin.
- Further actions will require some speed in work. Draw stripes of varnish on the foil close to each other and blend their borders together. Dab the sponge into the created palette and transfer it to the nails.
- Cover your nails with top coat without waiting for the layer to dry.
- Clean off excess polish using cotton swabs and nail polish remover.
Multicolored nails
A popular technique is coating with varnish of different colors. You can choose a palette of colors that are close or opposite to each other according to the color wheel. You will need varnishes of 2-5 colors, manicure tools.

Step by step execution:
- Nail preparation.
- Before you start painting your nails, bottles of polish should be opened and prepared in the order in which they will be used. If 2 colors are used, determine which nails will be covered with which color.
- Cover the nails one at a time, dry, and secure with top coat.
Lunar manicure with gel polish or shellac
Moon manicure is the opposite of French manicure. The hole is covered with white varnish, the main coating is done in a different, contrasting color. You can use brighter combinations of foundation and smile.

Step-by-step instructions for performing a moon manicure with gel polish or shellac:
- Preparing nails for coating
- Coating the nails with the main color, drying the coating in a lamp. Depending on the power of the lamp, this will take from 1 to 2 minutes.
- Drawing a lunar smile using a thin brush. Drying.
- Cover with a top coat and dry again.
The border line between the main layer and the base can be decorated with rhinestones. Rhinestones are applied to the smile before drying. The surface is strengthened with topcoat.
Matte and mirror manicure for short nails
A fashion trend is a combination of matte and mirror manicure of the same color. A matte surface is obtained by applying a special coating to a regular gel polish.
This coating is great for short nails.
Step-by-step instructions for performing a matte-glossy manicure:
- Preparing nails for coating.
- Apply base, then foundation. Drying in a lamp.
- Apply matte top coat to selected nails. To combine a matte finish and gloss on one nail, use a stencil. This technique will allow you to create an interesting design.

For a glossy manicure at home, use foil or rubbing, polyester powder. You can buy all this in specialized stores.
Step-by-step instructions for creating a mirror manicure using powder:
- Apply a base layer of gel and dry.
- Immediately after drying, sprinkle the base layer with powder. The powder is applied using a spatula. Rub the powder with the applicator. Remove excess powder with a brush.
- Apply topcoat and dry in a lamp.
The secret of shimmering mirror nails
For a mirror manicure, a special powder is used. It is made of polyester, a material that consists of small particles. It is these particles that reflect light and give the manicure a mirror shine.

Using powder with different colors and particle sizes makes it possible to create an original manicure.
Newspaper manicure
A simple newspaper manicure. 
Required:
- base color;
- newspaper, 10 pieces of newspaper with fine dough for each nail;
- acetone;
- transparent top.
Execution sequence:
- Prepare nails for coating.
- Apply the base color.
- Immediately after applying the base color with a drop of acetone, attach a piece of newspaper to the nail.
- Wait until the newspaper is completely dry. Do not move the newspaper until it is completely dry to avoid streaks.
- Remove the newspaper and cover your nails with a clear topcoat.
Applying such a manicure will take time, but the result is worth it.
Hollywood mirror minx with foil
Mirror manicure using foil. The choice of foil color depends on what color of varnish will be used.

Step by step execution:
- Gel polish is applied to prepared nails and dried.
- Afterwards, colorless foil glue is applied to the gel. You need to wait until the glue dries.
- The foil is applied to the glue with the matte side and carefully smoothed with a wooden stick.
- After this, the foil is removed and the mirror layer remains on the nail.
- Completion – covering with a setting topcoat.
Design - cat eye
Spectacular cat eye manicure. A special magnetic gel is a varnish that contains particles that, under the influence of a magnet, create an iridescent pattern on the nail.

To work you will need gel polish with magnetic particles and a magnet.
Step by step execution:
- Gel polish is applied to prepared nails.
- A magnet is brought to the surface of the nail, which orients the particles in a certain direction, creating a reflective effect. Depending on how you apply the magnet, the particles will be positioned. Exactly, diagonally or in wavy stripes.
- After this, dry the layer.
- Apply top coat and dry.
Beautiful manicure with a stencil
Manicure using a stencil is very popular. The stencil makes it possible to create an original and neat manicure at home without much difficulty. In a specialized store you can purchase stencils for French and moon manicure.

They also sell special adhesive tape for geometric designs and a variety of adhesive sheets with elegant patterns. For this manicure you will need 2 colors of polish and a stencil.
Manicure with a stencil is performed as follows:
- First, the nails are prepared for coating;
- the base is applied, then the base, the layer must be dried;
- a stencil or adhesive tape is pasted and the nails are covered with varnish of a different color;
- the stencil is removed from the nails at the moment when the layer has dried, but not completely;
- A protective coating is applied and dried.
Stamping - stamp design
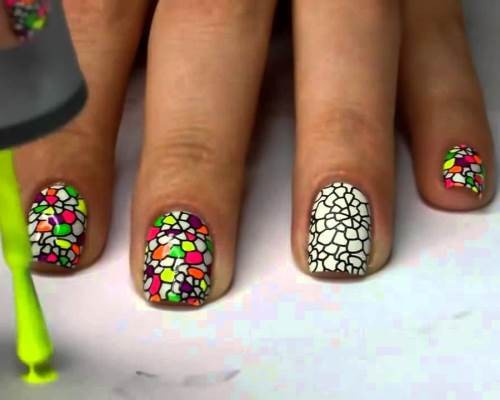
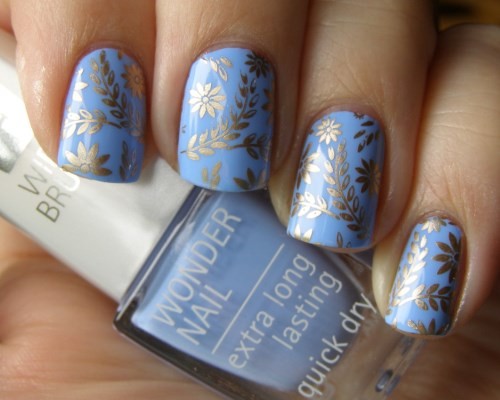
Another quick method to create an original manicure, now using stamps. This method differs from the previous method in that the stencil is a one-time sticker, and the stamp can be reused.
To perform a manicure using stamping, you will need plates with designs and a stamp - a device with a silicone base for transferring the design to the nail plate.
First, the nails should be prepared and covered with a base, then with a base on which the design will be applied.
Dry the base layer thoroughly so that there are no marks when applying the stamp. Apply a protective coating to the skin around the nail, which will be removed after applying the stamp and the skin will remain clean.

Varnish is applied to the patterned stencil, and the excess is carefully removed using a scraper. Afterwards, the design is transferred from the plate to the stamp, then to the nail, and so on. Then the finished manicure must be covered with a top coat.
A drawing made using a stencil is quite fragile and requires protection. Apply the top coat without applying strong pressure to avoid smearing the stamp. The top coat will extend the durability of the manicure.
Water manicure: how to do a manicure yourself
A simple water manicure technology, you will need:
- a water container, not very wide, but sufficient to place a finger in it;
- varnishes 2 - 3 colors;
- toothpick for drawing patterns;
- tape/cuticle oil/greasy cream to protect the area around the nail area from excess polish;
- cotton swabs and disks;
- varnish remover;
- base, top

Execution step by step:
- Cover the nails with the base, then dry with the varnish that will be the main one.
- Fill the container with water at room temperature.
- Drop a few drops of varnish one by one onto the surface of the water. Make the next drop in the center of the previous one. Wait for them to spread.
- Create a pattern on the water. Make 2-3 movements with a toothpick on the varnish film.
- Lubricate the periungual fold with cuticle cream/oil/glue it with tape around the nail. Nails should be dry.
- Dip your finger in water, the film will transfer to the nail. Remove your finger.
- Next, remove the tape; if cream was used, wipe off excess varnish. Anything that could not be removed immediately should be cleaned using cotton swabs and detergent.
- This procedure can be carried out with each nail. The combination of plain and water-based nail polish on the fingers of one hand looks original.
- Secure the resulting pattern with a top coat.
Simple varnishes with special effects
Varnishes with special effects are a quick way to create an original manicure without much effort.

Manufacturers offer:
- Glitter polishes. These can be rare small specks of glitter in a colored base or discernible medium-sized and large sparkles of geometric shapes in a transparent and colored base.
- Glitter polishes made entirely of glitter glitters.
- Glitters with splashes, resembling sugar crystals. The coating has a dense texture and, when dry, has a rough surface.
- Metallic effect varnishes, silver and gold.
- Varnishes with craquelure effect, cracking effect. The varnish is applied to a contrasting base with shimmer (reflective particles). Afterwards, a special color coating is applied to the base and dried in air. In this case, cracks appear on the top layer of varnish.
- Matte finishes with and without sparkles.
Brands of varnishes and acrylic coatings for nails and estimated prices:
- Laque RuNail – 270-300 rubles;
- Essie – 300-350 rubles;
- Vinylux CND - 550 rub.;
- P.I. – 550 rub.;
- Kodi Professional - 500 rub.;
- Shellac CND – 1000 rub.;
- Gelish Harmony — 1000 rub.
The most common brands that nail salons prefer to use are Kodi, Shellac CND and Vinylux CND.
Baths and oils to strengthen nails after manicure
For nails that are peeling, baths with sea or table salt will be useful.
To enhance the effect of such a bath, add a drop of iodine.
For weakened nails - warm oil baths with the addition of vitamins A and E, herbal decoctions of chamomile, calendula and mint.

Using natural nail oils will strengthen the nail plate, prevent splitting and brittleness of nails, improve the general condition of nails and the skin around them. Oils can be used both as part of baths and independently.
Baths with essential oils:
- lemon;
- grapefruit;
- rosemary;
- jojoba;
- avocado.
To strengthen nails, rub in ylang-ylang, lavender, and tea tree oils. Nail masks made from a mixture of natural oils are also used. Olive, castor, and linseed oil are used as the basis for this mask. To be effective, the oil mixture must be heated before use.
When performing a manicure yourself at home, you need to follow the advice of professionals.
Then step-by-step execution will become not just work, but an exciting creative activity that you will want to return to more and more often.
Well-groomed hands and a beautiful manicure are the calling card of every woman.
Useful videos on how to do a manicure at home
How to do a Gradient manicure yourself at home? Watch in the video clip:
Find out how to perform a trim manicure yourself in the video:
Most women have repeatedly done and continue to do manicures at home with their own hands. The technique of performing a manicure is quite simple. It just requires patience, diligence and time. Of course, you can spend a decent amount of money to visit a specialist in a salon, but it’s quite possible to do a manicure yourself.
I must say that now the trend is simplicity and elegance of manicure on medium and short nails, which means anyone can surprise others with beautiful hands. It is enough to carefully study the necessary recommendations, tips and look at photos of various options for simple manicure on the Internet.

Necessary arsenal
To perform a manicure at home, it is not at all necessary to have a whole set of expensive tools and devices. When doing extensions or gel coating, you need to purchase the necessary tools, but for a regular manicure you only need to have on hand:
- small water trays for immersing your hands;
- a pair of files: one made of metal for filing, the other made of plastic for grinding;
- wooden cuticle stick;
- metal tweezers;
- a cotton or paper towel;
- sharpened manicure scissors;
- rubbing alcohol or hydrogen peroxide;
- cuticle oil with vitamins;
- hand cream;
- wooden toothpick or dots;
- nail polish remover;
- cotton swabs;
- simple decorative nail polish.
Almost every woman has this entire arsenal at home, otherwise it will not be difficult to purchase all this in a specialized store. In addition, you may additionally need: tape, several rhinestones, strips for a French or moon manicure, nail polish in several colors. The procedure for manicure with gel polish is much more complicated and takes more time.

Hand care
Manicure implies both the beauty of nails and well-groomed hands. This means that you should also pay special attention to your hands, and therefore it is necessary to perform the following procedures:
- Apply nail polish remover to a cotton pad and remove the previous coating of nail polish;
- wash your hands, put them in baths with warm water and steam;
- take your hands out and pat them dry with a towel;
- Apply the scrub to your hands, massage them and rinse with water;
- moisturize your hands with oil or cream.

Performing this procedure will provide your hands with softness and tenderness, and a well-steamed cuticle can be easily removed using tweezers.

If the preparatory stage of the hands is completed, you can safely move on to the next stage of manicure: adjusting the shape of the nails and coating them with varnish.
Execution procedure
The home manicure procedure is not particularly difficult:
- Warm water is poured into the baths with the addition of liquid soap, sea salt, aromatic oils or lemon juice;
- Hands are immersed in water for 5-10 minutes so that the skin steams and becomes soft;
- Hands are pulled out and blotted with a towel;
- Using a special stick made of wood or metal, the cuticle is moved back and raised;
- The cuticle is cut with scissors or tweezers;
- The rough skin of the cuticle and around the nails is cut off with tweezers;
- The nail file gives the required shape to the nails. Nails are filed with a file in one direction so as not to damage the structure of the nail plate;
- The skin around the nail is softened with oil, the nails are wiped with a cotton swab and acetone to remove oiliness;
- Decorative varnish and fixative are applied.

The treatment of the skin layer around the nails is done very carefully to avoid cuts. If this occurs, the wound must be treated with hydrogen peroxide to prevent inflammation.


A variety of options for simple manicure
The surface of the nail is like a canvas for a painter, on which you can depict various ideas of your imagination or those you have spotted on the Internet, but the simplest are considered to be:


With an image. Pioneers in the field of manicure can also easily realize their simple design ideas by applying a simple, cute design to the nail. For example, peas. In general, there are quite a lot of manicure ideas with a pattern, but the most stylish and popular are: mustachioed, colored chaos, classic with adhesive tapes, dotted, graphic and checkerboard.
Colored manicure. This simple and beautiful manicure can be used both on weekdays and on holidays. Shades of the color scheme of varnishes can be combined according to the following principles:
- monochrome: a combination of shades of the same tone (from dark to light). These include ombre or gradient;
- complementarity: a combination of contrasting colors in one manicure;
- achromatic: the use of black or white and their shades;
- triadic: a combination of three tones in one manicure.

Colored manicure combines perfectly with French, moon, newspaper and other types.

French manicure. Timeless classics are as fashionable as ever. Reproducing this manicure option is quite realistic and easy.

To speed up the manicure process and avoid getting into trouble, you should know some tricks:
- to remove nail polish of bright colors, such as red or burgundy, without leaving traces of staining on the skin, you need to generously lubricate your hands with nourishing cream before doing this;
- In case of skin staining, ordinary tape will help remove stains. It is enough to apply it to the skin and remove the residue with the sticky side;
- You can easily remove polish containing glitter or sequins by wrapping each nail with cotton wool and nail polish remover, and then wrapping them in foil for 10 minutes;
- decorative varnish is applied to the degreased surface of the nail plate and covered with a fixative on top, so it will last longer than usual;
- It is better to apply the varnish in several layers;
- Ordinary steam will help to obtain a matte surface of the coating; just hold your varnished nails over it;
- It is easy to remove varnish from the skin near the nail with a makeup brush dipped in acetone;
- special strips for French tape can be perfectly replaced with ordinary stationery tape.
These practical recommendations will greatly simplify the manicure procedure and make it more creative. You should not regret the time spent, because the well-groomed appearance of your hands and nails will certainly attract the attention of the stronger sex!

Photo of a simple manicure