Antipyretics for children are prescribed by a pediatrician. But there are emergency situations for fever when the child needs to be given medicine immediately. Then the parents take responsibility and use antipyretic drugs. What is allowed to give to infants? How can you bring down the temperature in older children? What medicines are the safest?
Now I will tell you step by step about making a template (stencil) for cutting a flower.
It seems like the Internet is at hand, but we need to cut flowers for paper garlands or for decorating a wall newspaper, but we can’t find the desired form of templates anywhere.
So, we will make a template (stencil) on our own. In addition, this lesson is just on my topic: the development of fine motor skills of hands and the eye of children. Let's not miss this amazing opportunity.
A flower can have a different number of petals - cruciferous ones have four, buttercups have six, and jasmine has eight. But the Rosaceae have five (or a multiple of five), and the Rosaceae are prestige. So we will produce exactly the five-petal pattern.
Such a flower fits into a circle.
Ouch! But we do not have a compass at hand.
Not a problem - I will get the circumference by circling around the edge of my favorite rescue cup. We sculpted her, we gave tea to an elephant from her, now she is a sponsor of a circle for a flower.
 But. But when working with a circle, we must start from the center. And where is he here? I put a dot by eye and check whether all radii are equal. Hey me! - almost ten.
I will draw the middle of the flower - a small circle and by eye I will divide the circle into five sectors. And without a protractor - again by eye.

And now let's check how accurate our eye is: we will make an angle out of paper and by applying it we will check whether all five angles are equal.

So, what didn’t fit - we’ll correct it. Now let's write a petal in each sector.

This is a sketch, for now we just want to decide on the shape of the petals. Let's say let it be teardrop-shaped. I fold the same corner of paper in half and draw a half-petal.

I cut it out - here is the template for a separate petal.

I apply and wrap. Now it is important to rotate the picture several times, carefully comparing the petals, to make sure that everything is fine, there are no distortions. I made the drawing on paper.

And the template must be strong and rigid. Yeah, I'll have to cut it out and circle it on cardboard.

Now I turn again and look - exactly. And then after all, with all these cutting-outlines, errors inevitably arise.

Look - the student drew a flower well, but he hurried, casually cut it out - please, and the template turned out to be multi-petalled. So, quality control is needed at every stage of work!
So, I double-checked my template and now it's time to take on the flowers. Let's reread it first and try to distribute the flowers sparingly on the sheet. On a standard A4 sheet, it turned out like this.
Flower stencils are always in demand when decorating various crafts. Take a look at this selection to reduce your time searching for the right decor. In this article, you will find the most popular flower templates that you can easily draw or simply download and print.
We offer you beautiful stencils of the most common flowers: roses, lilies, daisies, tulips, poppies, asters, sunflowers, etc. Also in the selection you will find very unusual patterns: fabulous flowers and mandala flowers with bizarre curves. However, we tried to avoid too small details, since it is always inconvenient to cut them out.
Some stencils will come in handy for scrapbooking or postcards, others will be great appliqués for decorating clothes or the basis for embroidery, others will be suitable for decorating a variety of interior items. We offer you templates with large petals that do not require complex cutting - these stencils are suitable even for children's crafts. We have also selected pictures with whimsical curves and more intricate details that will appeal to even the most experienced craftsmen.
Any image can be reduced or enlarged and then printed. The simplest samples can simply be taken as a guide and copied from the screen.


Making an accent in your home, designing a souvenir package, or complementing a gift with a unique bouquet is now available to everyone. It only takes a little effort to get the desired result.
How to make beautiful paper flowers? - about this article below. You will find several detailed master classes in it.
Also, you will be interested learn how to make flowers from shells - with your own hands.
How to make a simple and beautiful paper flower with your own hands?
Recently, flower arrangements made of paper have become an alternative: both in the design of halls and souvenirs.

Try to make these simple but beautiful flowers yourself. Detailed instructions and diagrams are below.
For work you will need:
- colored paper;
- scissors;
- diagrams and templates for cutting out parts;
- pencil or pen;
- glue.
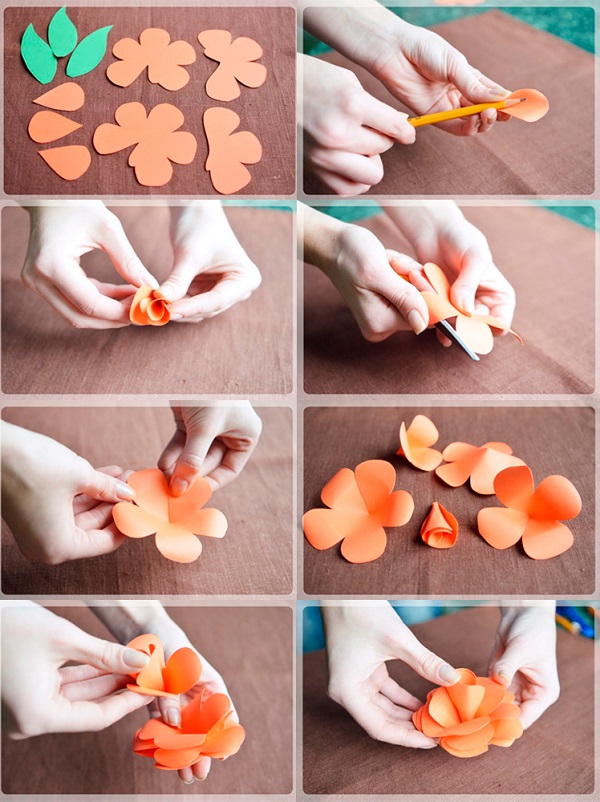
Manufacturing process:
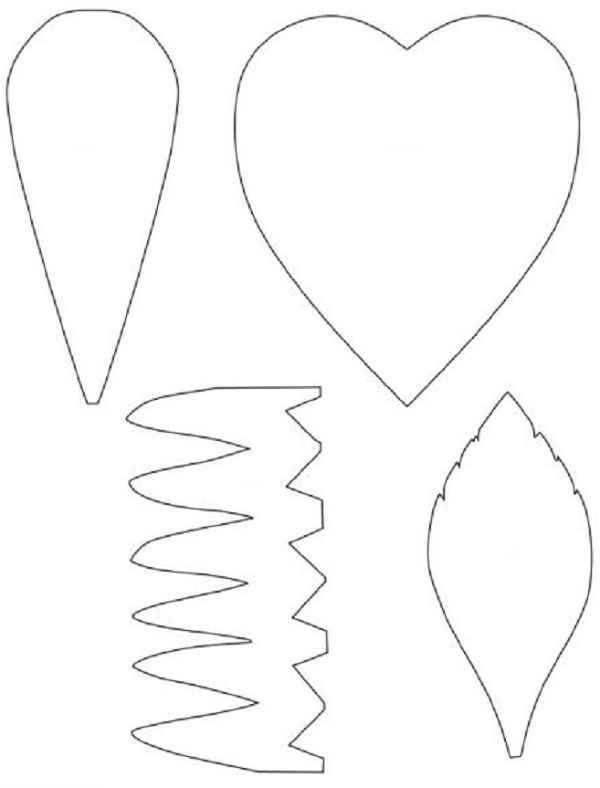
- From paper, it is necessary to cut out the details for the future flower according to the templates (for each product you will need: 3 parts in the form of a droplet, 1 - four-leaf, 1-three-leaf, 2 - five-leaf, 3 green parts - leaves).
- A pencil (pen, you can use a brush) will help to give the necessary shape to each detail for a future product.
- All blanks are glued together. At the beginning, you need to glue larger fragments, and then small ones. Repeat everything according to the diagram below.
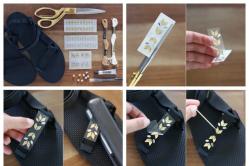
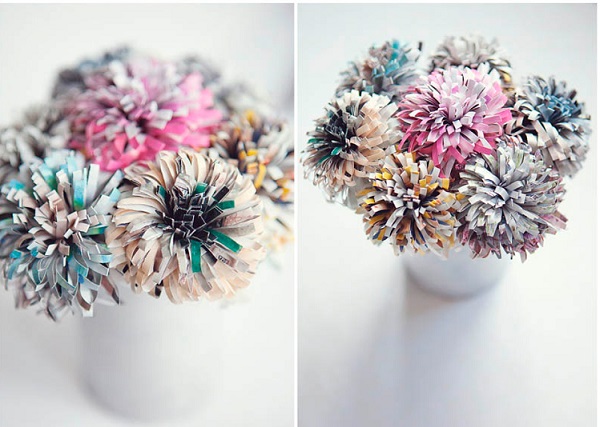
There is another interesting version of simple but lush paper flowers.
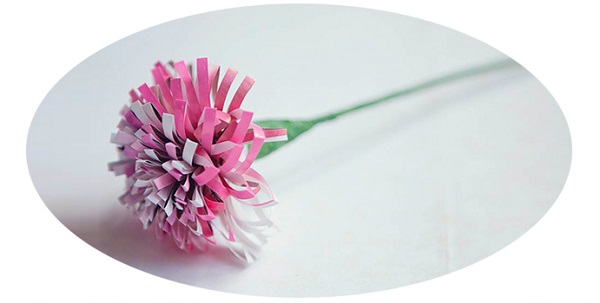
They are made in the style of quilling.
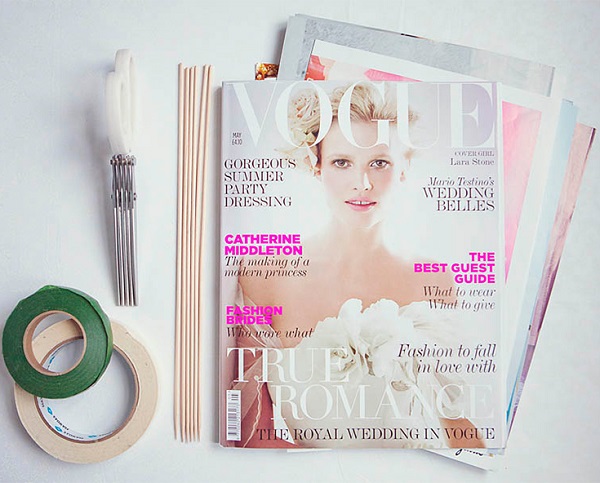
What you need for work:
- Illustrated magazines.
- Adhesive tape (green).
- Glue.
- Scissors.
- Barbecue skewers.
Step-by-step instruction:
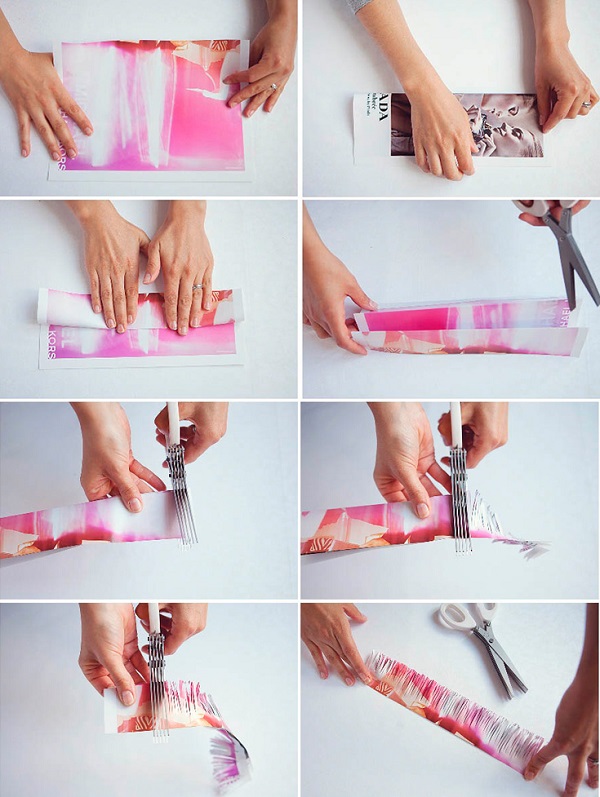

Here's how to make a paper flower bouquet very simply and effectively.
Large paper flowers - master class
 Huge buds allow you to create a unique interior for celebrations. Thanks to them, you can accentuate or highlight a place for a photo shoot.
Large flowers can be grouped into arches, a variety of compositions on the ceiling or wall. To make such a decoration will be quite simple.
Materials for work:
- patterns (diagrams) of parts;
- scissors;
- adhesive tape;
- colored paper (both sides);
- stick or skewer (thicker).
How to make a paper rose
These roses can be made as a souvenir or decoration for a photo shoot.
DIY crepe paper flowers - schemes
To make beautiful buds, you can choose one of the instructions that are presented below. Small or huge flowers can be made in a few hours.
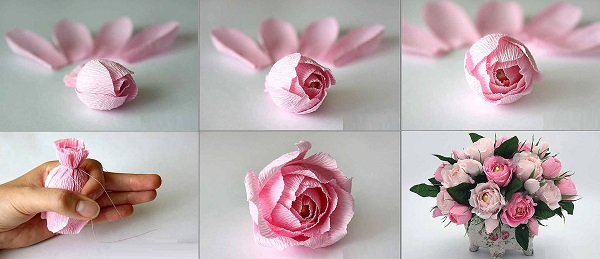
Wonderful lush peonies or a pink bouquet will be a wonderful addition to the interior or a souvenir.
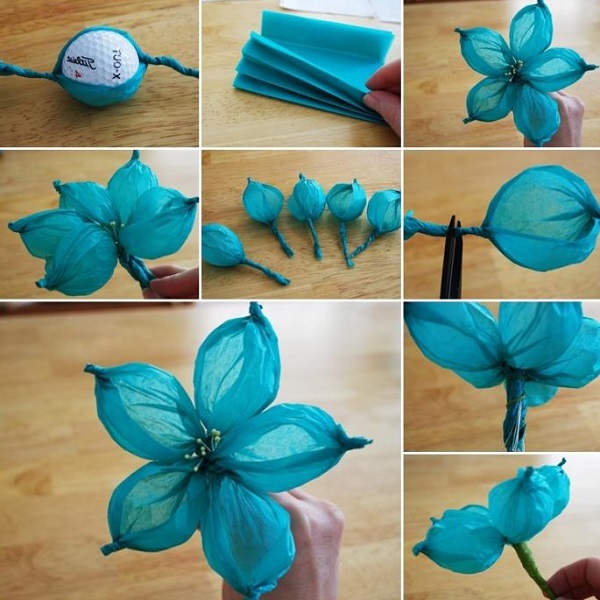
These wonderful blue flowers can be made from crepe paper with your own hands, if you follow the step-by-step diagram in the picture.
Volumetric flowers from corrugated paper - step by step photo
From crumpled paper, you can create beautiful bouquets, such as a composition of crocuses.
For work you will need:
- corrugated paper;
- glue;
- toothpicks;
- scissors;
- brush.
The process of making the composition:
- The paper must be laid in such a way that the relief is on the short side.
- Now you should cut the paper into rectangles measuring 8 * 4 centimeters.
- The blanks need to be crushed in the form of an accordion.
- Now, from these additions, you need to cut 6 identical petals, then they need to slightly twist the tips onto a toothpick.
- Now it's up to the stamens. They are made from the same rectangles as the petals. The blanks are cut with a fringe, leaving a narrow strip (see the diagram above).
- The fringe (each of its elements) must be twisted into a flagellum, and then the future stamen should be rolled into a tube. For this, a toothpick is wrapped with a blank of paper.
- The bottom of each of the stamens is smeared with glue, after which the flower petals begin to be fixed one by one.
- The completion of the manufacture of each flower will be wrapping the stalk with green paper, and then the leaves are attached to it.
How to make paper flowers for a postcard?
Decorating souvenirs makes every giver think about how interesting and original to design the packaging.
A simple ribbon bow is a thing of the past, replaced by paper flower arrangements.

Even hand-made cardboard flowers will allow even a small person to create unique gifts for friends or relatives.
What is required for work?
- colored paper (several colors: pink, red and green, you can choose another color scheme);
- a postcard purchased or made independently;
- glue;
- scissors.

How to make small decorative flowers?
- Round blanks are cut out of thin cardboard or paper. The edges of the circle are made serrated. The more such elements, the more magnificent the bud. Flowers can be made in different sizes.
- Each blank is folded into 4 or more additions - it depends on what shape you want to give the bud.
- Each part is fixed with glue on the postcard.
- The stem and leaves will complete the paper plant.
Here are such interesting master classes with step-by-step instructions for your attention that were selected and presented in this article. Imagine, create - everything will turn out!
Paper flowers will greatly decorate your interior and bring aesthetics and comfort to your living space. For everyone who wanted to learn how to make paper flowers with their own hands, we will show a few simple tutorials. A step-by-step photo for beginners will show the whole process in detail, and our tips will help you get the job done quickly and without too much fuss. From our article you will learn how to make a paper tulip, how make voluminous flowers for decorating the interior, how to cut a rose from colored paper and much more.
To cut out all this flower-paper variety, we have selected for you beautiful schemes and templates so that you can complete this task easily and quickly.
Paper flowers have a number of advantages that you will not find in living plants. Firstly, they do not fade, do not require special care and do not cause allergies. With the help of multi-colored paper flowers, you can advantageous to decorate the interior or clothing, volumetric flowers are attached to the wall or on the door, they are placed in large vases and solemnly presented for the holidays. , you can find out in one of our previous articles.
But to make your first paper flowers with your own hands, schemes, templates can be printed on a printer. And then - glue the petals according to the proposed instructions.  Do you dream of being presented with a scarlet flower? Make it yourself! Cut out several templates of different sizes and glue the petals on a special sponge located in the middle of the flower.
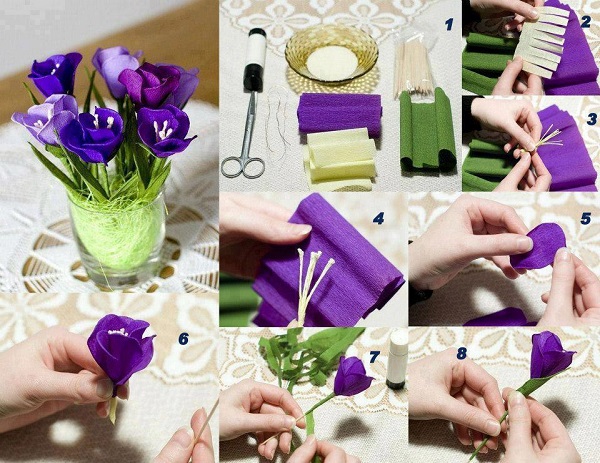
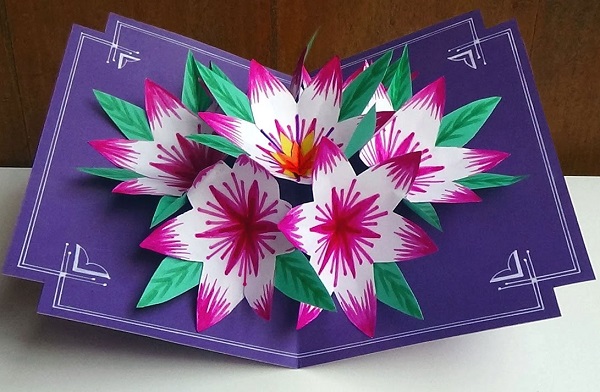
 And for this purple flower you will need:
- white sheet of paper;
- watercolor paints;
- scissors or stationery knife;
- aluminum wire;
- corkwood;
- paper tape;
- green tape or floral tape.
- Cut a sheet of paper into even strips, not reaching the edge of the sheet.
- Fold the cut leaf into a flower shape.
- Make sheets of paper and fold as in the photo.
- Connect the flower with the leaves and secure with tape.
- Fasten a small piece of cork to the wire and twist it in half.
- Insert the wire into the middle of the flower instead of the stem.
- Wrap the stem with tape and then tape.
- A delicate purple flower is ready.


 For a stock, for example, March 8th or May 9th, you can make several origami tulips according to the scheme shown in the photo.
 If you have a special stencil, you can make a whole bouquet of scarlet roses and give them to a loved one. Detailed instructions for creating flowers just present in the photo. If there is no stencil, draw the flowers yourself on a sheet of A4 paper yourself.
For other decorative experiments, we offer you a selection of videos for children and adults with detailed instructions on how to make crafts in the form of flowers.
Paper cut flower templates
And in this part of our conversation, we will introduce you paper cut flower templates. The shapes and sizes of flowers for every taste - from the most delicate color of an apple tree to bright blue cornflower and fiery red poppy.

 A few more templates will diversify your flower gallery.


 Large paper flowers for decorating the hall with your own hands: templates and schemes
Paper flowers are a win-win option for decorating any room.
 Note the short but very detailed master class for the production of volumetric paper flowers.
  Application from such a "pink heart" decorate the gift box or a greeting card.
 Crepe paper flowers are the most beautiful trend of this season. Such giant paper roses can be formed into a chic bouquet, or you can decorate the hall of a restaurant, cafe or your own apartment with them.
It is not difficult to make a flower with your own hands out of paper, especially if you have instruction and manufacturing scheme. Beautiful roses can be made from simple paper templates.
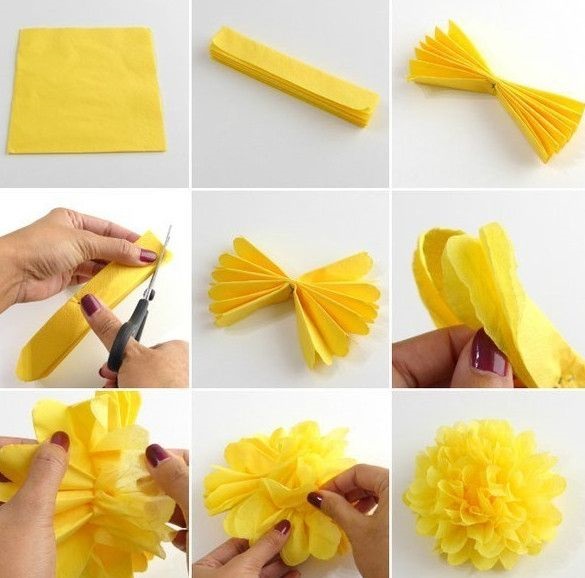
Popular flowers such as carnations can be easy to make from a regular napkin. These delicate flowers will certainly not wither soon.
 Scrapbooking is another popular form of creativity for both children and adults. From special colored paper cut simple flowers for cute bouquets or decor.
 Easy scrapbooking ideas - try cutting out roses, leaves and petals from special sheets of paper. And then glue everything on a postcard along with bows and decorative ornaments.
Making flowers can get you so engrossed that you don't notice how you transfer your hobbies to other materials, such as fabric. Such cute flowers can make unusual garland or delicate flower basket.