Antipyretics for children are prescribed by a pediatrician. But there are emergency situations with fever when the child needs to be given medicine immediately. Then the parents take responsibility and use antipyretic drugs. What is allowed to be given to infants? How can you lower the temperature in older children? What medications are the safest?
Applying rhinestones at home is not difficult. Any fan of beautiful nails will be able to glue rhinestones without the help of a specialist, having mastered the skills of nail art with rhinestones. It is enough to be creative, original and neat. With a little diligence, you will surprise everyone with beautiful nail art at any event.
Glue rhinestones on nails at home
Everyone who has attached rhinestones knows the main rule: before gluing and decorating your nails with rhinestones, be sure to put them in complete order. Remove cuticles, polish and enamel your nails. Now you can safely start decorating.
Place several rhinestones on the varnish that has not had time to dry, creating the desired pattern. Press them a little and they will lock into place. Now cover them on top with a transparent fixative and then you will not be upset by the rhinestone falling off literally an hour after gluing.
Care tip!
The main condition for a beautiful appearance of hands: a strong nail plate. Before removing cuticles, soak your hands in warm water with some sea salt. Haven’t you noticed that after seaside resorts any nail becomes stronger? The thing is that sea salt is a real first aid for nails. It perfectly improves the structure of nails. A sea salt bath for 15-20 minutes before each home care session will help your nails become stronger and acquire a healthy, natural shine.
How to glue rhinestones on nails?
Shiny tiny stones - rhinestones - are produced in different sizes and from different materials. There is no point in making heavy rhinestones - they will not stick to the nails. That is why manufacturers most often make them from plastic, glass and, less often, crystal. There are rhinestones that look like an adhesive sticker, and there are inexpensive plastic ones. High-quality rhinestones made of plastic look no worse than their expensive counterparts, and are much more practical to wear.
Salons use several methods of gluing rhinestones to a nail, and the simplest (it is very often practiced at home) is attaching it to a layer of varnish that fixes the composition (also called a topcoat).
How to properly attach rhinestones to nails?
You can carefully apply the design to the nail using an ordinary toothpick. Lightly moisten the tip with water and touch the rhinestone. You will see: it will quickly move and take the place you need on the nail. You can draw a butterfly or a star, or you can simply add any beautiful pattern.
To glue each rhinestone to the nail, either a fixative or glue is usually used. Both methods have certain disadvantages. If you attach your feet to varnish, you need to catch the moment when the varnish has become quite viscous, but has not had time to dry completely. If it is liquid, the rhinestones will simply “slide off”, but will not stick to it when it is dry. The adhesive should be chosen solely on recommendation: according to reviews, it is quite difficult to find a good one. A cheap one does not fasten for long and the rhinestones fall off.

How to apply rhinestones to shellac?
Shellac (gel polish) remains the most popular nail coating in recent years. Fashionistas appreciate shellac for its practicality, beauty and durability, thanks to which each nail looks well-groomed for weeks and does not need correction. Glitter with rhinestones allows you to transform your nails with gel polish and turn an everyday home manicure into an elegant one, so as to look impressive when going out.
Do you want to apply rhinestones correctly so that you don’t need to re-glue them the next day, and your nail doesn’t lose its appearance? Follow the correct course of action. If you decorate nails with shellac with rhinestones, do not use glue - it can quickly ruin your entire appearance.
The correct procedure for applying jewelry, guaranteeing a reliable result:
- Apply a base coat to each nail.
- Arrange shiny accessories in a pattern that pleases you.
- Gently place your hands under a UV drying lamp to dry each nail.
- All that remains is to apply the composition that secures the rhinestones on the nails.
The nail industry does not stand still; nail artists come up with new fashionable designs every day. One of the options for decorating nails is rhinestones. The variety of assortment is impressive; lovers of beautiful marigolds can pamper themselves with multi-colored decorations of absolutely any shape and size. However, before we talk about the final result, you need to figure out how to properly glue rhinestones on your nails. As with any other business, there are some peculiarities here.
Preparation
- First you need to remove the keratinized skin particles around the nails - the cuticle. To do this correctly, make a bath from a decoction of medicinal herbs (brew 40 grams of any plant in 1 liter of boiling water, let it brew, strain). Lower your fingers and wait 20 minutes. After the period has expired, stretch the skin so that the edge of the cuticle is clearly visible. Remove dead particles with nail clippers, moving from both sides.
- Sterilize your hands with antiseptic or hydrogen peroxide (can be replaced with Chlorhexidine). Remove the old varnish layer and give the plate the same length and shape. Rhinestones look very beautiful on oval and square nails with soft corners. When processing the free edge, keep the file perpendicular to the plate, otherwise the nails will begin to peel. For these purposes, it is better to use a thin glass file of low abrasiveness.
- For better adhesion of the rhinestones to the surface of the plate, polish your nails with a buff. Firstly, you will make it easier to apply the varnish, and secondly, you will get rid of unsightly “waves”. In addition, any coating lasts longer if the nail plate is pre-polished. Cover the surface with healing varnish-strengthener in 1 layer, let it dry.
Technology
- It is imperative to wait for the varnish to dry completely, otherwise the final design will be blurry and the rhinestones will not last long.
- When the first layer has dried, begin applying the second. You can use either colored or clear varnish. It all depends on personal preference.
- The second layer is applied one by one to each finger according to the following scheme: paint, attach rhinestones, move on to processing the next finger, repeat the previous manipulations.
- Start the procedure with your little finger: apply varnish, take a needle and dip it into the colorless composition so that a small drop forms at the tip. Pull out the needle, bring it to the outside of the rhinestone and hook it, the element will hang on the needle.
- Bring it to the nail, apply it to the desired place, press. Since the varnish dries in a short time, you need to act just as quickly. Repeat the steps with each subsequent rhinestone, then move on to the other finger.
- When all nail designs are complete, leave to dry for 10-20 minutes. After this period, cover the plate of each nail with a fixative so that the rhinestones last a long time.

- In the case of extended nails, it is better to cover the nails with a special gel or adhesive base intended for attaching decorative elements.
- Removing rhinestones is quite problematic using a liquid that contains acetone. Soak 10 cosmetic swabs in it, secure on each nail with cling film or foil, wait 5-10 minutes.
- You should not glue rhinestones in large quantities on each nail, such a manicure looks vulgar. Select 1 finger on your hand that will receive special attention; decorate all other nails more modestly.
- When you apply the second coat of varnish, wait half a minute until it partially dries. This is necessary so that the pattern does not smear if your hand suddenly trembles.
- You can purchase special glue for decorative elements at a nail store. In this case, the composition is applied to the inside of the rhinestone, then attached to the dried nail plate.
- A pattern of rhinestones looks beautiful on long nails. Pebbles can be attached to the free edge, imitating a French manicure. There is also an option when rhinestones are attached to the dividing line in the middle of the nail.
- Use rhinestones that suit your nail length. For example, on a short nail plate, elements of the smallest diameter look beautiful and laconic. Ladies with long nails are recommended to stick larger rhinestones.
- When choosing the color of rhinestones, give preference to one main shade and two or three additional ones. Do not overload your nails with a lot of bright colors, maintain contrast.
- An important feature of nail design using rhinestones is that they look beautiful only separately from other elements. For this reason, craftsmen do not recommend gluing stones in combination with sparkles, sequins, and foil.
- Do not handle the stones until they are completely dry. If you smear the pattern, you will have to redo the entire pattern. The needle used to attach the rhinestones can be replaced with a toothpick.
Design options using rhinestones
- The most common is the “flower” design. This option involves gluing one large Swarovski rhinestone in the middle and several small ones along the edges in the form of petals.
- Lately, moon manicure has become especially popular. In this case, the rhinestones are attached to one nail over the entire surface, bypassing the holes at the base of the plate.
- As mentioned earlier, a classic French jacket can be transformed into an evening one by gluing rhinestones to the free edge of the plate.
Before using the stones directly, prepare your nails: file and polish them, remove the cuticle. Attach the rhinestones to varnish or special glue, and pick them up with a needle/toothpick. Draw the design with a thin brush to better see the trajectory on which the decorative elements will be located.
Video: how to glue rhinestones on nails
“Well-groomed hands mean a well-groomed woman” - this slogan of an American advertising campaign from the time of the sexual revolution has not lost its relevance today. Today, to the usual trimmed manicure, such types of nail care as strengthening and extension, decoration with enamels and, of course, rhinestones have been added.
Glue rhinestones on nails
Rhinestones are beautiful decorative stones with a ground edge, which are attached to the nail plate using special glue or varnish. Rhinestones can be glued not only to artificial nails. If you have good glue and some skill, they will stick perfectly to a natural plate. It is not recommended to glue crystals to the edge of the nail: they fall into the stress zone and make the nail heavier. Therefore, it is better to use glitter there.
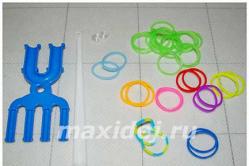
To work with rhinestones you will need:
- crystals
- wooden stick or thin brush
- varnish and fixing composition
Stones for natural nails
First of all, get your nails done. There is nothing more vulgar than painted, unfinished nails. Apply a layer of base varnish (base) to the nail plate. Make a drawing if it is assumed that rhinestones are not an independent decoration, but an addition to it. While the base and design are still wet, wet the tip of the stick and use it to pick up the rhinestone. A light pebble will stick to a wet stick, and it will be easier for you to put it in the right place.
To prevent the rhinestones on your nails from catching on hair and threads on clothes, when gluing them, make sure that the glue is evenly distributed along the edges
Place the crystals on the nail and gently press them onto the plate. Try not to move a single pebble, otherwise you will have to redo the entire design on the plate. Take your time and let the base set. Wait a minute and only then apply the fixing composition.
Stones for extended nails
Crystals look luxurious on artificial nails. The technology for attaching rhinestones to tips is not much different from gluing them to natural nails, except that in this case it is recommended to use a special glue rather than a base varnish as a fixative.
Glue tips or make nails according to shapes, apply a layer of gel and dry in a UV lamp. Use a nail file to remove excess material and shape your nails. Cover the cuts with base varnish or a thin layer of gel. Apply a design if you are doing French - ultra-white gel.
Apply glue to the place where the crystal will be installed. As a rule, adhesives are sold in tubes with dispensers and needles; they can easily be used to make small droplets the size of rhinestones. If you purchased professional material without a dispenser, use a thin brush, but then you will have to throw it away.
Place a stone in a drop of glue. The glue should not extend beyond its edges; if it drips, collect it with a brush so as not to spoil the design. After placing all the rhinestones, cover the nail with the finishing compound and dry it in a lamp, so the rhinestones will last a long time.
Manicure with rhinestones has become popular due to its versatility. After all, rhinestones are suitable for all colors of varnish, for any nail shape and also for any occasion. But what kind of glue should I use so that the rhinestones last for a long time and the nails do not deteriorate?
Manicure using rhinestones has been winning women's hearts for many years, because it has many advantages. You may notice that in many wedding photos girls have just such a manicure, because rhinestones go well with a wedding dress. Rhinestones are a universal option for manicure, the main thing is not to overdo it with their quantity. To get this manicure, you can go to a salon or learn how to do it at home.
To perform a manicure at home, you need to purchase all the necessary tools and parts for a manicure. For example, before each application of polish you need to treat your nails with manicure tools, so you need to buy scissors, a file and a special cuticle stick. You also need to remember to protect your nails, especially if the manicure is done with gel polishes. The nail plate always needs a varnish that will make it healthier.

Also, if you want to get a manicure with gel polish, you must first find out all the nuances of using the coating, buy the necessary materials, and only then begin the procedure. Gel polish may seem heavy at first, since you need more varnish and a special lamp that will dry your nails. But this coating is considered the most durable and brightest, therefore, having done a manicure with gel polish, you can wear it for about four weeks.
Subtleties of manicure with rhinestones
When it comes to manicure with rhinestones, you need to remember the main rules for using this decor. Firstly, you need to select rhinestones carefully so that they fit the nail. Secondly, the color and shape of rhinestones play a major role in the entire manicure, so they need to be examined carefully. And thirdly, you need to choose the right nail glue. Glue for rhinestones is very easy to use, because you just need to apply it to the base varnish, then transfer the rhinestones to the glue, let them dry, and then cover the rhinestones with a fixative.
![]()
Types of glue for rhinestones on nails
Several types of glue are suitable for manicure, which can glue rhinestones to the nail. The first is superglue, it has many advantages for manicures, but there are also disadvantages. By gluing rhinestones with superglue, you don’t have to worry about its service life, since it can last a very long time. But at the same time, superglue makes it impossible to adjust the placement of rhinestones, since it dries in a matter of seconds.
The second glue is two-component, it is also well suited for gluing rhinestones. Before the procedure, it is necessary to mix the components together, since they do not work separately. The glue makes it possible to adjust the position of the rhinestones, since after application there is time until it dries completely. Only the girl doing the manicure, or the master himself, can choose which of these two types of glue is better, because it may be more convenient for him to work with one type.

Reviews of different types of glue for rhinestones on nails
Albino:
“I treated my nails, and when they grew to the desired length, I decided to experiment with manicure. My first goal was to find rhinestones for nails, it was not difficult, since I found them in the first store. But there was a problem with the glue , there was no nail glue anywhere, so I decided to use superglue, and immediately regretted it.
The point is not that it will ruin your nails, not at all, because it is applied to the varnish, and not to the bare nail. It’s just that after the glue is applied to the nails, you need to quickly grab the rhinestone and glue it, and if it is not positioned as it should be, then there is no way to fix it.
Also, after gluing rhinestones to this glue, they lose their shine and become just a piece of plastic on the nail. That time I found a way out and decided that I would glue rhinestones onto the topcoat. I simply drowned them in varnish, and they looked beautiful. Of course, then I found out that there is a special glue for nails, but still, if I don’t have this glue at hand, I use top coat.”

“I read reviews about manicure with rhinestones, and saw advice about glue. I decided to conduct an experiment for myself: I bought superglue and epoxy and did a manicure on both hands with different glues. Of course, it was sad when I tore off the rhinestones from the superglue, since I I was just afraid not to ruin my nails, but I still decided for myself that I would never use it for manicure again.
A friend said that its composition is not suitable for application to nails, but it is recommended by those who do not know how it can affect the nail. Two-component glue, of course, turned out to be much better and more convenient, and it makes it easier to remove rhinestones. That's why I only use it now. “I advise girls not to use superglue in any situation with cosmetic procedures, otherwise there may be unpleasant consequences.”
Video on the topic of the article
Today, sparkling pebbles on nails have become very popular among fashionistas. But how to glue rhinestones onto your nails correctly so that they lie flat and don’t come off quickly?
After all, quite recently such stones were used only as decoration on clothing, furniture and various accessories. The idea of using them in manicure appeared quite recently. Therefore, not everyone has practical experience in creating it, but any girl can learn how to make such an exquisite decoration.
General rules for making designs with rhinestones

Today, manicure is a real art, which requires, first of all, accuracy from the master. But in practice, gluing your nails correctly and beautifully is not so difficult. And for extraordinary and creative girls, this skill will help them save money and always be on top at any time. The most important thing here is to learn how to glue jewelry correctly and to have patience with such delicate work.
Adhesive rhinestones are shiny stones of different sizes that are attached to the nails using special glue. The main feature of rhinestones is that they have a relief surface on one side and a flat surface on the other. It is on the flat side that rhinestones are attached to the nails. Due to the fact that rhinestones come in different colors and shapes, girls have an excellent opportunity to realize their fantasies by making an unusual manicure for their nails.
When planning to make such a design, you should know how to glue rhinestones correctly. Otherwise, there is a chance that the decoration will disappear in the near future. It is important that to create such beauty on your nails, no special tools are required. The most important thing is to follow certain rules and their consistent implementation.
Rhinestone gluing technology:

- After applying the varnish, you need to wait for it to dry completely. Otherwise, the fastening of the stones will be weak, and the intended pattern will be blurred.
- It is recommended to use a gel or glue specially designed for this purpose. Especially if the design is carried out on extended nails. It is permissible to use a simple transparent varnish, but with the obligatory use of a fixative. In this case, the rhinestones will become less shiny.
- The patterns are made carefully, using a toothpick or a tool specially designed for this. First, you just need to moisten the stick in varnish or plain water.
- How to glue decorations and how many of them do you need? Here it is best to remember moderation, because nails overloaded with stones look ugly and even vulgar. The only exception is a manicure in which small pebbles are used, and adhesive rhinestones are applied only to one nail.
- After applying the rhinestones strictly according to the pattern, you need to leave your nails until the glue dries completely.
- In order to remove rhinestones from nails at home, you need to have cotton swabs and a cosmetic product designed to dissolve the adhesive crystal base. All work should be carried out with extreme caution.