Antipyretics for children are prescribed by a pediatrician. But there are emergency situations with fever when the child needs to be given medicine immediately. Then the parents take responsibility and use antipyretic drugs. What is allowed to be given to infants? How can you lower the temperature in older children? What medications are the safest?
Good afternoon, today we will talk about autumn crafts. And we will make these crafts from natural materials with our own hands. Autumn is rich in a variety of materials. And so we will do with A variety of crafts on the theme of Autumn- from leaves, branches, acorns, chestnuts, straw, moss, dried flowers and other natural materials. I will show you interesting ways to create autumn crafts with your own hands using ordinary natural materials. in an unusual design way. In this article you will find fresh ideas, that will inspire you to get creative this fall. So, we go on a quiet hunt for ideas for the best crafts for the fall 2017 season.
Autumn natural material is rich in ideas for a variety of crafts for children. Let's see what ideas you can implement this fall.
Leaf compositions
and natural materials.
Who said that autumn crafts from natural materials should be done while sitting indoors? Golden autumn beckons with warm sunshine and the smell of rotten leaves - and we don’t want to sit within four walls. We go outside with the children to catch a little more warmth and warm our eyes with the yellow fire of autumn leaves.
Crafts on the AUTUMN theme can be made from natural materials right outside. In my yard, next to the entrance. All you need to do is find a quiet, windless place. Instruct the children to collect a stack of bright leaves and a bucket of dry pebbles.
And now an interesting game begins - laying out crafts from autumn natural material. For novice craftsmen, this can be a simple tree. Heavy pebbles press down the yellow leaves and prevent them from flying away from the wind. The craft can be saved as a keepsake in the form of a photograph.

If there is a whole pile of pebbles near the place where you walk, then you can make a craft from natural material on a larger scale (as in the photo below).

If you are observant, you may notice that different trees have different colored foliage. If we collect yellow leaves from an ash or birch tree in a separate bag, red leaves from an aspen or Canadian maple in another bag, and a little more brown, blackened leaves, then we can make this Winnie the Bear on our porch.

Any silhouette picture can be laid out from a colored mosaic of nature itself. The main thing is to find a place without strong wind. And have time to photograph this beauty before it flutters from the wind and flies away like a bird.

The natural materials of autumn themselves will give you ideas for collages - gray branches (like the gray plumage of a wing and tail), yellow leaves (like yellow down on a chest). And here you are, the tit bird.

You don't have to be an artist, you don't have to have a lot of leaves. Even the smallest piles of leaves can be used to create beautiful autumn crafts. The simplest DIY craft, arranging foliage according to the colors of the spectrum, looks like real magic.

You become little wizards. Secret gnomes-assistants of Queen Autumn. You misbehave secretly, leaving good signs, funny symbols of the autumn season.

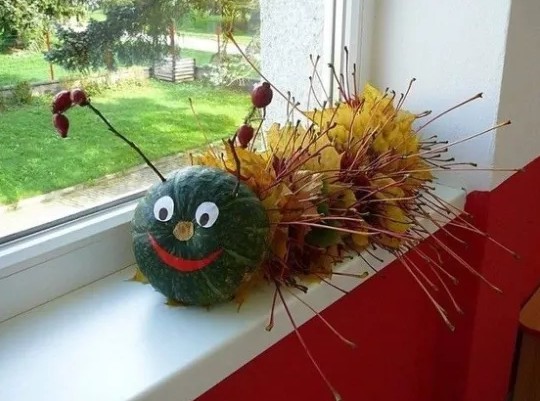
And some crafts can be made using a tree trunk as a base. Make the tree smile. The nose is a bump, two eyes are cut from a wood log, and a smile is made from physalis fruits strung on a thread.

Do you know what mandalas are? In the east, mandalas are sacred patterns closed in a circle. A harmonious pattern repeating in a circle is like a map of the universe. Mandalas are painted or laid out from mosaics, colored sand, and flower petals. Mandalas are a spiritual practice that allows you to touch the divine principle within yourself. You need to make mandalas in a special state of mind - pure, serene, enlightened.
We can also make beautiful harmonious mandala patterns with our own hands in the form of crafts from natural material – bright, beautiful autumn material.

Your autumn mandala craft can be very small (as in the photo below).

Or a very large one, consisting of many circles in a cyclic pattern.

Mosaic applications
on the theme AUTUMN.
All children love mosaics. Why don't we make it from autumn natural material.
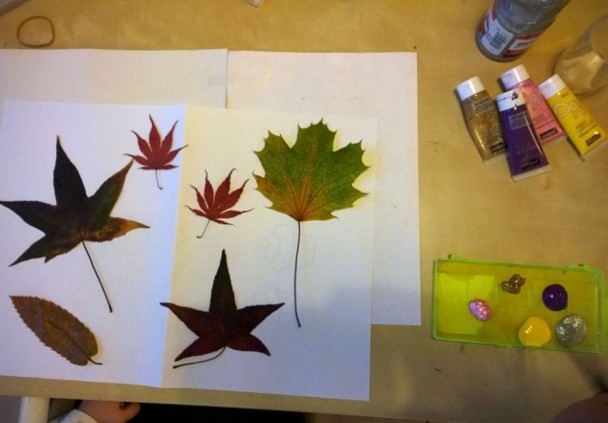
Since the leaves are too large for mosaics (and suitable for laying out large paintings in the yard), for small indoor works we can cut an ordinary succulent maple leaf into small squares. Place them in bowls - yellow, green, red separately. And let the children themselves lay out a bright mosaic craft from such a pleasant-to-touch natural material.

You can use cereals or seeds as an ornamental material. A very good natural material for autumn children's crafts is yellow corn kernels or large pumpkin seeds painted with gouache.

And a mosaic of whole leaves can become a tree crown - a simple and quick craft made from natural material, which is suitable for kindergarten children. You can stick the leaves on paper, or on a transparent office file - and then such a craft can be mounted on a window, the leaves will shine in the sun. A beautiful children's craft for younger children.

Crafts on the theme AUTUMN.
Natural material STONE.
Here’s another wonderful idea for crafts made from natural materials in an autumn theme. Ordinary flat river stones can become a canvas for autumn paintings. You can paint stones with a brush, but it is better to apply the design using dots technique - round wooden sticks or special dots sticks (metal devices with a round ball at the end) are suitable for this. They are sold in the manicure department as they are intended for painting on nails. The ball tips on the dots sticks have different sizes, which allows you to draw even dots of any size.

You can also draw owls on stones - this is the simplest drawing - the main thing here is expressive eyes, a pointed beak, and oval wings with even rows of feathers. First we draw with paints, then we outline each painted element with a contour (white, as in the left photo or black, as in the right photo below). And a thin contour outline of the elements will make the craft-drawings clearer and more expressive.
Such owl crafts made from natural material will look good on driftwood with scraps of moss, inside a wooden frame, glued to a cut log.

And it’s even cooler to put such an owl inside a hole cut in a thick round cut of a tree trunk.

Autumn crafts
with tree branches.
Ordinary tree branches can also become the source of an interesting DIY autumn collage. This natural material is lying around completely unused. You can give children the task of collecting beautiful, non-dirty twigs in a bag while on a walk, disassembling them at home, clearing them of debris and breaking them into small pieces.
Next, on a sheet of paper, draw the outlines of a basket with handles. And either we give the child plasticine, or we arm ourselves with a glue gun and begin to assemble our basket from sticks. Then all that remains is to put the fruit in it (cut it out of cardboard, draw it and then cut it out, or use the cut-out applique technique).
And if you collected beautiful leaves along with sticks, then you can make a children’s craft tree from natural materials.

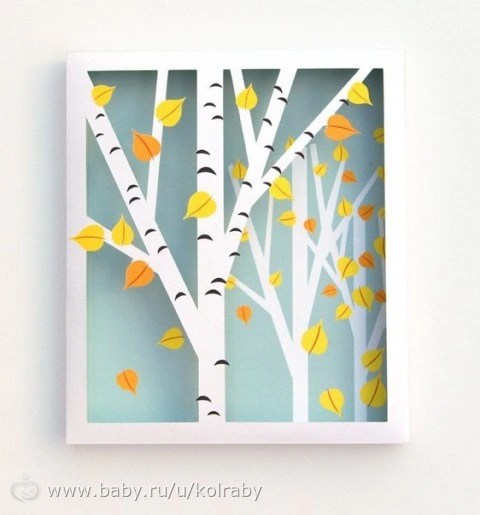
Long sticks found in the park can not be broken, but put aside to make them a new craft-panel made from natural materials(as in the photo below). The principle is simple. The sticks are laid in the shape of the sides of a square - we tie the junction of the sticks with twine (wire, thread). And then we decorate such a frame using natural materials and colored paper.

You can place a canvas inside a frame of branches - we tint a sheet of cardboard with paints, make holes on its sides with a hole punch - and tie the sheet with threads to the branch frame, pulling the thread through the holes and around the branch (as was done in the left photo below). And then on this canvas we make an application from natural material on the theme of autumn.
Or you can simply decorate the frame along its perimeter - at the bottom of the square we attach a bush, mushrooms, pieces of moss, bark, and a cardboard hedgehog to the plasticine. On the top of our panel made of natural material we hang a garland of autumn leaves cut out of colored paper, a sun, clouds, and a kite.
From the branches you can lay out large applique in the form of an owl , a children's craft, which is entirely made from natural materials that autumn is rich in. Branches, dry and fresh pine needles, withered fir legs. You can lay out the applique on a sheet of plywood and secure everything with glue - or make a temporary mosaic on a walk right on the ground or stump.

Looks very nice DIY HEDGEHOG made from natural material . This fall craft is my favorite in this post. Let me even tell you in detail how to simply and easily make such a hedgehog with your own hands. It's really very easy. Now you will see this.

First, we find beautiful thick twigs from a bush or birch branches - we cut them with scissors or a knife into segments with long oblique cuts (as in the photo of the hedgehog below).
For this autumn craft you will need plasticine - a large piece. Where can I get it? I never throw away used plasticine from children's crafts, I put it in one common pile - then I soak this multi-colored pile in hot water - it becomes soft like fresh dough, and easily and simply I knead this whole lump into a homogeneous mass with my hands - I get a large piece of fresh brown plasticine of excellent quality. You can make a variety of crafts from it for a long time
We form the body of a hedgehog from plasticine- drop-shaped. And row by row we stick pieces of branches into the thick part of the hedgehog - the oblique cuts should all point in one direction.
2 ways to design a hedgehog's face.
1 way. I wrap the hedgehog’s plasticine nose with a piece of burlap or a piece of gauze (bandage) soaked in a solution of iodine and water.
Method 2. The hedgehog's face can be coated with PVA glue, covered with pieces of paper napkins, coated with glue again, another layer of napkins, glue on top and allowed to dry - you will get a layer of papier-mâché. We cover it with paint - draw eyes and a nose on it
Craft-web from branches and leaves.
You can also make beautiful decorative pendants on the AUTUMN theme from natural materials. We will need straight, even branches - like willow. Let's look at the photo, and below I give a detailed step-by-step description of this children's craft.

A detailed master class on this craft made from natural materials.
Take a lump of plasticine and divide it into 2 small pellets. On the first cake we place the branches in a circle (that is, radially from this plasticine center) - so that the tips of the branches meet in the middle of the plasticine cake. Lightly press each branch so that it sinks into the plasticine. Cover the top with a second piece of plasticine, also pressing it onto the branches. It turns out to be a splay with rays of branches.
Now we need coarse threads - the ones that are used in the store to tie up packages with purchases. Such canvas-paper thick gray threads. With them we begin to weave a web between the branches - starting from the plasticine center and gradually moving towards the outer edge, until our web rests against the edge of the maple leaf.
Craft autumn kaleidoscope.
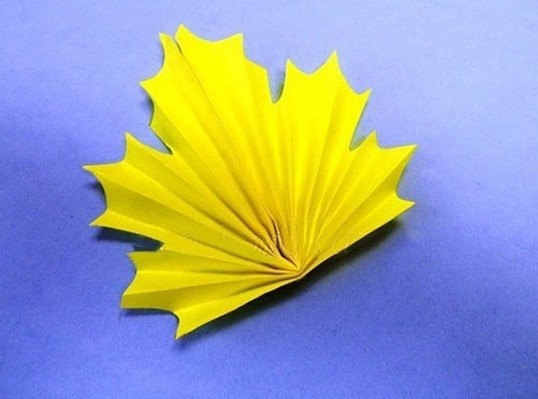
Also you can do colored kaleido made from natural material – from branches and leaves (as in the photo below).

For this craft we will need hot glue (or the ability to weave threads between crossed branches). Now I will give a detailed master class on how to create this craft with your own hands.
Step 1 Cut 4 rods of equal size. Two of them we cross cross over cross - fasten with glue or thread. Two others we cross in the same way. We now have two crosses made of branches.
Step 2 We place these 2 crosses on top of each other diagonally - so that they form snowflake figure. We fasten the middle of this clutch with glue (or fix it with threads).
Step 3 We make a round ring from a flexible willow rod (fresh or soaked in water). We attach this ring to our “snowflake” made of twigs - so that the edges of the ring are at the same distance from the center - along each rod(we measure with a tape measure). If the distances are the same, then the ring will be even and not crooked.
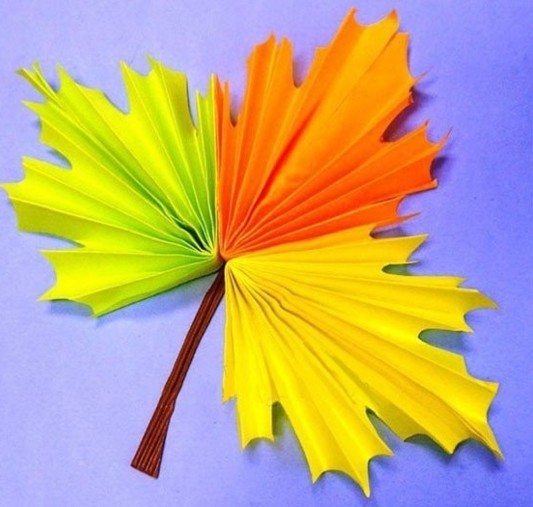
Step 4 As a result, we got a circle from the branches, divided into triangular sectors. And all that remains is to find large maple leaves of different colors - pure yellow, pure red, pure green, pure orange. From them you need to cut out triangles that are suitable in size to the hole sector on the future kaleidoscope. Cut out the triangle like this: so that the central vein on the maple leaf passes through the middle of such a triangle– divided it in half like a bisector from geometry. And we attach all these multi-colored triangles made of maple leaves with a glue gun to the sectors of our structure made of natural material.
Autumn applications
Made from natural material.
And of course, all children love to make appliques from autumn natural materials. Small and large paintings of leaves and dried flowers. The most favorite children's crafts on the theme of autumn.

The symbol of autumn made from natural material is, of course, a hedgehog. What can it be made from, from leaves, from flowers, from twigs, from maple or ash seeds.

The simplest hedgehog is made like this. Cut out the silhouette of a hedgehog from cardboard. We give children plasticine and maple seeds. We begin to attach rows of seeds to the cardboard with plasticine - you need to start from the back of the hedgehog. Children are eager to start with the muzzle - explain to them that this is not correct, that then it is not convenient to do the back rows of needles, when the front needles stick out back and get in the way.
Using the same principle, a hedgehog is made from flat natural material - leaves and dried flowers. Also starting from the butt, we attach it to plasticine or glue. This is the most common children's craft on the theme of Autumn.

Children also love making fall turkeys. This is also a simple bird craft that doesn’t require much natural material. The body and head of the bird can be cut out of cardboard. Or the head and body can be cut out with scissors from the same maple leaf (as in the photo of the craft below).


YOU can make crafts without using colored paper, but by cutting out all the parts necessary for the picture from natural material, if you do not find a leaf of a suitable shape.


Here's a great idea. Large craft LION. It can be made from real natural leaves. Or you can design it as a collective paper craft. In the kindergarten group, we distribute sheets of paper with a maple leaf drawn on it. The children's task is to cut out the contour of this sheet. At the end of the lesson, all children attach their leaves to the lion's mane. A good idea for a craft on the theme “autumn” is for the middle group of kindergarten, when children are in their first year of learning to cut out contours with scissors - they will cut out a maple leaf for about 10 minutes, and puff with zeal like steam locomotives.

If you work in a large group of children (as a kindergarten teacher or a teacher, or a circle leader), then you can make one large collective craft. For example, this bird is made from natural material. We cut out parts of the bird from cardboard - the left wing separately, the right wing separately, the body separately and the tail separately. Divide the team into 4 creative groups. Each group of children receives their own piece and begins to place leaves on glue or plasticine. After completing the work of each team - we combine the details into one common bird craft made from a natural material as bright as autumn itself.

Autumn crafts-paintings
Made from natural material.
And of course, autumn material makes beautiful, bright collage crafts in the form of natural landscapes. In the photo below we see how a picture-panel was made from different materials - paper, leaves, herbs.

You can dry many flower petals. And make a big collage with the children with a blue sky and a blue river. Stretch a bridge across the river, cut out of a blackened autumn leaf (in order for the leaf to turn black, it must be ironed with a hot iron through a newspaper).

And if you don’t have enough dry natural material, then you can paint a picture in gouache or watercolor and lay out only individual elements of the landscape from leaves and herbs (as in this craft below).

Autumn crafts
from natural material.
Autumn nature is rich in a wide variety of ornamental materials - hawthorn berries, rose hips, pine cones, fluffy moss. After a walk in the forest, you can make an elegant autumn composition with a candle. And have a romantic candlelit dinner with an autumn theme.

Thick cut logs, round birch logs and walnut shells - this poor natural material can become a source of inspiration for such a craft in the form of a mushroom clearing.

From the found cones you can make a variety of characters with your own hands. And place them in the form of a single autumn composition, made with your own hands from natural materials (wood, leaves, moss, wood chips, etc.).

Fresh oak branches plucked by a hurricane can be dried in the shade of a shed, under the roof. Oak leaves do not lose their rich green color when dried. And then they will be able to take part in interesting crafts made with their own hands from autumn natural materials.

A wreath - a symbol of autumn - made from natural material in all shades of bright foliage will delight your whole family. It is so interesting to collect leaves - to select only the most beautiful ones. You need to weave a wreath with your own hands from willow twigs and weave autumn leaves into it with threads, plant pine cones on wire or glue. On our website we have a special educational article on weaving wreaths from twigs and branches -

The bright fruit boxes of physalis, twigs with hawthorn fruits, and immemorial flowers look beautiful in autumn wreaths.

But even if you don't have bright natural material to make an autumn wreath, don't worry. You can do bright wreath of gray pine cones. You just need to take more gouache. Paint each pine cone in shades of fall foliage. Spray with hairspray (to make the color richer and not stain your hands). And then collect all this colorful splendor of autumn into a rich wreath with your own hands.

The cones in the wreath can be placed with their butts forward (as in the photo above), or with their noses forward (as in the craft below).

You can make decorative autumn wreaths from one natural material. Only from rose hips - string the red fruits onto copper wire and bend it into a heart shape.

Or your fall wreath can be made from a log of wood found in a woodpile.

In the same woodshed you can find natural material suitable for making a composition with owls.

Your autumn compositions can look like cheerful people made from birch cuts, decorated with various natural materials that autumn is rich in.

And tufts of mown grass can turn into a hedgehog if you (or good neighbors) have physalis blooming profusely. Its boxes can be sewn with thread to a straw bale. Wrap the sharp edge of the bale with twine and glue on the nose and eyes.

You can also make it from natural autumn material beautiful candlestick . We will need the bottom part of any white bottle of household liquid (washing balm, etc.).

We unroll transparent wide tape on the table. On its sticky surface we place beautiful small leaves, seeds and other flat natural material, wrong side up. We place it so that there are empty spaces of adhesive tape between the elements (so that there is adhesive space).
These are the new ideas for this fall - made from natural materials. You've found inspiration here. You fell in love with some crafts. And that means this fall will not pass by your skillful hands. All that remains is to collect natural material, of which there is plenty everywhere, and, fortunately, it is free. Like in that poem...
Autumn is coming in our park,
Autumn gives gifts to everyone.
And we give you even more other articles on the topic of autumn crafts.
Olga Klishevskaya, especially for the site.
DIY autumn topiary
Topiary "Autumn tree" Master class with step-by-step photos
DIY topiary made from artificial paper leaves. Master class with step-by-step photos
The master class is intended for middle-aged and older children, educators, teachers, additional education teachers, as well as for those who like to be creative.Purpose: for decorating the interior of an apartment, a hand-made gift.
Target: Creating a topiary "Autumn tree"
Tasks:
-teach the sequence of making topiary;
-develop creativity and imagination;
-improve skills in working with various materials;
- to cultivate hard work and accuracy.
Autumn is the most wonderful time of the year, when nature gives us a lot of different materials for creating various beautiful crafts. All we have to do is to dream up our imaginations, choose a material and start making crafts. That’s what we will do with you now. My choice fell on making the “Autumn Tree” topiary .Handmade topiary will be a continuation of the autumn theme in any room, be it a group in a kindergarten or your apartment.
Leaf fall
Leaf fall, leaf fall,
Yellow leaves are flying.
Yellow maple, yellow beech,
Yellow circle in the sky of the sun.
Yellow yard, yellow house.
The whole earth is yellow all around.
Yellowness, yellowness,
This means that autumn is not spring.
(V. Nirovich)
To make an autumn tree we will need:

-newspapers;
-sewing threads;
-leg-split;
-PVA glue;
-gypsum;
-glue gun;
-scissors;
-wooden stick;
-paint-gouache;
-flower pot;
-artificial leaves, grass, berries;
-napkins;
-satin ribbon.
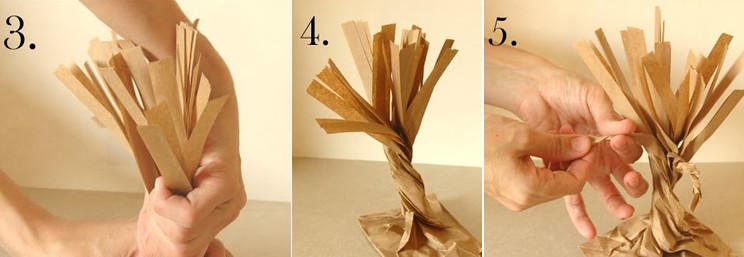
Everything is ready and we can start making topiary. The base of the topiary will be a ball, we make it from crumpled newspapers wrapped in sewing threads.

When you decide that the required size of the ball has been achieved, we proceed to gluing the ball with napkins. To do this, tear the napkins into pieces and stick them on the ball, previously greased with PVA glue

We make several layers to give a more even surface to our ball

When the entire ball is covered, give it time to dry, it is better to leave it overnight.
This is how our ball should turn out.

While our ball is drying, we make a trunk, for this we take a stick or a twig, grease it well with PVA glue and wrap it with twine and let it dry.

Now that both the crown and the trunk are ready, we begin assembling our topiary.
Make a cross-shaped cut in the ball

and insert the barrel and secure the cut with a glue gun.

We begin to decorate the crown with autumn leaves. We make small holes in the ball (I did this with a nail, or you can use an awl), apply a drop of glue with a glue gun and insert the leaves.

We glue the leaves as your imagination tells you, I did it like this

Add some berries

Having finished decorating the crown, we proceed to planting our tree in a pot. We will have the simplest flower pot as a pot. We make a solution from building plaster, the consistency of the solution should not be liquid, the solution will take a long time to dry). The solution should be like store-bought sour cream. Fill it solution into the pot, insert the stem into the middle of the pot and wait a little until the solution sets.

Let's start decorating the surface of the pot; to do this, take artificial grass and carefully place it on the plaster surface while it is not yet completely frozen.

Now we move on to decorating the pot itself, we do this using twine.

We tie a beautiful satin bow and our pot takes on a different look.
Let's add a little decor to the grass and our autumn tree is ready.
This is the “Autumn Tree” I came up with.

Sharing with your finds. All or almost all of us have to do crafts with children for kindergarten or school... You will also find fantasies here for home creativity with kids.
Let's start with the trees...


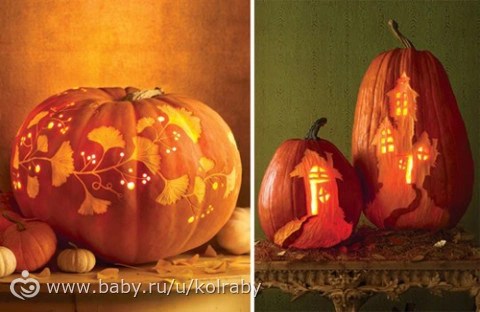
And now - pumpkins...


You don't have to do everything for a specific master class... And strictly adhere to the proposed topic. Can just take a craft idea and remake it in your own way.
Fantasies about candles...


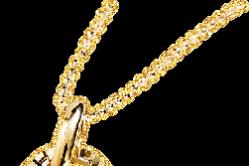
Accessories of the “Queen of Autumn”…


Papier-mâché... And not only...


Well I didn’t put the owls first again. They are always the first and most important for us...


There are, in addition to owls, other living creatures…


And again - improvised material. Not only the one found in the forest... But also the “home” one... For example, pistachio shells...


AND door (wall) wreaths... good not only for New Year and Christmas... In autumn they especially cozy and bright it turns out...


And again pumpkins... Some people have a lot of them in their dachas! I’m not a dacha lover (no, no): my mother just hands me buckets of vegetables. But my godmother gave me a pumpkin last year. Ahhhh... Maybe I'm Cinderella?


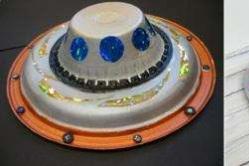
If you don't understand how cover with leaves or dough bowl from below, to get such beauty, watch the master classes...


Many people make baskets now. A very popular craft. On this topic "Gifts of Autumn"... Well, the baskets really turn out very colorful and juicy...


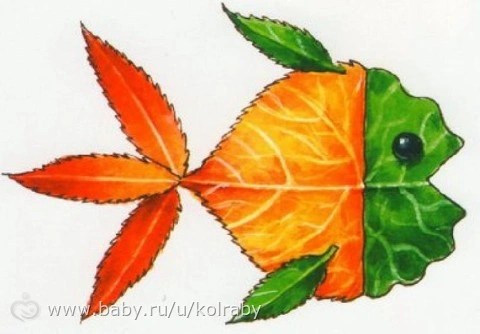
And again leaves... And again owls... And a lot of art...


In our kindergarten, Alice’s group is very talented, kind and hardworking teachers- Olga Grigorievna and Anna Sergeevna. They love children. And they adore them make all sorts of things in the educational process... Or draw...


Us crafts for children in kindergarten teachers left on a large panel- attached to paper clips that hang on fishing lines... Now I’ll find a post in a magazine when we made such a panel (with owls, of course) for crafts...


Some parents ignore creative activities... They say that paints are a lot of dirt and stains - you can only get by with pencils or felt-tip pens... And all that comes out is a mess... But the child, they say, doesn’t understand the plasticine - he rejects it... Start small- just give the child the materials. A couple of lessons... Then again... And then start gradually advise and help... To encourage creativity, to create... I also don’t really like dolls and LEGOs covered with plasticine... But accuracy, diligence and imagination... they won’t come from anywhere from a child if you don’t work. Daily.


Of course, there is always not enough time. Of course, there is a lot of work and household chores. But the child is delighted that his autumn work is also on display in a kindergarten or school. This - a source of pride yourself and your family...
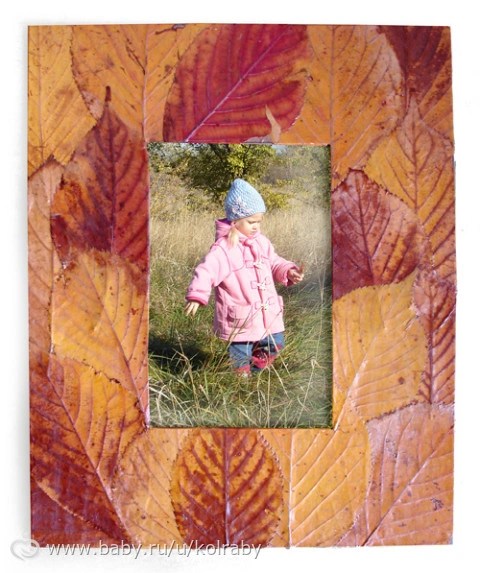


Maybe this year... Maybe next... Your work will be recognized as the best at the exhibition. Even a prize. It will be a wonderful day. In the meantime, let family evenings be warmed by autumn candles, and photo frames decorated with leaves or acorns adorn the shelves...
By the way, my friend and I once made of papier-mâché just made giant mushrooms... All the children made them as tall as a palm... And here we have... Giants. Mutants...)))


Who hasn't read mine yet? 100 ideas for autumn, be sure to read. And apply - partially...
We a lot of things have already been used and done with Alisa and Shura- I’ll tell you in other posts...
And I’ll show you not today or tomorrow... autumn video...And pictures. According to last fall. Ours is so beautiful There was a family shoot. It’s just so complicated for a video combination of video and photo...So I'm waiting for Shura will finish installation. For now he has a lot of work to do.
P.S. Yes, I show you very few personal and family photos. Otherwise you will get tired of me...


Hello!
Today I again propose making crafts in an autumn theme. Look out the window and see how many colorful leaves are already lying there. Memories and lines from, for example, these immediately grab you:
“Suddenly it became twice as bright,
The yard is like in the sun's rays.
This dress is golden
On the birch tree’s shoulders...”
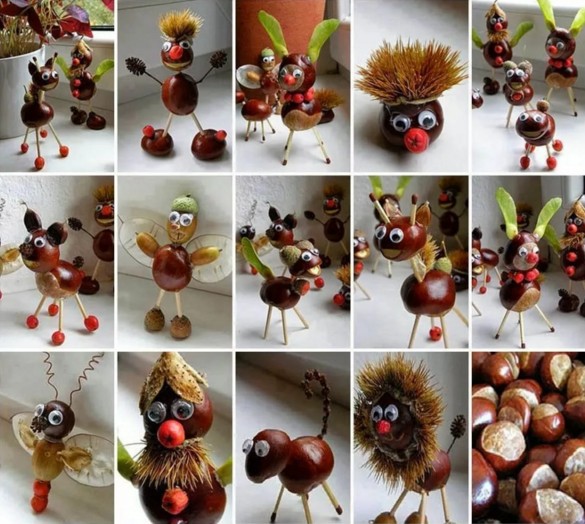
This time of year is good because there is something to craft from. Because you can take any and then you have, for example, a little man made of pine cones, or maybe you love it? Then you can also easily make a souvenir for an exhibition, for example.
You can even take ordinary leaves and create a masterpiece on paper. In general, the list can be endless. So let me introduce you to a lot of cool and beautiful ideas on this topic.
I hope you will be inspired, and once you decide, you will immediately start making crafts with your children. After all, children of any age really love such work, be it primary schoolchildren or preschoolers.
In my previous note, we have already considered many options for what you can make with your own hands from various types of materials, it can be natural, fruits, vegetables, and even waste. This time I will show you a few more options, which are also no less beautiful and attractive.
And perhaps I’ll start with a non-traditional, but a paper-plasticine miracle. Take cardboard and make blanks of maple and oak leaves. You will also need glue for ceiling tiles and a CD for the job.

Take plasticine of different colors in your hand and roll it into a ball.
Advice! You can use modeling dough instead of plasticine.

Roll out with your hands, as if painting the surface of the leaves.

Glue the finished blanks onto the disk using glue.

Mask the middle with oak leaves and roll up the red rowan berries. This is such a cool masterpiece with an autumn theme.

Do you want to create something extraordinarily cool from real rowan berries? I propose to make a picture of rowan in the form of a squirrel. You need to draw the image of a squirrel on cardboard (from under a box, thick) and then cut it out.
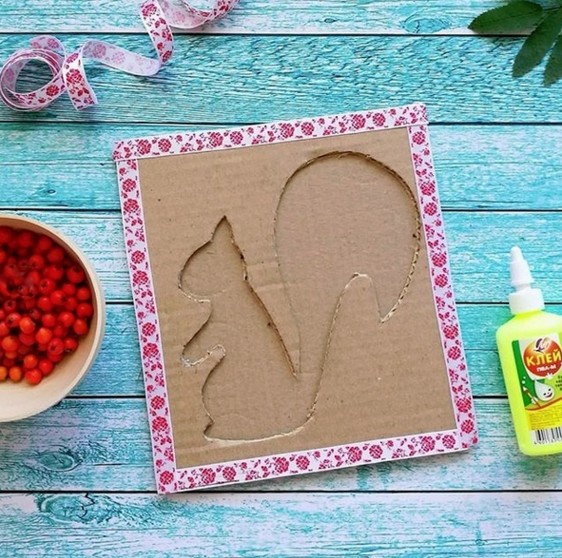
Use decorative tape to connect the edges of two cardboards. Or glue with regular PVA. And then fill the image of the animal with berries. It looks original and beautiful! She's a charmer, isn't she?
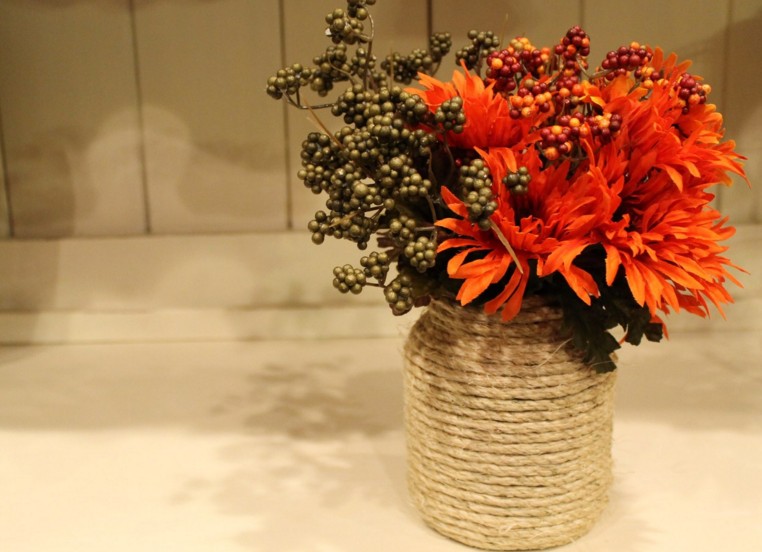
The next craft is a flower vase, you can make it yourself. Take any glass container and wrap it with woolen thread or twine. When doing this, first paint the jar with glue. You can see the stages of work below in this figure:

Now prepare the bouquet and place it in a vase. And a gift or souvenir for the exhibition will be ready. Good luck!
Now make a funny little guy in the shape of a sun. Cut out a circle from colored paper, glue eyes, mouth, and nose onto it. Or you can draw all these details with a marker.

Then cover the diameter of the circle with dry leaves.

Also, in order to comfortably hold the sun with your hands, glue a stick. Or then stick it in a glass, which you can also build yourself.

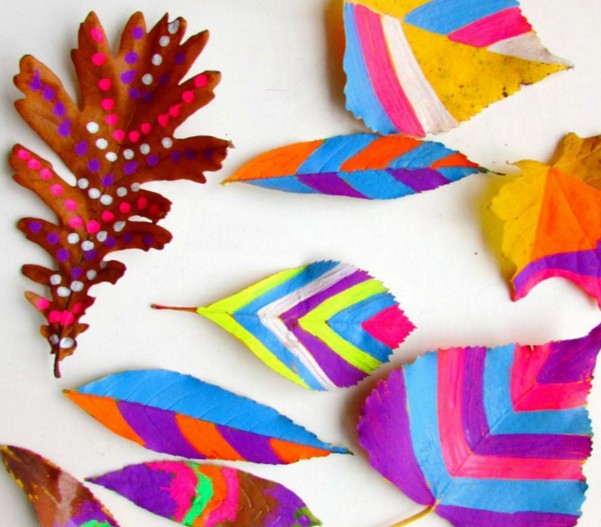
With preschool children in the park, collect dry leaves and then invite them to decorate them with felt-tip pens, or better yet, with acrylic paints.

It turns out to be quite wonderful and cool, you won’t be able to take your eyes off it!
You can go the other way and make a cool bouquet. I remember that I haven’t shown you anything like this before. But, I repeat.


You can give this to your mother, grandmother, or your favorite teacher.
DIY crafts for kindergarten on the theme “Autumn” (all new items)
With preschool children, you can simply use your imagination. Take and lay out magical multi-colored trees from plasticine balls. And indeed there will be a golden autumn.

In addition, you can also use paints and cotton swabs for hygiene; you can use them to create paintings and scenes on any topic.

Agree, there is nothing difficult about this, just sit there and put it on a piece of paper.

Another fun work from scrap materials, made at home, such as millet, is what the author offers.


You can also make pictures from rice and semolina, or pasta, in the same way.


Everyone knows that kids love to play with signets, so why not take advantage of it. Dip dry leaves wounds from the ground and dip them in liquid paint, you will get an excellent print.

You see how brightly and elegantly you can decorate any drawing.

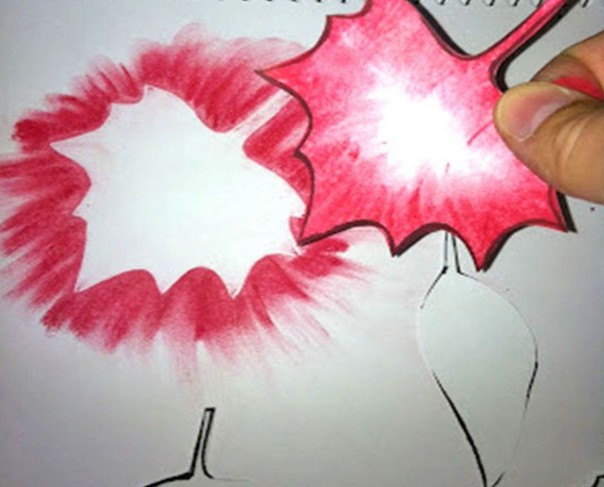
Or you can go another way, put leaves (either real or paper) and use them as stencils, that is, paint directly on them, you will get prints.

Works made from palms are popular. Well, let's use this idea.

You need to take a disposable white paper cup and paint it green. Make a barrel out of a toilet sleeve and glue it to the plate.

Draw the children's hands on cardboard and cut them out.

Glue one of them brown on the trunk.

And then, in this order, everything else.

Alternatively, you can make the work in the form of acorns and even squirrels, cool!


Kids also love to use natural materials in their creations; for example, you can get by with pumpkin seeds. Print out a picture of wheat or rye on an A4 sheet of paper and decorate it with these branches. Doesn't it look creative? And most importantly, it’s simple and charming!

Read the finished description with materials and description below:

Do you want to use only colored paper? So you will need to cut strips of different colors and a couple of circles. Decide on the sizes yourself.

Fold each circle in half.
Then draw the trunk and make the crown of the tree, cut it as shown in the photo with scissors.

Glue the trunk on white paper, and the crown, that is, two circles with each other, only asymmetrically.

What is missing is, of course, colorful leaves! Cut them out in red, yellow and green.

So, what else, but here's what. You can take disposable paper plates, these are sold at a fixed price or in any hardware store. Paint them in the desired color, for example brown, and then let them dry. Cut out the body of a hedgehog or other animal from white cardboard, draw parts of the body, and let it hold a pine cone or acorn with its paws.

Probably the most primitive, but also so bright, souvenir made from cotton pads. Dilute the paint in a glass beaker and take pipettes. Carefully paint the discs with them. Let them dry.

And then glue it to any background, wow, beauty! And my mood even lifted, it was so bright and cool!

In my classmates I came across another such landscape, only it was made in a different technique.

Original works made from cones and acorns
Of course, forest or waste material is always in great demand. Especially in the autumn period. Because the gifts of nature can be found on paths and in parks and forests. If you have a desire to create something ingenious from ordinary pine cones, then here is an idea for you, go for it.
Pour acrylic paint into a cup and dip each piece. After drying it, place it on any tray covered with oilcloth.

Then, from durable cardboard, you can even use a box, cut out a ring and decorate it with cones, they are glued with a glue gun. Just be careful not to get burned.
Carry out this procedure only together with adults.

Try to glue the cones tightly to each other so that there is not much space between them.

Here's a wreath for you, isn't it cute? I really liked it. By the way, you can use it as

You can also make a bouquet from them, who would have thought, but it looks so beautiful, especially if the vase is made by your own hands.

I recently showed you a lot of ideas about what else can be done on this topic. These can be bunnies, hedgehogs, owls, foxes, etc. and any other animals. Here are a few more ideas for inspiration.


I would like to show you one more video. In it you will see a bunch of new products this year. Enjoy watching.
As for acorns, there are also creation options from them. People or animals are usually made, but also cutlery and cups. Additionally, matches or twigs are used.

Well, if you want to distinguish yourself, then make an original thing, this is a brooch. Good luck.
Crafts “Autumn Fantasies” for school (grades 1-4)
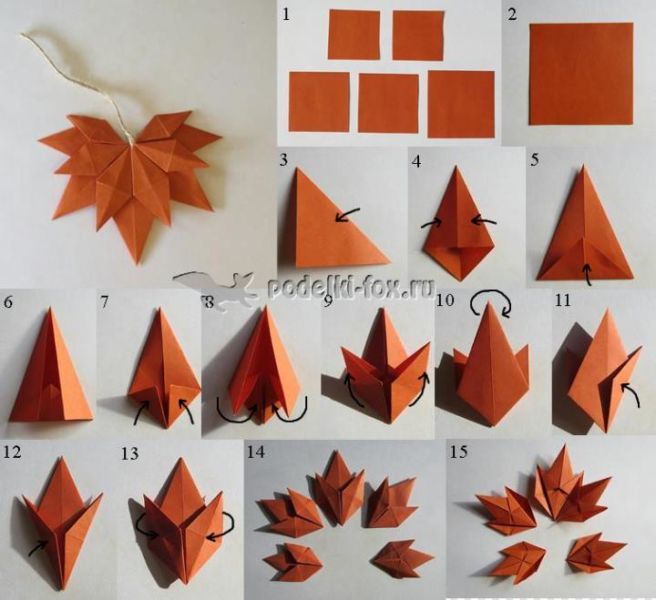
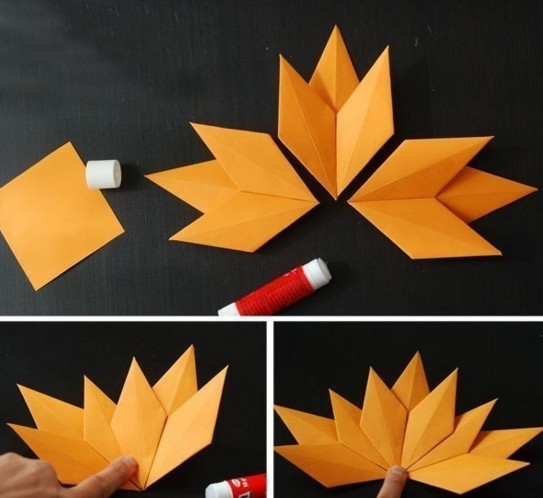
And now I propose to make a craft according to this master class in the style of modular origami. Wow, I’ve been asked for a long time to show how you can quickly and easily make maple leaves like this out of paper. So take note, because it is with these blanks that you can decorate the interior of a group, class, and even at a gala event, a matinee.
And then please, take it and fantasize. Here's how they decorated it on the Country of Masters website.

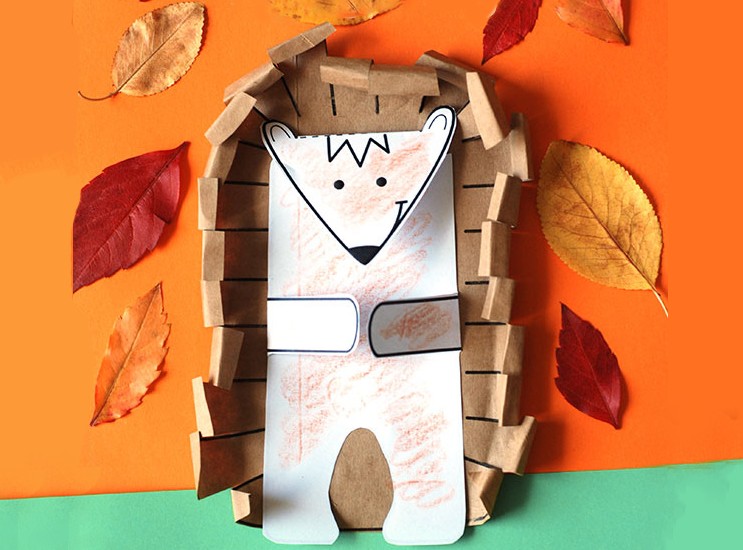
The next option, which is loved by younger schoolchildren, is of course the main character - a hedgehog.
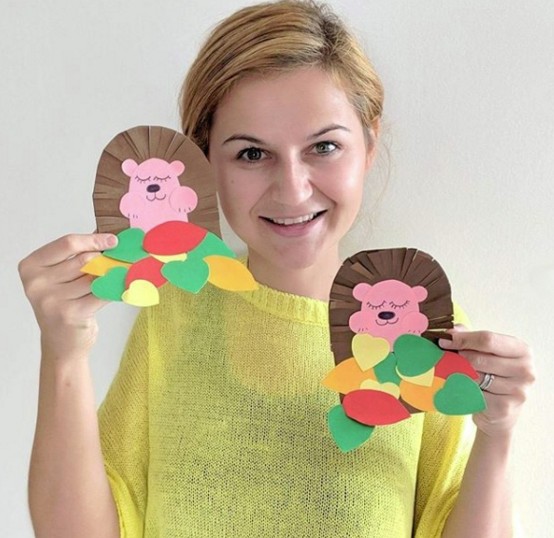
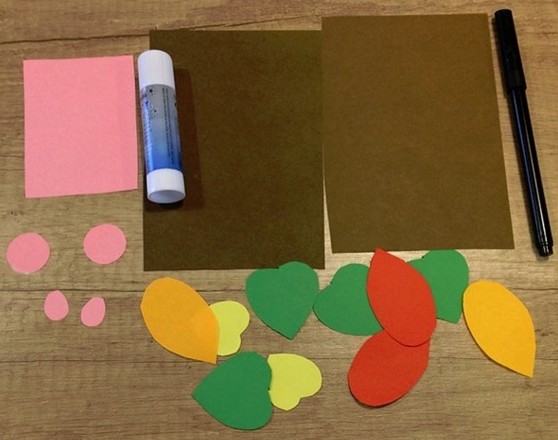
In order to create it, you will need everything that you see in the picture below. This is colored paper, a glue stick, a felt-tip pen.
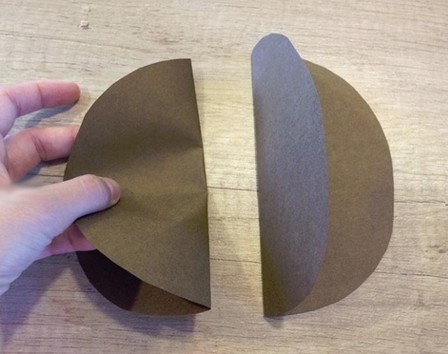
Take brown colored paper and fold it in half. Cut along the fold line with scissors, you will get two rectangles.

Then glue them together to form a stand.

After the glue has dried, draw and make round edges on the workpiece. Cut along the line. Using pink paper, also draw outlines in the form of a semi-oval.

It is also necessary to cut out round-shaped ears and paws from it. Arrange the parts in the correct proportions as shown below and glue to the base. Scatter real dry leaves or cut them out of colored paper.

Now all that remains for the hedgehog to do is make the spines; make cuts along the edge of the brown paper.

Draw the eyes and face. Your fabulous little animal is ready.

Using an accordion, make the work in the shape of trees. Look how original it looks.

Also, one of the favorite characters among children at any time of the year remains. I suggest making it this time from a CD. And again you will have to fold the paper like an accordion, in general, look at the instructions in the pictures and create.


What an unrealistically charming sun it turned out to be; my spirits lift when I see it.

And if you don’t have colored paper, then use napkins, although take them in a single color. Cut into small squares and roll each piece into balls.

Draw any still life, in this case the author depicted trees and a river. And sit and painstakingly glue each ball until the whole image is formed.


The next idea is work from cotton swabs, which, as you can see, were initially painted, their heads, in the desired color.

And for those who want to comprehend quilling, or are deeply interested in it, I would like to invite you to consider such a masterpiece.


Here's another fascinating idea, look how cool the author came up with it. Do you want to make it happen? Then let's get down to business. It will turn out to be just a living corner.


And if this is too difficult for you, then take a regular package and follow the photo description.


Beautiful souvenirs made from natural materials and vegetables
I think that every time you visit such exhibitions you always rejoice. Because such events are always fun. Thanks to positive and creative works. Which are made from all sorts of things.
You can take absolutely any vegetables and fruits and use them to build
The simplest and easiest idea is a basket with such characters. As you can see, the author used a lot of vegetables that are found in any home.


And even build the heroes Smeshariki and Minions, catch the description:


Here are a few more thoughts that will lead you to your next creation. You can see the rest here. By the way, you can create with it too! There would be a desire.
Well, I want you to build Gena the crocodile. Especially when there are instructions with a description. We don't need much: carrots, cucumbers, tomatoes and toothpicks.

Use a knife to cut a piece of the carrot into a cylinder shape, and then make something similar to a mushroom.

Cut off the tip of the cucumber, and cut the vegetable itself in half, but not all the way.

Connect the resulting parts with a toothpick. The result was the head of a crocodile.

Then make eyes from cucumber pulp and black olives.
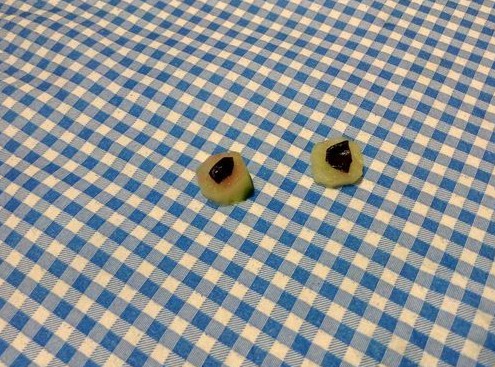
Stick them also into the head using wooden sticks. Cut the tongue out of the tomato.
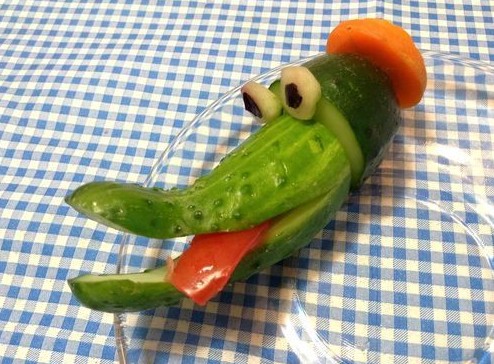
For the body, use a slightly rounded cucumber, and design the legs like this.

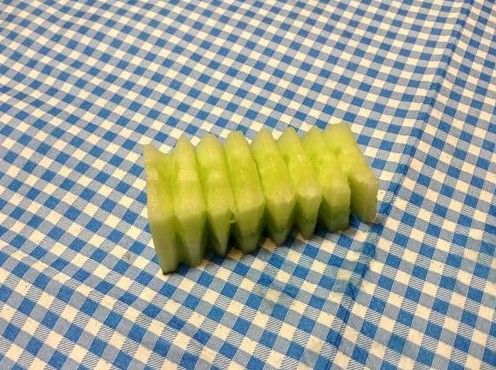
You can also make an accordion from the greens pulp, but this is optional.
Place the weirdo on a plate and run to school or kindergarten to amaze everyone.

And then there are these faces, oh, when I saw them, I was really scared). And you?

How to make an applique from leaves: quickly and beautifully
For such works, you can take absolutely any character and easily decorate it with dry leaves that you collected in the park. For example, you can lay out funny owls using cardboard and paper.

Or you can make a huge owl entirely out of leaves.

Or plant the birds on a branch decorated with bunches of rowan berries.

You can take any face, preferably some animal, cut it out, and then decorate it.

And with what, of course, leaves. Collect them and place them on a sheet of newspaper so that they do not shrink when drying.
Maple leaves are best suited as decoration, for example a lion.

Or perhaps you will be interested in working in the form of a little lion cub.

Today my kids and I made these creations. And we actually sat down to do it, and then my mother remembered that she forgot to buy glue. I’m thinking what to do, mine are about to go broke))). It's good that there was plasticine. And this is what happened.


You can easily build a vase using a balloon.

Or make an applique of seeds and plasticine.

Or you can imagine the work in the form of a three-dimensional toy.


Autumn paper crafts for kids with templates
So we’ve reached another subtopic in which you can safely take templates and print them on a printer. And of course, create, get new masterpieces, adding some of your own twists.
If you use this drawing, then later you can color it, or you can safely make a greeting card and write in it

You can take absolutely any piece of paper you like as a sample, or you can draw it yourself with a pencil. Fold a blank sheet of paper in half, and then cut out an image of the blank on one side. Cut crayon squares from office construction paper.

Scatter them in a chaotic manner and glue them with a glue stick.

This is how mysterious the postcard looks.

Now let’s take a closer look at one more master class. Before that, I already gave you some instructions, but this one is more understandable and the technology is different.

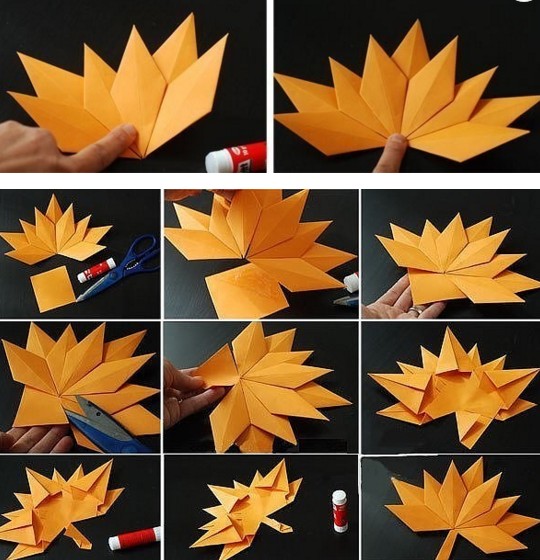
You need to cut 10 squares.

And then fold each of them like this.

This kind of work takes little time, don’t worry, you can do it in 20 minutes.

And then you have to glue each blank to each other.

Of course, looking at the pictures, everything becomes clear.
Don’t forget about other options; by the way, this craft somewhat resembles


You can fold the leaf into a butterfly shape.

Also difficult, as you can see there is nothing, fold it like an accordion and glue it together.


Moreover, you can make it in completely different shapes, use your imagination.


You can make it even more interesting so that the leaf turns out to be three-colored.


Or make a bookmark using thread.


In addition, you can make a pumpkin out of paper if you cut a bunch of long strips with scissors.


How you decorate it is up to you, you can also use a toothbrush.

Well, and finally, take these ideas and dress up your favorite cartoon and fairy tale characters.


Well, according to tradition, I’m giving you a few coloring pages, in case they come in handy in your spare time.

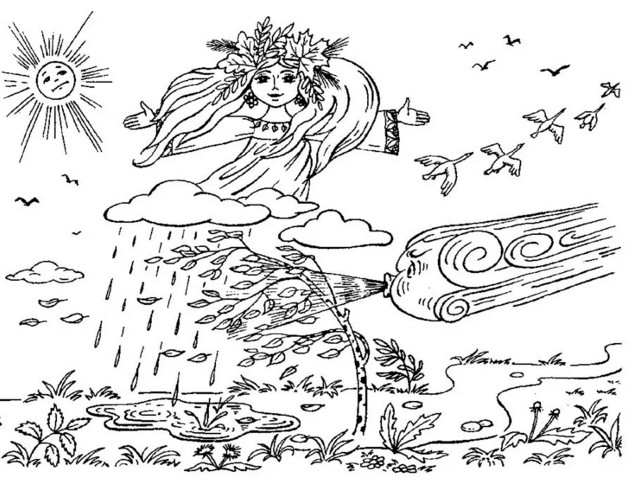

Or use an anti-stress coloring book for creativity.

That's all, dear creators! I wish you a creative approach to business. And may autumn crafts win your heart and make you want to make more next year. I wish you success and patience! Bye.
Best regards, Ekaterina
Autumn topiary is an almost eternal bouquet that you can make with your own hands. Autumn is a special time, this is a time when you can be both pleasantly sad and solemnly dressed. The gifts of autumn: yellow, red, green, orange leaves, pine cones, twigs, acorns and much more - can be used to create incredibly beautiful compositions that are sure to lift the spirits of loved ones, friends and acquaintances.
A DIY autumn topiary can decorate any home. An autumn tree will chicly complement the interior and bring warmth and light into the house. There are incredibly many manufacturing options; you can use ready-made ideas, or you can come up with something of your own. You can use any gifts of autumn - leaves, grass, driftwood, stones and much more.
Topiary made from natural materials: creation technology
A stylish autumn accessory made from natural material will look great on the windowsill in a children's room or in the dining room. The gifts of autumn provide an opportunity to imagine. The master class describes in detail the instructions for making the craft. For this product, it is better to take maple leaves, as they have unexpected colors, as well as spectacular rowan clusters. In addition to these materials, you will need:
- Plastic pot.
- Wooden stick.
- Styrofoam balls or plaster mixture.
- Glue gun.
- Stones.
- Moss litter.
- Black acrylic paint.

Step-by-step instructions for creating an original tree with your own hands are as follows:
- First you need to take a plastic pot and fix a wooden stick inside it, filling it with plaster. If there is no plaster, but there is a foam ball, then the stick should be fixed in it.
- The next step involves carefully covering the entire piece with black acrylic paint. Once the pot and stick are painted, the product should be allowed to dry.
- When the workpiece is dry, you can begin decorating, the most interesting part of the work. To do this, you need to prepare a gun with a glue stick.
- A foam ball should be attached to the stick. It is convenient for work to lay out the gifts of autumn in front of you. Each cutting must be lubricated with glue and inserted into a foam ball. The composition should be diluted with rowan bunches, leaves, and twigs.
- Similarly, you should decorate the entire upper zone of the topiary. You can attach several leaves to the trunk of the product.
- Moss or stones will help cover the plaster surface or foam in the pot. You can insert several branches of viburnum or rowan into the pot.
This is how easy it is to make topiary from natural material. Anyone can do it, you just need to be willing and have a little time.
Autumn topiary (video)
Acorn topiary
Often children want to do something with their own hands or take part in making crafts with a parent or teacher. Topiary made from natural materials is exactly what you need. For work you will need the following materials and tools:
- Fresh acorns.
- Medium size plastic pot.
- Medium sized foam ball.
- Sisal.
- Sponge for bouquets.
- Wooden stick.
- Glue gun.
- Brown acrylic paint.

The manufacturing instructions are as follows:
- Work should begin with the design of the top of the topiary. The gifts of autumn, namely bright shiny acorns, should be laid out in front of you. Take a glue gun, a ball and begin to carefully glue the acorns to the workpiece with the top part.
- After the top of the topiary is made, you need to take a stick and shorten it to the optimal length. Then you need to cut the sponge to the size of the pot and assemble the composition by inserting the “stem” with the ball into the pot.
- Once the structure is well secured, you need to start painting the product. When the tree dries, you need to cover the sponge with sisal, and if there is none, then use dry fallen leaves or pebbles for this purpose.
An interesting DIY product is ready. Creating such a simple topiary is a great idea for kindergarten activities. All older children will be able to make trees from acorns and give them to their mothers.

Spectacular tree with your own hands
Topiary “Golden Autumn” can be made from paper napkins. For work you will need the following materials and tools:
- Plastic pot.
- The napkins are multi-colored, the theme will be yellow, orange, red.
- Sushi sticks – 3 pcs.
- Decor – leaves.
- Alabaster.
- Newspaper – 2 pcs.
- Superglue and PVA glue.
- Threads.
- Satin narrow ribbons 80 cm long.
- Foam beam.
- Scissors.
- Stapler.

The craft is easy to make. Step-by-step instructions are given below:
- The first step is to take sushi sticks and wrap them with ribbons, securing the ends with superglue.
- Next, you need to cut out a blank from foam plastic and place it in a pot. In the pot you need to fix the trunk with alabaster.
- The next step is to make the crown of the tree of happiness; to do this, you need to crumple the newspaper and secure the resulting ball with threads.
- Next, fold the napkins in half and in half again, and fasten them in the center with a stapler. Then cut off the corners of the resulting squares and lift the layers of napkins so that it looks like a flower.
- The next step will be fixing the crown to the trunk and gluing volumetric flowers to the crown.
- The tree of happiness should be decorated with maple leaves, and pebbles, leaves or moss should be poured into the pot.
That's it - a few simple steps, and the spectacular tree is ready. Anyone can make topiary.
This craft can decorate a windowsill, dining table or bedside table. The tree of happiness from the gifts of nature will not leave anyone indifferent.
Topiary “School Tree” (video)
Topiary “Autumn Glitter”
A topiary made in the shape of the sun will warm you all winter, delight the eye in the evenings and lift your spirits in the early morning. The following materials and tools are required for work:
- Organza fabric in yellow and green colors.
- Gypsum.
- Decorative pot.
- Glue gun.
- Eyes, lips, nose (made of paper or other material).
- Decorative ladybugs.
- Scissors.
- Ball made of plastic.
- Skewers.

The master class is carried out in stages:
- From yellow organza you need to cut out squares measuring 7 x 7 cm.
- Next, you need to prepare the ball; to do this, take skewers, wrap them with yellow tape and stick them into the ball. You must first cut a hole in the ball.
- The next step is to prepare a gypsum mixture, place the trunk in a pot and fill it with gypsum. The craft should be left for about 5 hours until completely hardened.
- Next you need to start making the sun. You need to glue the organza squares with a glue gun. Be sure to leave room for the face.
- You need to glue the eyes, mouth and nose onto the “face” of the sun.
- Next, you need to cut squares of green organza and glue them into the pot.
- You can decorate with anything: ladybugs, stars, hearts. You can imagine endlessly in decor. The craft is ready.
A sunny autumn bouquet will perfectly decorate a child’s room; you can make it together with your child. Girls and boys will happily do needlework with their parents. You can imagine endlessly when creating new topiaries. Such a craft will be a wonderful gift for friends, the tree of happiness will pleasantly delight and surprise, it will not get boring and will not wither.