Antipyretics for children are prescribed by a pediatrician. But there are emergency situations for fever when the child needs to be given medicine immediately. Then the parents take responsibility and use antipyretic drugs. What is allowed to give to infants? How can you bring down the temperature in older children? What medicines are the safest?
Vytynanka (from - "vytinati" - "vitinati" - "vytsіnats" - "cut") is an ancient Slavic type of arts and crafts, openwork cutting out of paper, birch bark, foil, fabric and leather.
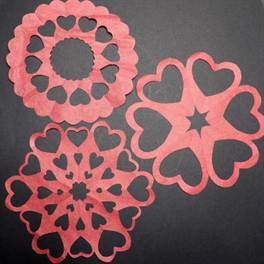
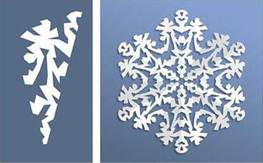
It differs from the appliqué in that the whole work is a single piece of paper, while the appliqué is usually glued together from several separate parts. The most famous vytynanki to us are snowflakes.
And yet, not all works made in the technique of artistic carving are called vytynanki.
Distinctive features of the protrusions are that the images in them:
- symmetrical, because in their manufacture, a sheet of paper is folded a certain number of times, after which various patterns are cut out on it,
- relatively few colors, because, in addition to the background, usually no more than 1-2, less often 3 colors of paper are used,
- contain national folk symbols.
In this form, this cutting technique existed in Eastern Europe (Poland, Lithuania, Ukraine, Belarus, Russia).
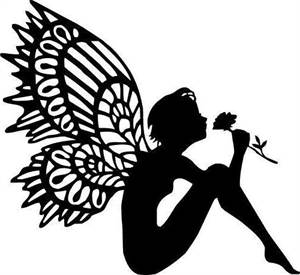
In Western Europe it was common silhouette cutting. It is characterized by a black image on a white background, the absence of slotted parts. Subjects: portraits (most often - profiles), landscapes, domestic scenes.
Modern works made in the technique of artistic paper cutting, which do not contain traditional folk symbols and symmetry, are called cut-out images, paper graphics, openwork (filigree) cutting.
In this technique, you can make many beautiful things: paintings (panels), postcards, paper napkins, window decorations, shelves, frames, mirrors and much more.
To cut patterns, use scissors or knives (stationery, breadboard).
Read about the features of cutting such works with scissors and how to transfer the diagram to paper in the article:.
This time we will talk about cutting with a clerical or mock-up knife.
- It is safer for children to cut with scissors, because. a knife is still a knife. When cutting, they need to protect their hands, do not keep their fingers on the cut line, do not go beyond the cutting mat. A rug is needed so as not to spoil the table. Sold special mats for cutting. If there is no such rug, it can be made from a piece of linoleum or thick cardboard.
- The scheme is drawn and cut out from the wrong (back) side of the future tenderloin.
- Just like when cutting with scissors, work begins with the smallest details, then cut out the details in the center, then along the edges, and only then - the contour, if any.
- If necessary, smoothly rotate the paper so that it is more convenient to cut.
- When cutting straight lines, you can use a ruler.
- When using a clerical knife, break off the dull end of the blade more often.
- You can not leave parts of the cut areas uncut, and then tear them off with your hands. The work will look sloppy and thus it can be inadvertently torn.
- Depending on the purpose of the clipping and the chosen plot, choose a suitable background and stick the work on it.
Video lesson on cutting with a knife (not in Russian, but since this is a video, it’s clear how to cut it)
Similar articles:
Enjoy your creativity!
Especially for blog readers, with sincere respect, Julia Sherstyuk
All the best! If the article was useful to you, please help the development of the site, share a link to it on social networks.
Placing site materials (images and text) on other resources without the written permission of the author is prohibited and punishable by law.
- Do-it-yourself postcard for February 23 or May 9 in ...

Paper cutting shapes and shapes help young children develop fine motor skills in a playful way!
How to teach a child to cut paper?
- First of all, your baby's hands should be ready for instilling the skill of cutting. The best exercise for a baby is squeezing water out of a simple sponge, it trains the right muscles.
- Then show your child how fun it is to tear apart old newspapers and pieces of paper - this will teach him to hold the paper in his hands without dropping it.
- Now you can learn paper cutting using special materials for children! Start by cutting out straight and wavy lines, then teach your child to cut out the shapes before offering pictures to cut out.
Important! Remember to take breaks if your child is tired or bored. Be sure to encourage the child verbally, praise him and try to interfere less in the cutting process itself.
Paper cutting safety
Before teaching, show your child how to hold scissors properly and talk to them about safe use of scissors. The child must clearly understand that:
- You need to cut in the direction from the body and fingers.
- You can not play and indulge when scissors are in your hands.
At what age do you start learning to carve?
All children develop differently. The age limits below should be used as a guide, taking into account the interests, temperament and attention span of individual children.
2 years: children at this age will enjoy tearing paper into small pieces and cutting something out, only repeating after adults;
3 years: at this age, with a child, you can try to cut out any shapes, sitting next to him and continuously watching the process;
4 years: the child is able to cut out simple lines and shapes by himself with a little help from an adult;
5 years and older: the child himself should easily cut out the pictures and even stick them on paper, making applications.
Seeing products made in the form of carved lace from plain paper, you will never say that it is easy to create such beauty with your own hands. Everyone can master openwork paper cutting, the schemes of which are also provided. This type of needlework is also called paper graphics, silhouette cutting, but the essence is the same, it is always a whole-cut drawing on a plain background. There are two main directions: cutting with a knife and scissors. For beginners, when creating paper patterns, great patience, perseverance and desire will be required.
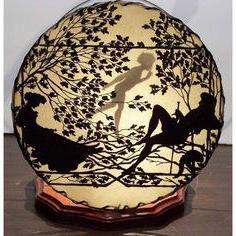
You can use this interesting technique not only to create postcards, panels, but also to decorate the interior. Usually products are made from white or black paper, but other shades will also look good. Openwork paper cutting can be both flat and voluminous. So, using the silhouette cutting technique, you can make such fabulous things: window decorations, snowflakes, postcards, napkins and much more.
What materials and tools will be needed in order to master openwork paper cutting? In fact, nothing special and expensive is needed. You will need:
- printed schemes (invented independently or ready-made);
- sheets of white (you can have a different) color;
- mock-up (clerical) knife;
- a tablet, a regular board or a piece of thick cardboard on which you will cut;
- nail scissors.
As you can see, you will need ordinary office stationery.


Consider a master class on openwork paper cutting, which will help you master this interesting art.
When all the tools and materials are prepared, you can begin work. Most often, patterns are cut out on a sheet of paper that is folded in a certain way. Almost everyone carved intricate patterned New Year's snowflakes in childhood. But in this way you can still make a frame for a mirror or a napkin for a table. A napkin or a frame made according to the model in the photo below will look very nice:

Step by step job description:
- Take a sheet of white paper and fold it.
- With the help of tracing paper, we transfer the contour of the pattern to the base, circling it twice.
- Cut out the pattern with scissors or a knife.
- Unfold the product very carefully and iron the folds with an iron through another sheet.
- We put an openwork napkin on colored cardboard or paper and glue it. Make sure that the glue does not leave marks.
- If desired, you can laminate the product so that it lasts longer.
Decorate the house for the holidays
Easter is one of the most beloved holidays for both Orthodox and Catholics. Many housewives traditionally prepare for it - they paint eggs, bake Easter cakes, decorate their home. We will help you in this matter. According to special patterns for Easter, you can make beautiful attributes and wonderful decorations. But you can show your imagination in the technique of filigree cutting and come up with your own options.

One of the main symbols of this holiday is eggs. Usually housewives color natural eggs or decorative ones, for example, from wood. But you can easily make openwork eggs with your own hands. To do this, you just need to transfer the pattern using carbon paper or tracing paper to drawing paper, cut it out and carefully glue it. It is better to glue from the center, first to one end, then to the other. During work, it is necessary to allow the glue to dry before taking on the next seam, otherwise it may disperse. Put the finished eggs in a patterned basket, and you get a fabulous composition!


In this way, you can also make greeting cards for Easter, decorate gift bags and boxes, decorate windows. Egg vytynanki are even used as a festive garland, connecting them together. Inspiration and imagination will help to make a unique Easter holiday.
For the New Year
New Year's Eve is loved by both children and adults. Everyone wants to create a New Year's fairy tale at home and plunge into the wonderful atmosphere of magic. Nowadays, New Year's decorations are not only balls for the Christmas tree and garlands, but also many other wonderful little things for the festive decoration of your home. Our tips will help you prepare for this wonderful holiday in a unique way. One of the most traditional ways to decorate a room is with paper snowflakes. They can be made like this.

Usually they are glued to windows, cabinet doors, shelves, walls. Some make garlands out of them and place them on the Christmas tree.
To make beautiful openwork paper snowflakes, it is better to take ready-made patterns for cutting.

The main thing in the work is to correctly fold a sheet of paper to apply the template. Each snowflake consists of a repeating pattern around the circumference. Blanks are usually folded for 1/6 and 1/12 parts. You can fold the part on the basis of an already cut circle or any sheet that must first be cut to a square and then folded, or, conversely, folds are made first, and then the shape of a circle sector is cut out.
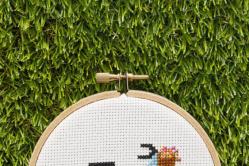
Today I will talk about such a seemingly difficult form of creativity as paper cutting. This art presumably originated in China and in the local language it sounds like "jianzhi". In China, it has several directions: "chuan-hua" or "window flowers" (originated from the tradition of decorating the windows of houses for the holiday of spring) and "si-hua"(holiday decorations, ritual objects and wishes for all occasions). In the future, the art of carving spread throughout the world, acquiring its own characteristics in each country.
Traditional Chinese work was done exclusively scissors, but now there is an easier way - cutting craft knife. About him and will be discussed. With some desire, you can also work with an ordinary clerical knife with a retractable blade, but this option is not very convenient when working with small parts.
I'll start with the materials that will be needed for work:
1. Paper. In fact, it can be absolutely anyone who is more comfortable in their work. I prefer smooth thick paper, around 200gsm. Mine is cut from white smooth paper 220 or 240 g/m. For those who are in Moscow or St. Petersburg, I can advise the Mir Paper store, aka Double V. They also write on their website that there are branches in Samara, Tver, Chelyabinsk, Novosibirsk, Krasnoyarsk, Krasnodar, Rostov-on-Don, Kiev and Almaty. But I was not there, I do not know what and how. So: in this store you can pick up paper for almost any applied purpose. In the hall there are racks with samples, which indicate the name, density, color, embossing and size of the sheet. The prices are indicated in the catalogs on the tables. Before the holidays, prices there were much lower than in the art shops, now, most likely, they have also risen, but in any case, it turns out to be somewhat more profitable and they usually have more choice. Well, if you just have a desire to try the technique without unnecessary expenses, you can always learn how to cut on a regular drawing paper.
2. Knives. They are of several types. Most regular craft knives are a handle with a collet clamp, which is attached to a replaceable blade. There are a lot of companies producing such knives now. I use a set of knives from an unknown manufacturer:
In a small box, there are three handles with blades, a number of additional blades on a magnetic strip and tweezers. I used to work only with the thinnest knife, but after working with it for a long time, my fingers begin to hurt. Now I mostly work with a medium knife. He has a heavier handle, he sits more comfortably in the hand and does not cause discomfort in work. I hardly work with the largest knife, its handle is not very convenient for me, but it all depends on personal preferences.
For prices: one simple knife is quite suitable for testing, now their choice is huge, prices start at about 100 rubles. (information on Moscow, prices of art stores).
The second type of knives - dummy with hinged blade. It is black in the photo. This is an art knife from Mr. Painter. In general, a rather convenient thing, but you need to get used to working with it. If before that you cut with an ordinary breadboard knife, you will have to adjust to the rotating head of this knife. But if you learn how to work with it correctly, it can greatly facilitate the process - you will not need to constantly turn the blade, the hinge allows you to do this by changing the inclination of the handle. It is also worth noting that the blades of the hinged knife are different from ordinary collet ones. They are narrower and smaller in size. I have not yet purchased additional blades, the set with such a knife includes 10 additional blades. This is enough for the first time.
I bought mine at a wholesale base for 150 rubles, in retail stores it costs about 300 rubles. It can be found in hobby centers, less often in thin. stores.
The third type of knives - finger knife. They come with an articulated and static blade. I heard a lot of good reviews about them, but I haven't worked with them myself yet.

Still sometimes needed circular knife. A handy thing for cutting even circles, but do not forget that it leaves a dent or hole from the needle in the center of the circle.

3. Substrate. In order not to spoil the desktop, you need to get yourself a substrate for cutting. Best suited for these purposes special cutting mat. They come in different sizes, from A6 to A1 for sure. I always have one A3 size on my desk. You can get by with just thick cardboard or a sheet of plastic, but this will greatly complicate the cutting process. Burrs may appear on the paper cut, and if the substrate has been used for a long time, the knife blade may simply come off. And cutting out is such a process where it can be very difficult to fix a mistake, so it's better to prepare and try not to make them :)
I can’t say that they are usually very cheap, but if you are going to cut a lot, then I highly recommend getting one. Prices: A6 - from 100 rubles. (but they are usually only available on order), A4 - from 200, A1 can go up to more than 3000. For starters, A4-A3 is quite suitable.

4. Pencil for drawing outlines. It must be constantly finely sharpened. It is preferable to take an HB or B pencil, very hard ones can scratch paper, and soft ones will leave marks that will then be difficult to erase. It is convenient to use a mechanical pencil, it does not have to constantly undermine.

I prefer to draw on the front side, without a preliminary sketch. In the photo - an example of a picture prepared for cutting. I shade some of the small details with a pencil so that it is clearer what needs to be cut out and it is more difficult to make a mistake. But if drawing clean right away is not about you, then you can draw a picture on a draft sheet, and then transfer it to a new sheet through a light table or using tracing paper. Or just put a sketch on top of the clean one and push the contours with something hard. But the latter method will not withstand every paper. I also saw works in which they paint on the back of a clean copy. But here it should be remembered that the image must first be mirrored in order for everything to be correct in the final work. In general, a good method, but I do not use it, because when cutting, it is more convenient for me to tilt the blade a little and cut the paper a little at an angle so that the cut looks more neat. But this is already as you like it :) It's up to you.
5. Eraser. I erase all the rough lines at the end of the work, on the already cut out picture. Here it is better to use soft erasers like Milan or Factis. Do not forget that paper tends to wrinkle and tear, so you should work with an eraser on the cut out picture very carefully so as not to damage the work. All coils from the eraser are well removed from work with a wide soft synthetic brush.
You can see the process of work on the video.
Anyone who first sees products made in the form of carved lace from plain paper is always surprised that such beauty is easy to create with your own hands. Everyone can master openwork Schemes, which are taken as a basis, are easy to find in specialized literature. The necessary tools are inexpensive and readily available.
decor ideas
You can use this interesting technique both for making postcards, panels, and decorating the interior. Products are usually made from white or black paper, but other shades also look great. It is interesting that not only flat things are performed. Volumetric openwork cutting out of paper looks very impressive. Schemes for such objects are also presented in the form of a contour drawing on a flat sheet, which is then folded along certain lines and glued into a three-dimensional part. So, in technology, you can do the following:
- Postcards.
- Snowflakes.
- Window decorations.
- Napkins for the table.
- Volumetric decor based on a flat product or an assembled three-dimensional paper structure.
Having mastered simple options, you can make things fabulous in beauty.

Materials and tools
You will need the following to master openwork paper cutting:
- Diagrams and a printer to print them.
- Sheets of white (or other) color.
- The basis on which you will cut (a special tablet, a regular board or a piece of thick cardboard).
- Manicure small scissors as an alternative to a knife or an addition to it.
The rest is optional and depends on how you will use the blanks:
- Glue on a colored base - decorative cardboard and glue.
- Hang on a Christmas tree or in the space of a room - pendants (threads).
- Decorate the window - regular or
In fact, nothing complicated, special and expensive is needed. General office stationery. The main thing is patience, perseverance and the desire to make a masterpiece with your own hands.

Openwork paper cutting: schemes, master class
Traditionally, patterns are created by cutting out part of the pattern on a sheet folded in a certain sequence. One of the most common and familiar products are snowflakes, but you can make not only them. A napkin or mirror frame made according to the following pattern will look very impressive.

Work like this:

Openwork paper cutting: New Year's schemes
To decorate the interior with elements of this technique, you can make various decorations according to ready-made templates. Print them in the desired scale (usually blanks are designed for a standard A4 landscape sheet), cut out the pattern. On the Internet, there are a lot of blanks, both directly festive and just winter themes.


- Entire landscapes and lacy plot scenes.
Start with simple diagrams.

Having mastered the principle and trained your hand, move on to more complex multi-object compositions.

How to make beautiful snowflakes
One of the most traditional and favorite ways to decorate a room for the New Year is to decorate with paper snowflakes. Usually they are glued to windows, cabinet doors, walls. Some make garlands from them, hang them on threads or place them on a Christmas tree.

To make beautiful openwork paper snowflakes, it is better to take ready-made patterns for cutting.

The main thing is to correctly fold a sheet of paper to apply the template. Any snowflake consists of a pattern repeating around the circumference. There are blanks for 1/6 and 1/12 parts. The second option with a narrower sector is obtained by additionally adding the workpiece for 1/6 of the part. You can fold the part on the basis of an already cut circle or any sheet that is first cut to a square and then folded, or, conversely, folds are first made, and then the shape of a circle sector is cut out.

So, you have learned in more detail what an openwork paper cut is. You can take ready-made schemes for any product or show your imagination and develop your own exclusive thing. Get creative. Create beautiful decor with your own hands.