Antipyretics for children are prescribed by a pediatrician. But there are emergency situations with fever when the child needs to be given medicine immediately. Then the parents take responsibility and use antipyretic drugs. What is allowed to be given to infants? How can you lower the temperature in older children? What medications are the safest?
16.11.2017
The horse is the favorite animal of many children. Even adults love him. Many people like to make crafts with their own hands, and today we will learn how to make a horse out of paper. We will learn how to make origami - folded paper.
- The Japanese used this technique to make paper crafts.
We will also see step-by-step instructions on how to make a horse of different sizes.
How to make a figurine using origami technique - step-by-step description
As we have already said, origami is a Japanese art. To make a horse with your own hands, we need to take scissors and a landscape sheet. Let's see the step-by-step instructions.

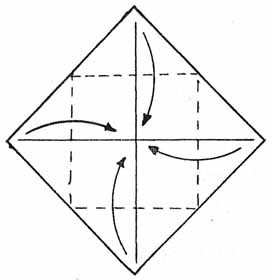
- The first thing you need to make from the sheet is a square. Fold any corner of the paper diagonally and cut off the excess.
- Open the paper and fold it along the other diagonal so that there are two lines. Then unfold it.
- Fold the sheet in half, horizontally, and unfold. Do the same along the vertical line. As a result, you will get a square with four lines.
- Make a diamond out of paper as follows: bend the sheet along a diagonal line, the sides need to be hidden inside the product, bending them along another diagonal bend.
- Fold the sides of the diamond into the center and then bend the upper triangle of the craft into the middle.
- Open the top diamond and cut the top sheet from the bottom edge to the horizontal strip in the center.
- After the cut, you need to open the triangles, which will be in the shape of a diamond.
- Fold each of these diamonds horizontally towards the middle.
- Turn the product over to the other side.
- When you see the top diamond, repeat steps 5-8 with it.
- You need to rotate the craft 180 degrees and bend the central triangle of corners upward.
- Divide the craft to make a square.
- Now we are going to make the horse's body. Fold the square in half horizontally, with the sides folded toward the center. Iron all the curves of the craft.
- Now, let's make the horse's legs. You need to bend the upper right triangle so that the bottom of the figure makes a horizontal line. Having unfolded, bend the corners inward along the marked lines.
- You need to bend the upper left triangle a little.
- Open and bend the corners inward along the lines.
- The horse's head is easy to make. Bend the tip of the head inward so that the horse's face is not sharp.
So our paper horse is ready.
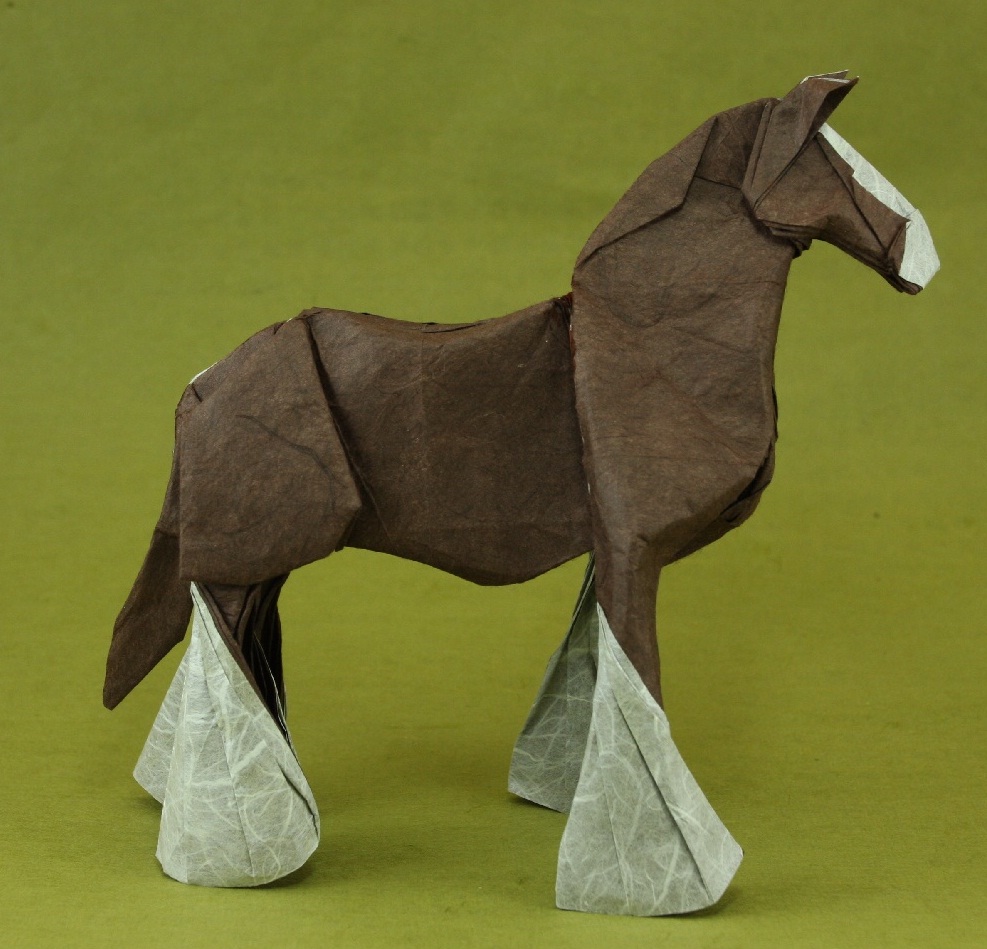
Graceful horse
To make a beautiful horse out of paper and cardboard, you need to make a three-dimensional modular figure. Its technology will be described below.
Little pony

A small paper horse can be made from a small white sheet and then it can be decorated with any color. Some knit small ponies from threads.
Volumetric modular figure

You can also make three-dimensional objects from paper. To make them, you will need a ready-made diagram of a horse, which will help you easily make such a figurine yourself. Such a diagram needs to be written on the Internet and printed on a printer.
For such a product you need to take scissors and glue. Carefully cut out the parts following the numbering. Then bend the cut pieces and glue them together. With this, the work is finished.
Important! If you download a non-color scheme, then the child can paint it, it will be more interesting for him.
Large stallion
A large horse can be made from wire, fabric and thread. A horse skeleton is made from wire, fabric is wrapped around it and secured with threads, carefully wrap all the fabric so that it is not visible. Finally, you can sew on the hooves and attach the mane and tail using hair or thin thread.

The size of such a horse will depend on the height of the wire skeleton. Exactly such a product can be made from thick paper, replacing it with threads.
Horse mask
Today we will talk about how to make a regular horse mask out of paper. The advantage of such a mask is that it can be made quickly and easily. To do this, you need a ready-made diagram, glue, A3 sheet, colored paper, black felt-tip pen, scissors. If you want, you can draw a template or diagram of the horse yourself.

Choose the color of the horse, and using carbon paper, transfer the animal template onto a colored sheet. From the main color, cut out the head, and then transfer the remaining parts, namely the mane, ears and bridle, to other colors and cut them out. Glue all the details onto the base and trace the outline of the horse for clarity. You need to draw eyes with a felt-tip pen.
Then glue the finished horse onto a blank A3 sheet and leave space at the bottom for the rim. Cut the horse out of the sheet, leaving a headband at the bottom to attach to the head. As you can see, making a mask is easy.
Schemes and ideas from other techniques
The horse can be made from thick paper and with moving legs. To do this we will need a horse template, flat small buttons, paints, scissors, thin wire and thick paper.

Cut out the horse template and transfer it to thick cardboard. Then paint the horse and cut out all the details. Make holes in the horse's legs and body where they will be held together, and connect these body parts with wire and a button on both sides. Attach the mane and tail. By the way, the mane and tail can be made from threads to make the horse look more attractive.
For reference! If you want all parts of the body to move, then you will need to attach additional wire buttons to the neck, tail, and legs.
Another way is to make a horse on thread paper. We will need to take threads, scissors, glue, A4 sheet. Draw on paper what your horse will look like. Take the glue and spread it on a separate part of the body, then quickly glue the threads in a circular motion. This should be done with every part of the body. As a result, you will get a horse like the one in the picture.
Applications in the form of horses
Little children cannot always make a horse out of paper, so an applique in the shape of a horse is suitable for them. To do this, you need to take cardboard or a regular landscape sheet, colored paper and scissors. Find a diagram on the Internet on how to make an applique and cut out all parts of the horse’s body from colored paper and glue them together.

Such applications allow you to make horses of different sizes. If the child wants, you can cut out all the body parts from a regular white sheet and decorate them yourself.
Paper bookmark horse
There are many ways to make paper bookmarks. For this we need cardboard, paper, glue, markers, pencils and scissors. You can draw a horse on a blank sheet of paper or copy it from a picture. Some people use carbon paper for this. Then paint the horse and cut it out.
Then choose the cardboard from which we will make a bookmark and stick the cut-out horse on it. Give the cardboard the desired look by trimming the excess parts. You can also glue cut-out photographs of a horse or ready-made drawings from the Internet onto cardboard. To make the bookmark last a long time, laminate it or wrap it with tape.
Can children make such crafts on their own?
Depending on the age of the child, you need to choose one or another technique for paper horse crafts. For the little ones, it is better to use the simplest method - paper applique. Older children will already be able to make an ordinary horse out of paper, and teenagers will be able to make a three-dimensional modular figure.
To make a beautiful horse, before starting work, watch the video with step-by-step instructions.
The amazing and extremely entertaining art of origami allows you to make amazing crafts with virtually no glue or scissors. To create a small masterpiece, just use one square piece of paper.
The Year of the Horse is just around the corner, so let's learn how to make the simplest paper horse. This will be an unexpected surprise and a pleasant handmade gift.
This ancient art appeared in Ancient China, but was more developed in Japan, where various gifts, symbols and figurines for ceremonies were made from paper. So, for a wedding, paper butterflies were made as a gift for the bride and groom.
A little about the history of origami
Origami can be modular or simple. the first type is more complex and involves the use of several parts from different papers connected into a single whole. The second type of simple origami was invented by origami designer John Smith, in which one piece of paper is only folded and bent in the desired directions. This, of course, limits the possibility of using a variety of techniques, but this method becomes available to any novice craftsman for creating paper.
You can make amazing figures with origami, without the need for glue or scissors. This is not at all difficult to do. Let's make a paper horse together. It will be a smaller copy of a real animal.
Paper horse. Beginning of work
- - Take the papers in your hands, A-4 format;
- - Fold the corner to the opposite edge. For manufacturing, you need a triangular part that appears on the fold;
- - The remaining part of the paper should be cut off.
Making horse parts
- - Now you need to bend the resulting triangle diagonally and unfold it. A fold line will be needed;
- - Once again you need to bend and straighten one side so that you get a square;
- - We straighten the second side in the same way;
- - Then you should bend a small corner and then straighten the resulting figure. You should get a small square at its base.
- - Now bend the figure so as to get a pentagon, the acute corner of which will be at the bottom.
The final stage of work
The craft is almost ready. All that remains is to use scissors.
- - You need to take scissors and cut the acute corner of the resulting pentagon into 2/3 of the figure. You should end up with several paper ends;
- - Next, we form the horse’s muzzle from one end. Fold it to the right and cut it again.
- - The second end needs to be folded several times until a narrow strip is formed, which then needs to be turned to the side. This is how the horse's leg turned out. The second leg also folds. And the two remaining legs too.
Here is one of the schemes on how to make the simplest and most beautiful horse out of paper:

(Click on the picture to enlarge)
So you have learned how to make a horse using the origami technique, out of paper. This activity is fun and easy.
And, most importantly, even if you don’t succeed right away, try again and again, because skill is honed only with time. Which means everything will work out!
In Japanese, origami means folded paper. The history of its origin goes far back to Ancient China. It was there that paper and the first figures originally appeared. But this served only as a necessity in life. The most common to this day is the Chinese paper lantern.
Often during burial, the personal belongings of the deceased were replaced with paper strips on which it was written that they were being replaced. However, origami as an applied art developed in Japan. The word “God” in Japanese is consonant with the word “origami”, so this art began its development within a religious framework.
Temples were decorated with paper crafts. Paper was used as kindling for kindling sacrificial fires, and in boxes made of paper, gifts were presented to temples. Gradually, origami began to go out into society, beyond the gates of monasteries and temples. More and more different techniques appeared, but only a select few, people from the upper classes, owned them. The ability to fold various figures was a sign of good form.
When paper became known to everyone and was easily available, its price dropped significantly. It was then that origami gained its popularity in other countries and classes. This type of art was respected in Korea, Germany, and Spain.
Origami symbols were invented only in the mid-twentieth century. They made it possible to significantly simplify the description of the circuit. The initiator and author was the Japanese Akira Yoshizawa.
Types of origami
Based on the type of origami, it is divided into several types. Modular - folding one figure from several, wet - folding from wet paper, folding according to a development (pattern). And the simplest is ordinary origami. Even children can make such figures. You can make a zoo out of animals. And under magical hands the animals come to life.
Start of making a horse
To build a horse that can flip, you need to follow a few simple steps.
1. Place a square-shaped piece of paper in front of you. Fold it diagonally, connecting the lower right corner to the upper left and iron it. Expand. Also connect the lower left corner and the upper right, iron, unfold.
2. Next, turn the sheet over and fold it in half. You should end up with 2 rectangles. Unfold, rotate 90 degrees and fold in half again. Lay it out. As a result, the straightened square should have 8 triangles. 
3. Turn. The sheet should lie in front of you so that there is a diamond shape. Grab the side corners and connect them to the bottom corner. When folded, the top corner will also be pulled towards the bottom. Iron the resulting diamond, smaller in size. 
How are legs made?
4. Grab the right corner of the top layer and fold it towards the fold line in the middle to create a right triangle, point down. Do the same with the left corner. Fold the top corner along the top line of the triangles. Open the folded triangles.
5. Cut the top leaf along the vertical fold line to the horizontal one.
6. Bend the resulting parts upward so that you get 2 diamonds.
7. Then, fold each of these elements in half along a long diagonal.
Tail and head
8. Turn the figure over. Now do the same thing again from points 4 to 8. 
9. You should get a figure that looks slightly like a rocket. Then, bend the upper right part of the part at an angle of 45 degrees so that the fold line is a continuation of the inside of the left part. On the left part, bend the corner to the left to create a head. 
10. In order for the horse to be able to make turns, it needs to be slightly modified. To do this, straighten the tail, open it from the outside. Now fold it inward along the folds. Do the same steps with the horse's head. Ready! Now she can not only walk, but also roll over.
To make your horse stand more confidently on its feet, bend the corners of its legs inward. To perform somersaults, hit it sharply on the inside of the tail. 
An ordinary sheet of paper, instructions and a few minutes not only calms you down, but also puts your thoughts in order.
Making an origami horse will appeal to all lovers of this beautiful and strong animal, symbolizing freedom, fortitude, wisdom and will.
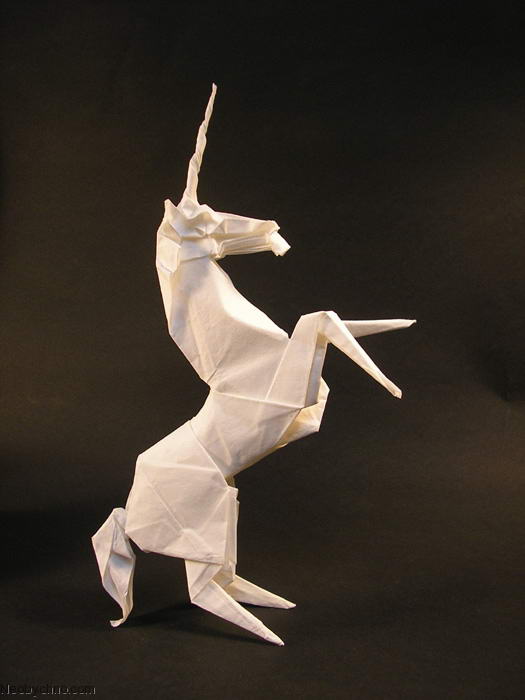
There are quite a lot of ideas for assembling horses in origami style. Professionals assemble complex models that include 40 or more actions.
The master class will tell you how to make an origami-style horse in different ways. Even beginners can cope with the presented assembly diagrams, and it is recommended to watch the detailed assembly of more elegant and complex origami figures in the video.


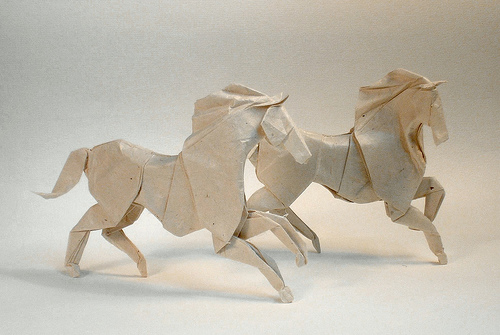
Making a herd of paper horses
Graceful horse
Even beginners can make such a horse: the simple scheme begins with assembling the basic “double square” shape. Next, you need to stock up on scissors and continue assembly according to the following instructions:
Strong horse
A pair of thin-legged horses can make a strong horse. To do this, you need to prepare a square sheet of paper and follow the step-by-step instructions:

Little foal
A cute little horse - pony - will also be made from a square sheet. This MK differs from previous origami horse patterns in that, in addition to assembly, it involves working with scissors. You will also need felt-tip pens or paints to color the finished craft.
If all the necessary materials and tools are prepared, you can begin to perform the following steps step by step:
Now all that remains is to design the resulting models: draw or cut them out of colored paper and glue on the saddle, harness, and mane. Those who do not know how to draw can use ready-made templates. It is not necessary to put a saddle on the skate; it can be decorated with “apples” or stripes.


Video MK origami horses
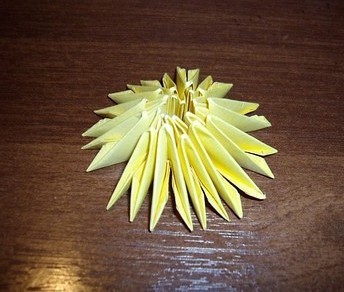
Making a three-dimensional modular figure of a horse
Modular origami will help you create various three-dimensional models with your own hands, including horses. The key element of the figure is the traditional standard origami module, which is folded from a small paper rectangle. You can see how to fold the module in the photo below: 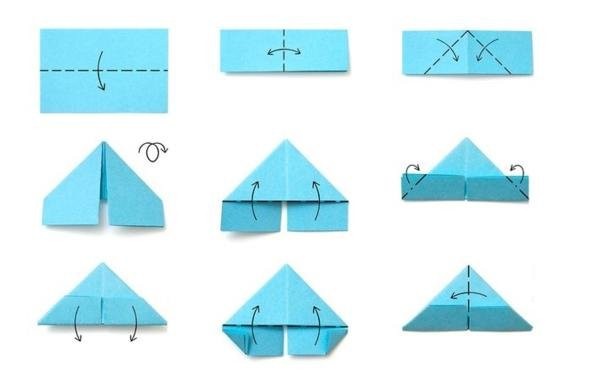
The parts of a horse or pony figure are assembled from the modules in stages - the body, head, legs and tail. To ensure that all parts adhere well to each other, you can glue them as you work.
The master class gives the general principle of assembling a three-dimensional horse: each master can assemble it in his own way, having thought out the design and details himself.
General job description:
- Prepare elements for the body and mane, tail, hooves (in this example - 366 yellow and 36 brown).
- The body is assembled: modules are connected in a circle with the long side outward.


- On the 3-4th row, lift the modules with their sharp ends up and continue to put on the rows to the desired height.
- To form the neck: put the rows with the short side outward on two modules from the previous row (“the mane” is also put on, with the long side outward).


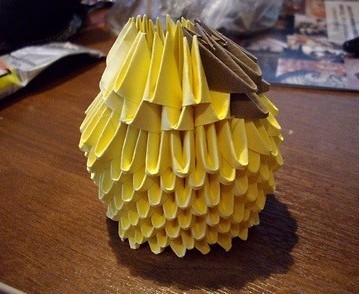

- Form the head: connect several rows into a ring and raise them with sharp corners, continue the rows, not forgetting the “mane”.

- Place several modules on top of each other on two opposite sides to form “ears”.
- Connect the head to the body and form a muzzle from a ring of modules gathered into a bundle.

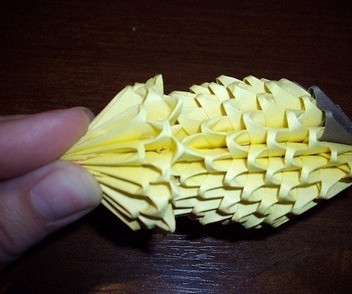
- Make legs from three modules of brown and yellow colors.


- Attach a tail.
- Glue on the eyes.
Video tutorial on creating a modular horse
You can also watch the video on how to make a horse using modular origami technique.
A selection of patterns and ideas for creativity
What other origami-style paper horses are there, you can see in the photo:


Suitable for school age children (from 7, 8 years old).
You can make such horses with your children and decorate a Christmas tree or room with them. A real and simple symbol of the coming year can be decorated with felt-tip pens or pencils. Or you can play with them, for example, by arranging horse races.
Materials and tools for one horse:
- A4 paper of any color. 80gr. density
- Scissors
Simple DIY origami horse - assembly diagram:
 1. Fold a piece of paper diagonally as shown in the picture and cut off the excess part. It should be a square.
 2. Unfold the square and now bend it in the opposite direction. Expand. You will get lines like this.
 3. Now fold the square exactly in half in two different directions. Expand.
 4. You will get a square with outlined lines.
 5. Now, using the existing lines, bring the three upper corners to the lower corner.
 6. Fold the right and left corners of the figure to the central marked line. Then make a fold as in the picture from top to bottom.
 7. Using scissors, cut the top layer of paper to the top line.
 8. Bend over the cut top layer of paper as shown in the picture.
 9. Roll the resulting workpiece towards the center line.
 10. Turn the workpiece over and do steps 6-9 now with the other side.
 11. You will get a figure like this.
 12. Turn the figure 180 degrees so that there is a triangle in front of you with one corner at the top. Make folds at the top:
- on the left is a horse's head
- on the right is the horse's tail
 13. Unfold the folds and make them internal, as in the picture.
 14. Origami horse is ready. A simple photo assembly diagram will help you make a whole herd of horses.
Have fun and enjoy your creativity!